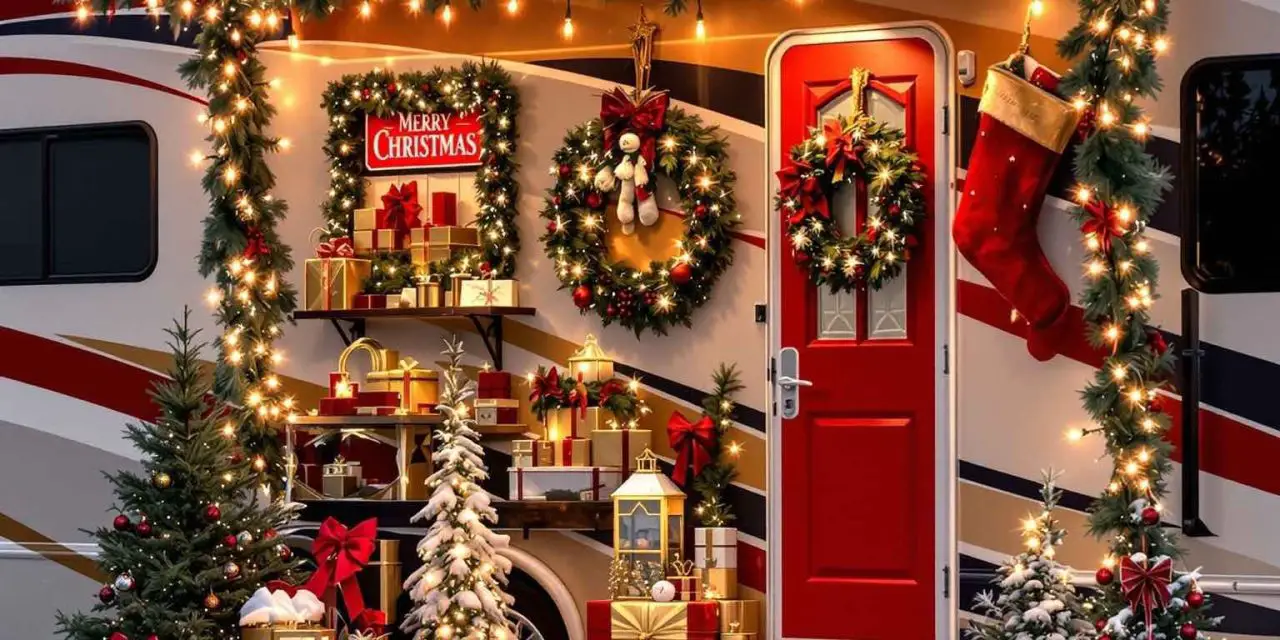
Decorating your RV for Christmas is one of the most delightful ways to bring holiday cheer to your camping adventures, whether you’re parked at a festive RV resort or boondocking in a winter wonderland.
The key to successful RV Christmas decorating is finding the perfect balance between creating a magical atmosphere and maintaining practicality for life on the road.
Unlike traditional home decorating, RV holiday décor needs to be lightweight, weather-resistant, and easy to secure against wind and movement. Consider your power source carefully—solar-powered and battery-operated decorations are excellent choices that won’t drain your RV’s electrical system.
Most importantly, remember that less is often more when decorating an RV; a few well-chosen, strategically placed decorations can create just as much impact as an elaborate display while keeping your setup and takedown time manageable for your nomadic lifestyle.
1. Classic String Light Display
Would you like to save this article?
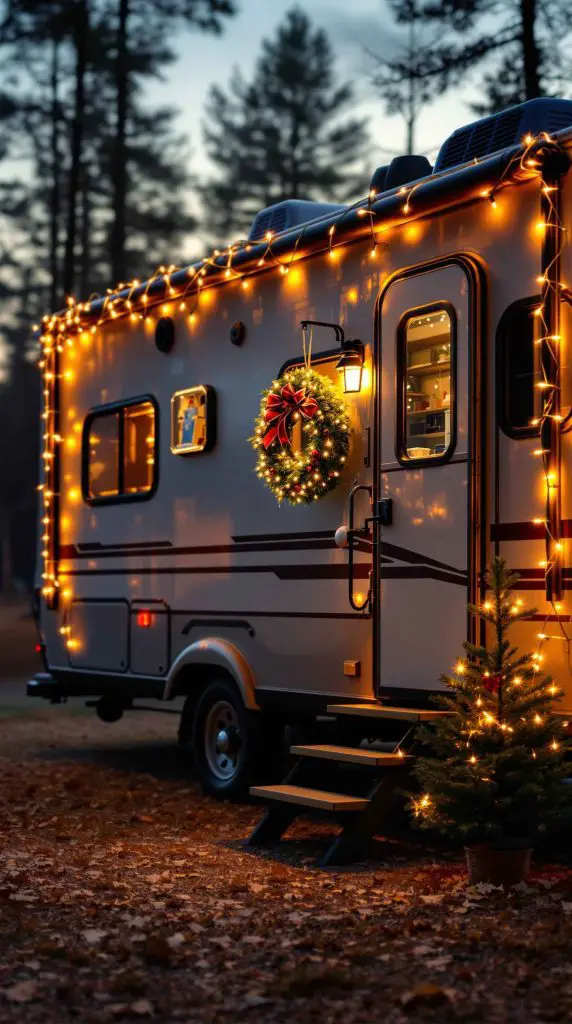
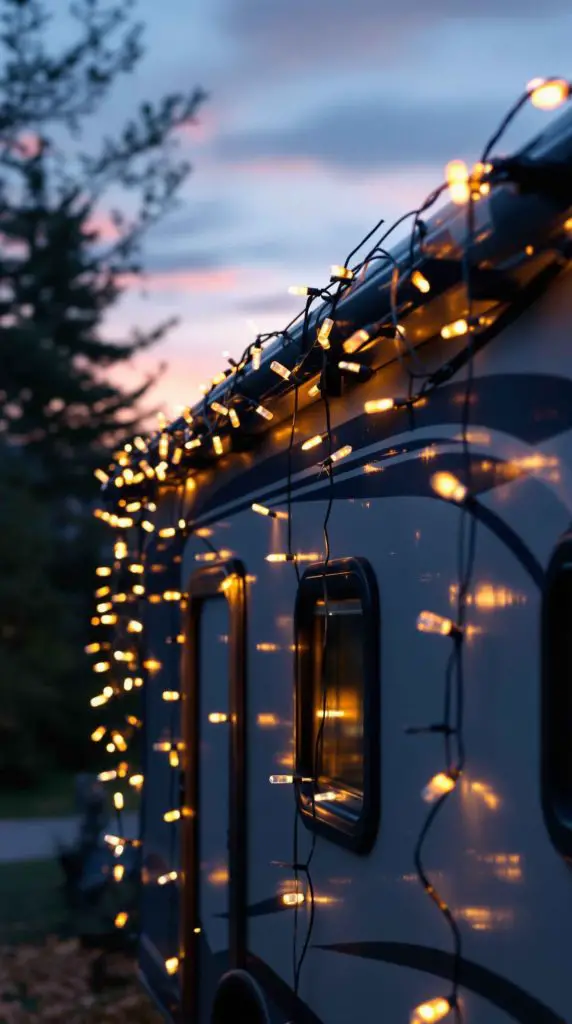
Transform your RV into a glowing beacon of holiday joy with classic string lights draped elegantly around the exterior. This timeless decoration creates instant curb appeal and makes your RV feel warm and inviting on cold winter evenings. String lights work beautifully along the roofline, around windows, and framing the entry door. Choose LED lights to minimize power consumption, and opt for warm white or multicolor depending on your style preference. The gentle glow of string lights not only enhances the festive atmosphere but also provides practical illumination for evening activities around your campsite.
When installing string lights on your RV, use removable adhesive hooks or magnetic clips designed specifically for RVs to avoid damaging the exterior. Consider the length of your RV and purchase accordingly—most Class A motorhomes require 100-150 feet of lights for full coverage. Weather-resistant outdoor lights rated for cold temperatures will ensure your display lasts throughout the season. Remember to test all light strands before installation and bring along extra bulbs and fuses for quick repairs on the road.
PRO TIP: Invest in timer-controlled string lights that automatically turn on at dusk and off at dawn. This saves battery power and ensures your display looks magical every evening without manual intervention. Solar-powered string lights with rechargeable batteries are ideal for boondocking situations where electrical hookups aren’t available.
2. Festive Awning Snowflake Display
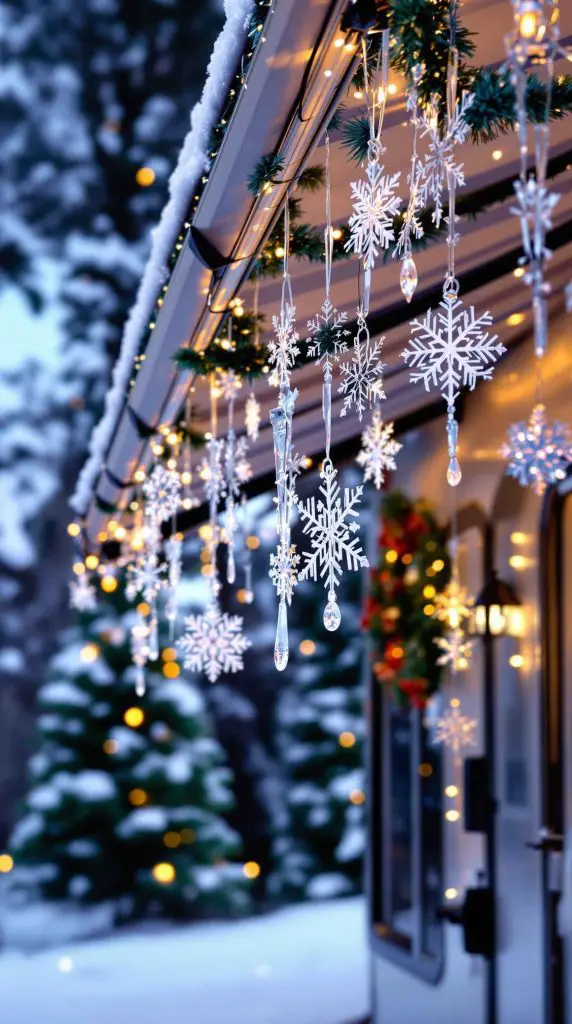
Your RV awning provides the perfect framework for a stunning winter wonderland display featuring hanging snowflake ornaments and icicle lights. This vertical decorating space is often underutilized but offers excellent visibility and creates a beautiful canopy effect over your outdoor living area. Large plastic or metal snowflakes in various sizes can be suspended at different heights using fishing line or clear wire, creating depth and visual interest. Pair these with cascading icicle lights for a magical frozen effect that sparkles in the evening.
The beauty of awning decorations is their versatility and ease of installation. Lightweight ornaments won’t stress your awning’s structure, and they’re simple to attach using the existing awning track or small hooks. Choose shatterproof ornaments to withstand wind and accidental bumps. Consider incorporating LED snowflakes that light up internally for added drama after sunset. This decoration style works particularly well in campgrounds where your awning faces a common area, sharing your holiday spirit with neighbors and passersby.
PRO TIP: Always retract your awning decorations before traveling or in high wind conditions. Create a quick-release system using carabiners or S-hooks that allows you to remove all decorations in under five minutes. Store ornaments in a dedicated plastic bin with dividers to prevent tangling and breakage during transit.
3. Cheerful Inflatable Characters
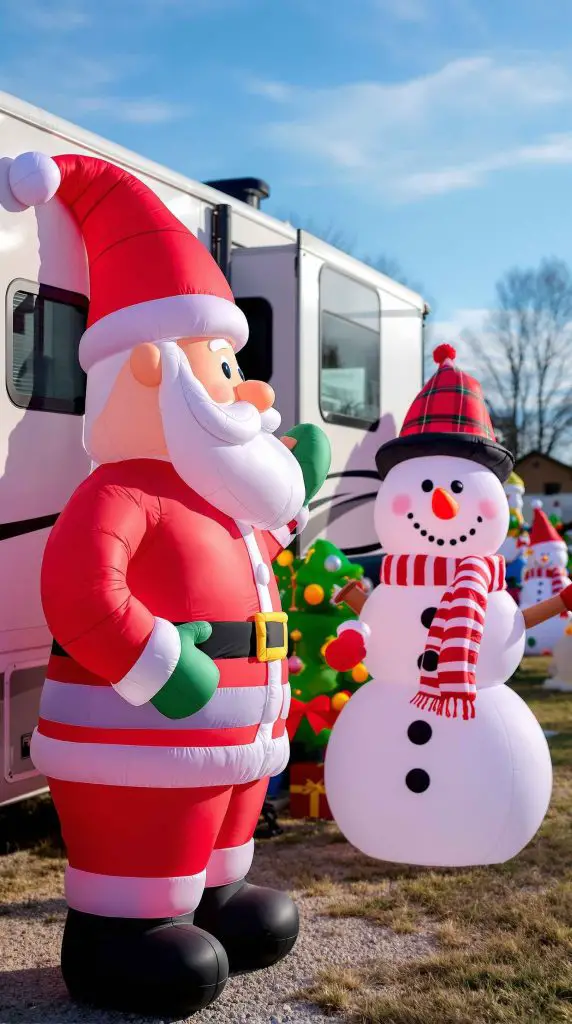
Inflatable Christmas characters bring instant whimsy and personality to your RV campsite, delighting children and adults alike. These eye-catching decorations range from classic Santa Claus and snowmen to reindeer, penguins, and even inflatable snow globes. The beauty of inflatables for RV life is that they pack down incredibly small when deflated, taking up minimal storage space in your basement compartments. Most come with built-in LED lighting that makes them glow beautifully at night, creating a festive focal point that’s visible from across the campground.
When selecting inflatables for your RV setup, consider the scale in relation to your rig’s size—a 12-foot Santa might overwhelm a small travel trailer but look perfect next to a Class A motorhome. Position inflatables on stable ground and use the included stakes and tethers to secure them against wind. Many RVers choose 4-6 foot models that make a statement without dominating the campsite. Check the power requirements and consider models with energy-efficient LED lighting. Some advanced inflatables feature animation or color-changing effects that add extra entertainment value.
PRO TIP: Always deflate and store inflatables during inclement weather or when leaving your campsite unattended. A sudden windstorm can damage or carry away even well-staked inflatables. Consider purchasing a small air compressor for quick inflation and deflation—many models plug directly into your RV’s 12V outlet and make setup a breeze.
4. Illuminated Window Wreaths
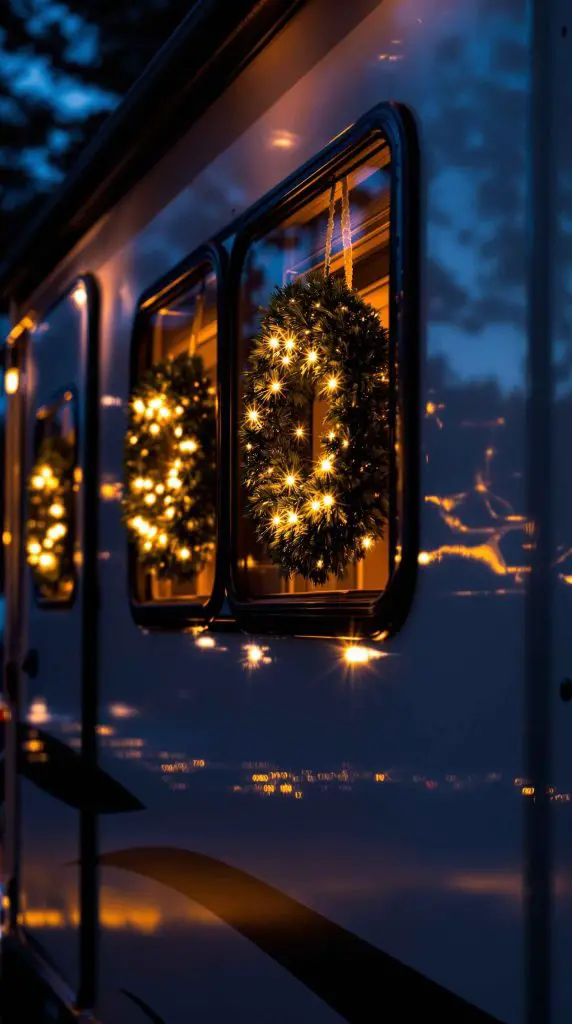
Window wreaths create a cohesive, elegant look that transforms your RV’s exterior into a mobile Christmas cottage. Lighted wreaths hung in each window provide symmetry and visual appeal while being visible from both inside and outside the RV. Battery-operated wreaths with LED lights are ideal for RV applications, eliminating the need for multiple power cords and outlets. Choose wreaths sized appropriately for your window dimensions—typically 12-18 inches for standard RV windows—and secure them using suction cups with hooks or removable adhesive hangers designed for window mounting.
The warm glow emanating from window wreaths creates an inviting ambiance that makes your RV feel like a home away from home during the holidays. Coordinate your wreath style across all windows for a polished look, whether you prefer traditional evergreen with red bows, rustic burlap and pinecones, or modern metallic designs. Pre-lit wreaths save setup time, but you can also decorate plain wreaths with battery-operated fairy lights woven through the branches. Window wreaths work beautifully in conjunction with interior holiday decorating, creating a seamless indoor-outdoor aesthetic.
PRO TIP: Use wreaths with built-in timers or connect them to a wireless remote control system so you can turn all your window lights on and off simultaneously. This is especially convenient when you’re ready for bed and don’t want to walk around outside turning off individual wreaths. Replace batteries before your trip to ensure consistent illumination throughout your stay.
5. Traditional Garland and Bow Accents
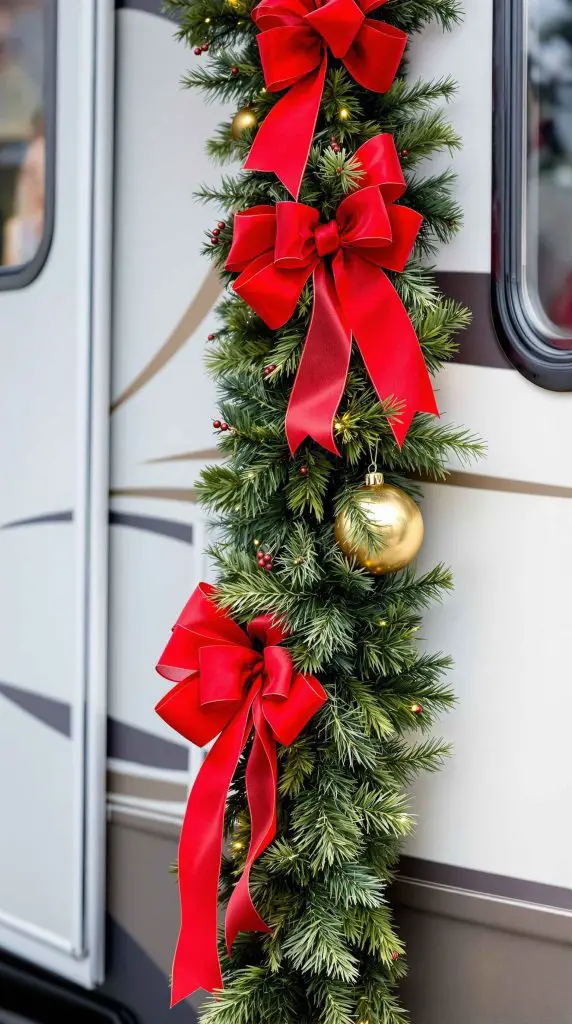
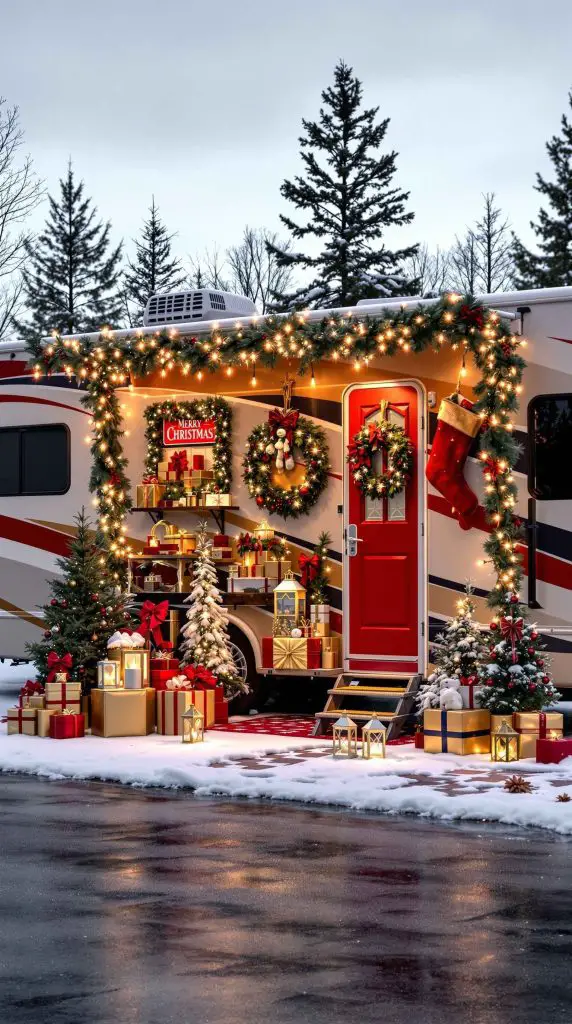
Fresh-looking artificial garland draped along your RV’s trim lines and accented with classic red bows brings traditional Christmas elegance to your mobile home. Garland provides a sophisticated decorative element that can be customized to match your personal style, whether you prefer realistic evergreen, frosted pine, or berry-studded designs. Drape garland along the roofline, around the entry door, over slide-out rooms, or along railings and steps. The addition of red velvet bows at regular intervals creates visual rhythm and adds that quintessential Christmas touch that never goes out of style.
When selecting garland for RV decorating, prioritize flexibility and weather resistance. High-quality artificial garland maintains its shape through multiple setups and withstands outdoor conditions better than real greenery, which can dry out and become a fire hazard. Consider pre-lit garland with battery packs to eliminate cord management challenges. Secure garland using zip ties, floral wire, or specialized garland clips that won’t damage your RV’s finish. For added dimension, intertwine ribbon, ornaments, or berry sprays throughout the garland. The beauty of this classic decoration is its versatility—it complements virtually any other Christmas décor style you choose.
PRO TIP: Store garland by loosely coiling it in large plastic storage bins or wrapping it around cardboard tubes to prevent crushing and tangling. Label each section if you use different styles for different areas of your RV. Before each season, fluff the branches back to their original shape and replace any faded bows to keep your display looking fresh and full.
6. Candy Cane Ladder Decoration
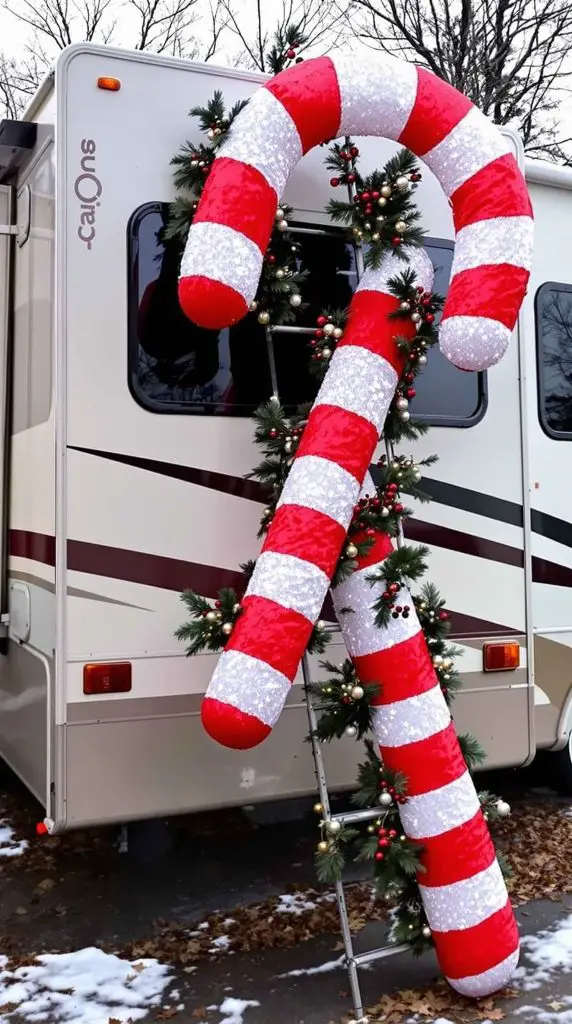
Transform your RV’s rear ladder into a playful candy cane display that’s sure to bring smiles to everyone who spots it. This creative decoration idea takes an often-overlooked functional element of your RV and turns it into a festive statement piece. Large candy cane decorations, either store-bought or DIY versions made from pool noodles wrapped in red duct tape, can be attached to ladder rungs or positioned alongside the ladder. Some RVers wrap the ladder rungs themselves in red and white striped tape for a integrated candy cane effect that’s visible from behind when driving.
This decoration works especially well because it utilizes vertical space that doesn’t interfere with walkways or awning operation. The bold red and white stripes are highly visible and instantly recognizable as a Christmas symbol. For added impact, consider adding small battery-operated lights along the ladder or at the top. This decoration style is particularly popular with families traveling with children, as the whimsical candy cane theme delights kids and creates great photo opportunities. Best of all, ladder decorations are typically unaffected by wind and stay securely in place while you’re parked.
PRO TIP: If creating DIY candy canes from pool noodles, cut them at angles to create the classic curved top. Use weatherproof electrical tape or outdoor vinyl in red and white stripes for durability. Secure decorations to the ladder using zip ties or bungee cords, but always remove them before traveling to prevent damage or loss due to wind resistance at highway speeds.
7. Luminaria Pathway Lighting
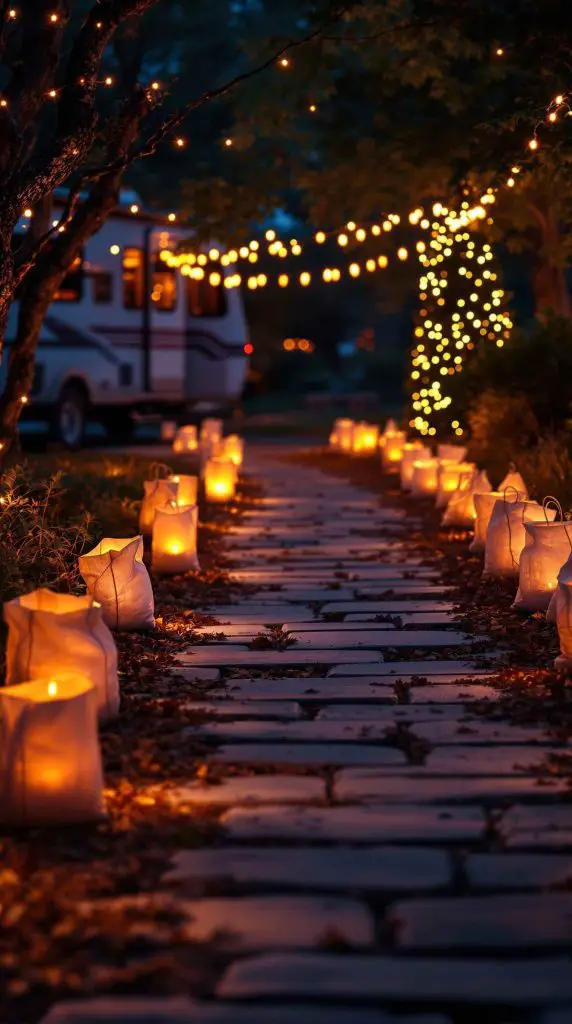
Create a magical walkway to your RV entrance with traditional luminaria bags that cast a warm, welcoming glow. These simple yet stunning decorations consist of paper bags weighted with sand and containing either real candles or battery-operated LED tea lights. Line your pathway, RV steps, or patio area with luminarias spaced evenly to create an enchanting ambiance reminiscent of holiday traditions from the Southwest. The soft, diffused light creates shadows and highlights that add depth and romance to your campsite after dark.
Luminarias are incredibly versatile and can be customized to fit any style. Purchase decorative pre-made luminaria bags with cut-out designs that allow light to shine through in patterns, or create your own by decorating plain white bags with holiday stencils. For an eco-friendly and reusable option, invest in plastic luminaria kits designed specifically for outdoor use. These come in various colors and sizes and can be used season after season. The flickering LED candles are safer than real flames, eliminating fire hazards and concerns about wind blowing out candles during the evening.
PRO TIP: Fill luminaria bags with colored aquarium gravel instead of sand for a lighter-weight option that’s easier to transport in your RV. Use rocks or gravel that complement your color scheme—white for a snowy effect, or red and green for traditional Christmas colors. Store flattened bags in a magazine holder or document box to keep them neat and ready for your next setup.
8. Potted Outdoor Christmas Tree
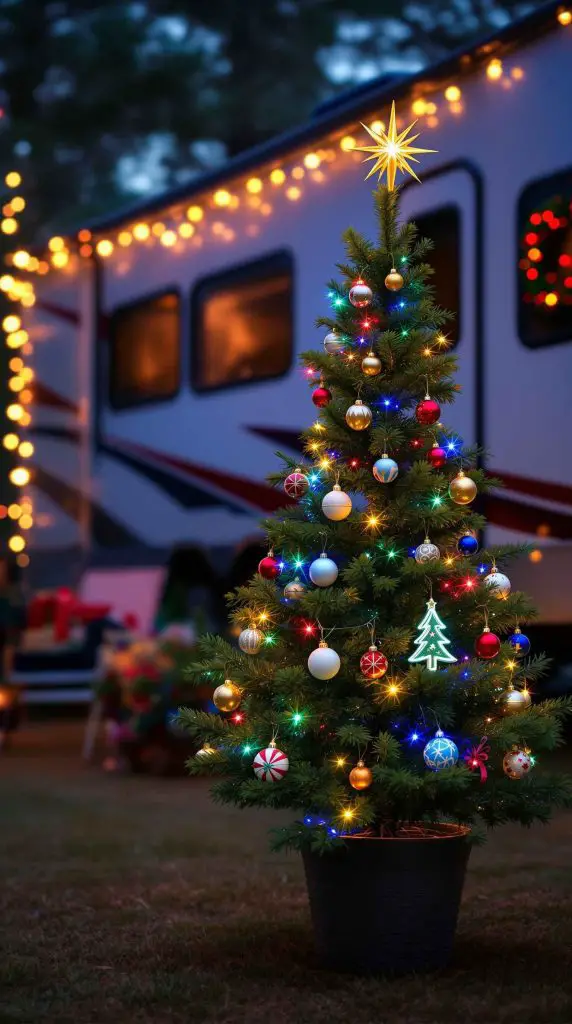
A small potted Christmas tree positioned beside your RV entrance brings the classic holiday centerpiece outdoors, creating an inviting focal point for your campsite. Choose a compact evergreen in a sturdy container—typically 3-5 feet tall for most RV setups—and decorate it with outdoor-safe ornaments, LED lights, and a weather-resistant tree topper. Living trees offer the benefit of fresh pine scent and authentic appearance, while high-quality artificial trees provide the convenience of reusability without the need for watering or needle cleanup.
Position your outdoor tree strategically to anchor your decorating scheme and serve as a gathering point for outdoor activities. Decorate with unbreakable ornaments in coordinated colors, interspersed with natural elements like pinecones and berries for rustic charm. Battery-operated string lights wrapped around the branches eliminate the need for outdoor outlets and extension cords. Secure the tree’s base with additional weights or stake it to the ground if you’re camping in a windy location. This outdoor tree complements your interior Christmas tree and extends the holiday atmosphere throughout your living space.
PRO TIP: If using a living tree, choose a hardy variety like a Norfolk Island Pine that can tolerate varying temperatures and later be planted or brought indoors. For artificial trees, look for models specifically designed for outdoor use with UV-resistant materials. Store pre-decorated artificial trees in tree storage bags to minimize setup time at your next destination—simply unwrap, position, and plug in the lights.
9. Projection Light Show
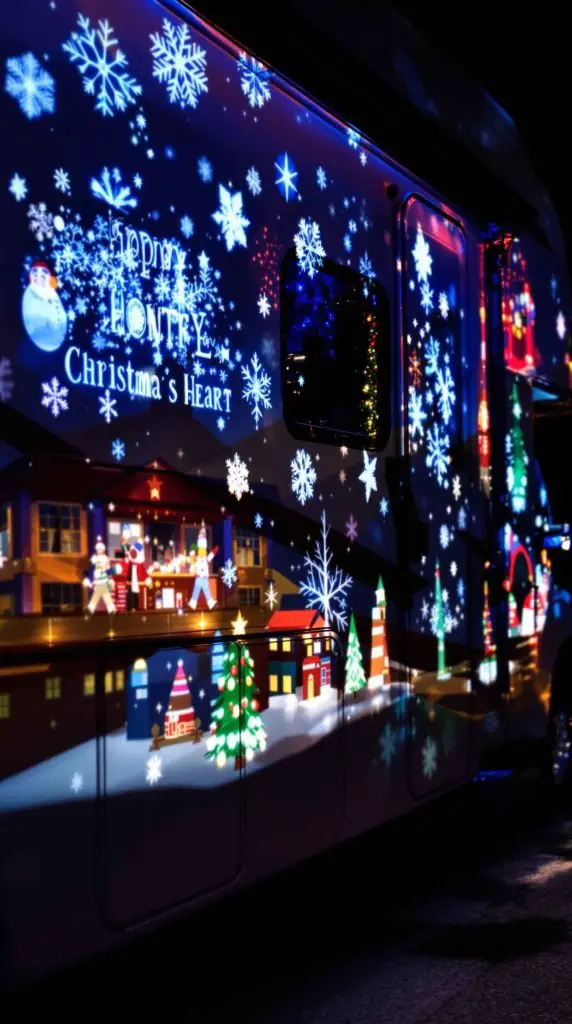
Modern projection lights offer a high-impact, low-effort decorating solution that transforms your RV’s exterior with animated holiday scenes. These compact devices project moving patterns—snowflakes, Santa sleighs, reindeer, or festive messages—across the broad side of your RV, creating a dynamic light show that captivates viewers. Projection lights are remarkably easy to set up, requiring only stable positioning on the ground and an electrical connection. The projector does all the work, eliminating hours of individual light hanging while delivering impressive visual results that look professionally designed.
The versatility of projection lighting makes it ideal for RV life. Many models offer multiple pattern options, adjustable speeds, and color variations, allowing you to customize the display to your preferences or change it throughout your stay. Projection lights work best on smooth, light-colored RV surfaces where the images appear crisp and bright. Position the projector 10-20 feet from your RV depending on the desired coverage area, and angle it for optimal projection. These lights consume minimal power compared to extensive string light setups, making them efficient for battery or solar power systems.
PRO TIP: For the clearest projection, set up after dark when contrast is maximized. Bring a small tripod or create a stable platform for your projector to prevent image distortion and ensure the device stays level. Look for models with remote controls so you can adjust settings from inside your RV, and choose weather-resistant projectors rated for outdoor use to protect your investment from moisture and temperature fluctuations.
10. Festive Welcome Mat
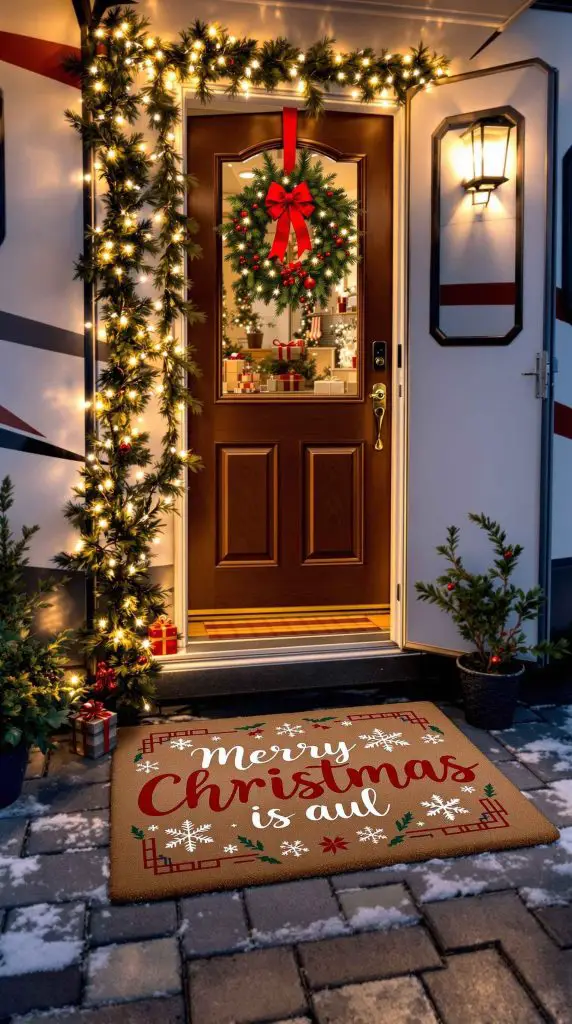
A holiday-themed welcome mat sets the tone for your RV’s Christmas decor from the moment guests arrive at your door. This simple but effective decoration combines practicality with festive style, providing a functional surface for wiping feet while announcing your holiday spirit. Choose from countless designs featuring classic messages like “Merry Christmas,” “Happy Holidays,” or whimsical graphics of snowmen, reindeer, or Santa. Quality outdoor mats feature coir or synthetic materials that withstand weather and foot traffic while maintaining their appearance throughout the season.
The entrance area of your RV is prime real estate for making a strong first impression, and a well-chosen welcome mat anchors your door decorating scheme. Coordinate the mat with your wreath, lighting, and other entrance decorations for a cohesive look. For added dimension, layer a smaller decorative mat over your regular RV step mat, or place complementary mats at each step leading to your door. Consider rotating different holiday mats throughout the season—a Thanksgiving design transitioning to Christmas and then New Year’s—to keep your entrance fresh and current.
PRO TIP: Secure your welcome mat to prevent it from blowing away or shifting on your RV steps. Use non-slip rug pads underneath or attach the mat with outdoor-safe double-sided tape. Choose mats with low profiles that won’t create tripping hazards, especially if your RV door has limited clearance. Store mats in a pillowcase or reusable shopping bag to keep them clean and protected during travel.
11. Cozy Holiday Seating Area
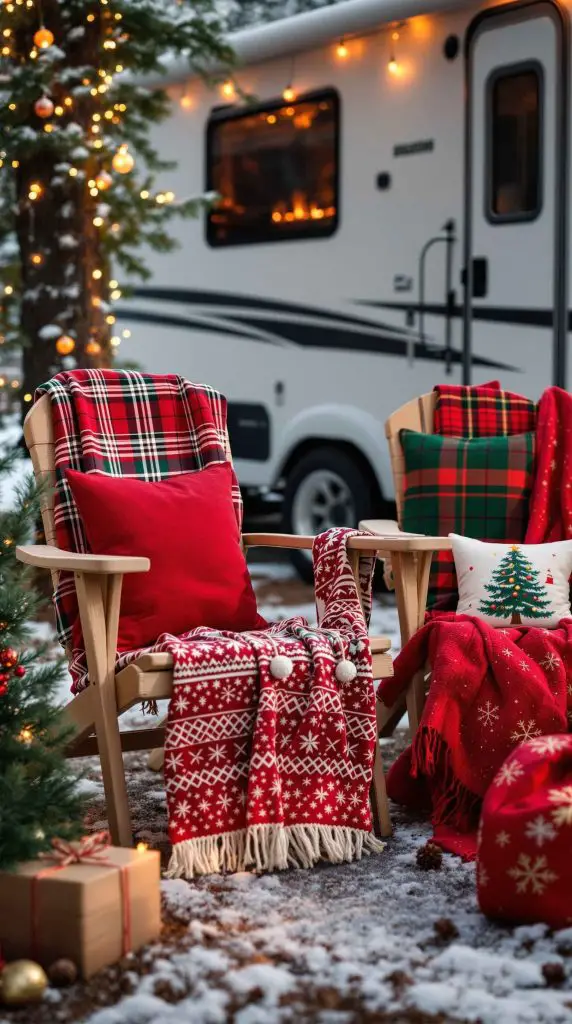
Transform your outdoor camping chairs into a festive gathering space with Christmas-themed throws, blankets, and decorative pillows. This cozy setup invites relaxation and creates a comfortable spot for enjoying hot cocoa by the fire or stargazing on clear winter nights. Drape plush fleece throws in holiday colors—classic red and green, winter white, or buffalo plaid—over chair backs, and add coordinating pillows with seasonal designs or inspirational messages. The combination of practical warmth and decorative style makes your outdoor living space feel like an extension of your RV’s interior.
Beyond aesthetics, this decorating approach serves the important function of keeping you and your guests comfortable during cooler December weather. Layer multiple blankets for extra warmth, and choose water-resistant outdoor pillows that can withstand morning dew or unexpected sprinkles. Consider creating a cohesive seating area with matching chair decorations, a themed outdoor rug, and a small side table decorated with a holiday centerpiece. This setup works beautifully near a fire pit or under your awning, becoming the heart of your outdoor holiday entertaining.
PRO TIP: Choose washable throws and pillow covers that can be easily cleaned and refreshed throughout the season. Store them in large zippered plastic bags or compression sacks to save space in your RV storage compartments. Look for decorative storage baskets or bins that match your decor to keep blankets tidy and accessible—these double as additional decoration when placed near your seating area.
12. Oversized Ornament Display
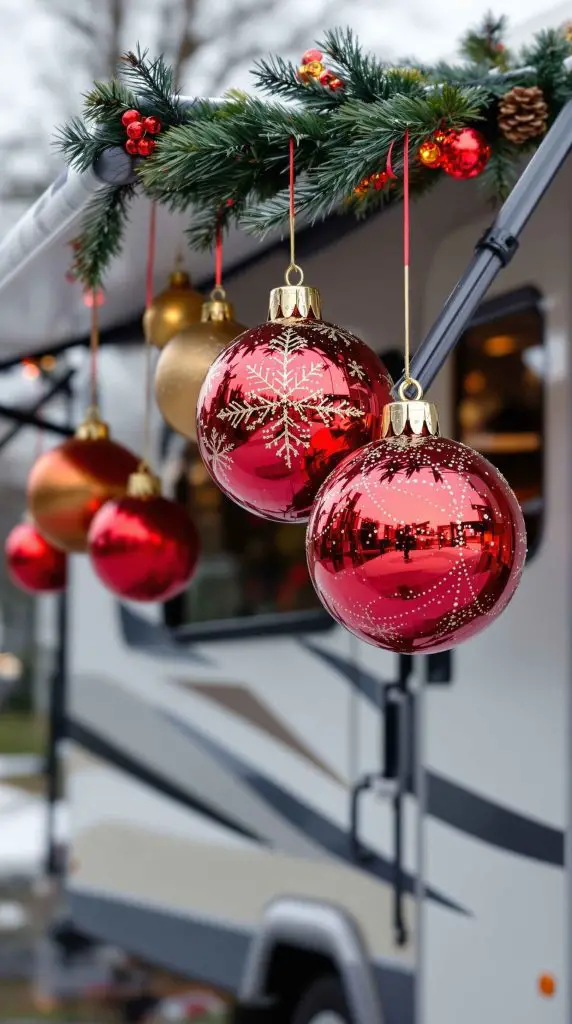
Make a bold statement with oversized ornament balls suspended from your RV’s awning or hung from shepherd hooks around your campsite. These large-scale decorations, typically 8-12 inches in diameter, create impressive visual impact with minimal installation effort. Shatterproof plastic ornaments in traditional colors like red, gold, and silver catch sunlight during the day and reflect string lights at night, adding sparkle and dimension to your display. Mix sizes and finishes—matte, glossy, and glitter—for added visual interest and depth.
The beauty of oversized ornaments is their versatility in placement and arrangement. Hang them at varying heights from your awning using clear fishing line for a floating effect, cluster them in groups of three or five for artistic appeal, or line them along your RV’s perimeter at ground level in decorative containers. These decorations photograph beautifully and create an instantly recognizable Christmas aesthetic. Since they’re lightweight and hollow, oversized ornaments are easy to transport and store, making them ideal for the RV lifestyle. Fill clear ornaments with battery-operated fairy lights for an extra magical touch.
PRO TIP: Invest in commercial-grade shatterproof ornaments designed for outdoor display rather than traditional glass ornaments. These can withstand accidental impacts, temperature fluctuations, and handling without breaking. Store ornaments in their original packaging or use divided storage containers with individual compartments to prevent scratching and maintain their finish. Remove ornaments during high winds to prevent them from becoming projectiles.
13. Magnetic Christmas Decals
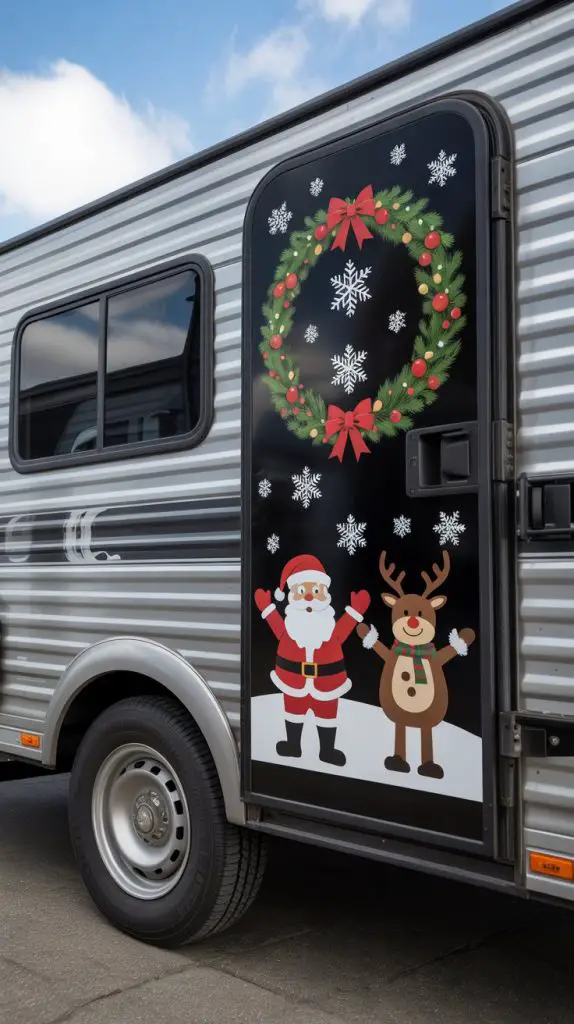
Magnetic Christmas decals offer a damage-free way to add festive graphics and designs to your RV’s metal surfaces, including storage compartment doors, slide-outs, and body panels. These removable decorations feature holiday imagery ranging from elegant wreaths and snowflakes to fun characters like Santa, reindeer, and snowmen. High-quality magnetic decals are weather-resistant, UV-protected, and can be easily repositioned or removed without leaving residue or affecting your RV’s paint. This makes them perfect for renters or anyone who wants to preserve their RV’s finish while still celebrating the season.
The application process couldn’t be simpler—just place the magnets on any magnetic-receptive surface and smooth them flat. Mix and match different designs to create custom scenes or arrangements that reflect your personality. Many RVers use magnetic decals to personalize their basement storage compartments, turning these functional areas into additional decorative real estate. Magnetic decals work year-round too; simply swap out Christmas designs for other holidays or seasons. They’re especially popular for decorating toy haulers and motorhomes with large, smooth side panels that provide ample canvas for creative expression.
PRO TIP: Before purchasing magnetic decals, test your RV’s surface with a refrigerator magnet to confirm which areas are magnetic—not all RV exterior panels contain metal that attracts magnets. Clean and dry the surface thoroughly before applying magnets to ensure they adhere properly. Store magnets flat in a binder or portfolio with sheet protectors to prevent curling and keep them organized for easy access next season.
14. Solar-Powered Christmas Lights
Embrace sustainable decorating with solar-powered Christmas lights that harness the sun’s energy during the day to illuminate your RV at night. These eco-friendly lights feature small solar panels that charge built-in batteries, eliminating the need for electrical hookups and reducing your carbon footprint. Solar lights come in all the traditional styles—string lights, icicle lights, net lights, and specialty shapes—making it easy to achieve your desired aesthetic while conserving power. They’re particularly valuable for boondocking situations where electrical resources are limited and every amp-hour counts.
Modern solar Christmas lights have improved dramatically in brightness and reliability, offering performance comparable to traditional plug-in lights. Position solar panels in areas that receive direct sunlight for at least 6-8 hours daily to ensure full charging and maximum nighttime illumination. Many models feature automatic sensors that turn lights on at dusk and off at dawn, providing hassle-free operation. Solar lights typically run for 6-8 hours per charge, covering the prime evening hours when your display is most visible. The initial investment in solar lighting pays dividends through eliminated electricity costs and the freedom to decorate regardless of campsite amenities.
PRO TIP: Keep solar panels clean and free from debris, snow, or fallen leaves to maximize charging efficiency. In winter camping scenarios where daylight is limited, position panels at optimal angles toward the southern sky (in the Northern Hemisphere) to capture maximum sunlight. Consider purchasing solar lights with removable battery packs that can be recharged indoors on overcast days or via USB backup charging ports.
15. Festive Outdoor Table Centerpiece
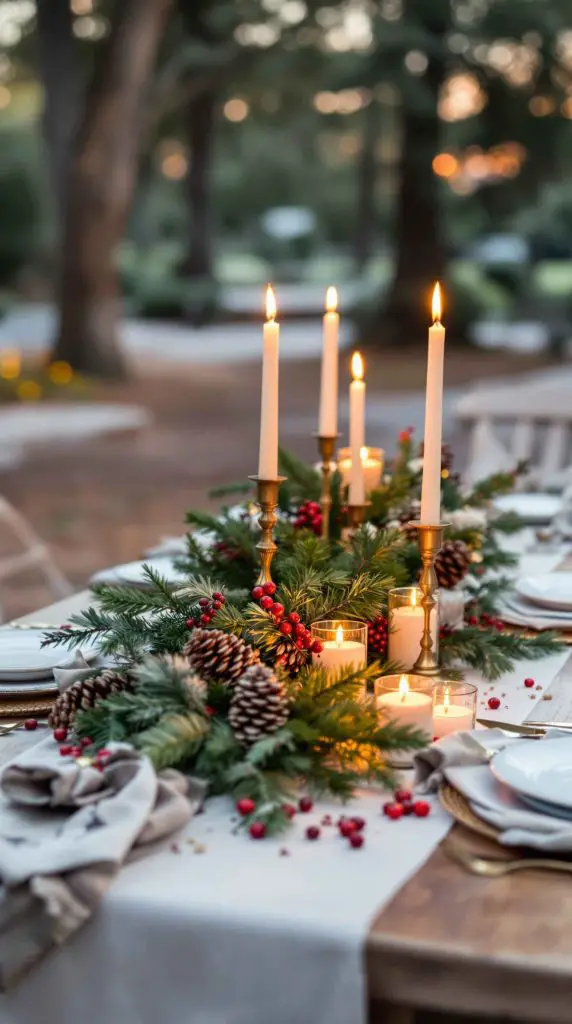
Extend your holiday decorating to your RV’s outdoor dining space by creating a beautiful Christmas centerpiece for your picnic table. A well-designed centerpiece transforms casual outdoor meals into special holiday occasions and provides a festive focal point for daytime activities. Combine natural elements like pinecones, evergreen branches, and berries with candles, ornaments, and seasonal accents. Use a weather-resistant tray, wooden box, or rustic basket as your foundation, building layers of texture and color that complement your overall decorating scheme.
Outdoor centerpieces need to withstand the elements while maintaining their beauty, so choose materials accordingly. Battery-operated candles provide ambiance without fire risk or wind concerns. Incorporate waterproof ornaments, artificial greenery treated for outdoor use, and securely anchored elements that won’t blow away. Add a holiday table runner or placemats to complete the look and protect your picnic table surface. This attention to detail shows your commitment to celebrating the season fully and creates an inviting atmosphere for outdoor dining, whether you’re enjoying morning coffee or evening appetizers with fellow campers.
PRO TIP: Create a low-profile centerpiece that doesn’t obstruct conversation across the table—aim for no taller than 12 inches. Weight the container with sand or rocks inside to prevent tipping in wind. Cover your centerpiece with a clear plastic dome or bring it inside during rain or when leaving your campsite to protect your arrangement and extend its life throughout the season.
16. Elegant Ribbon and Bow Accents
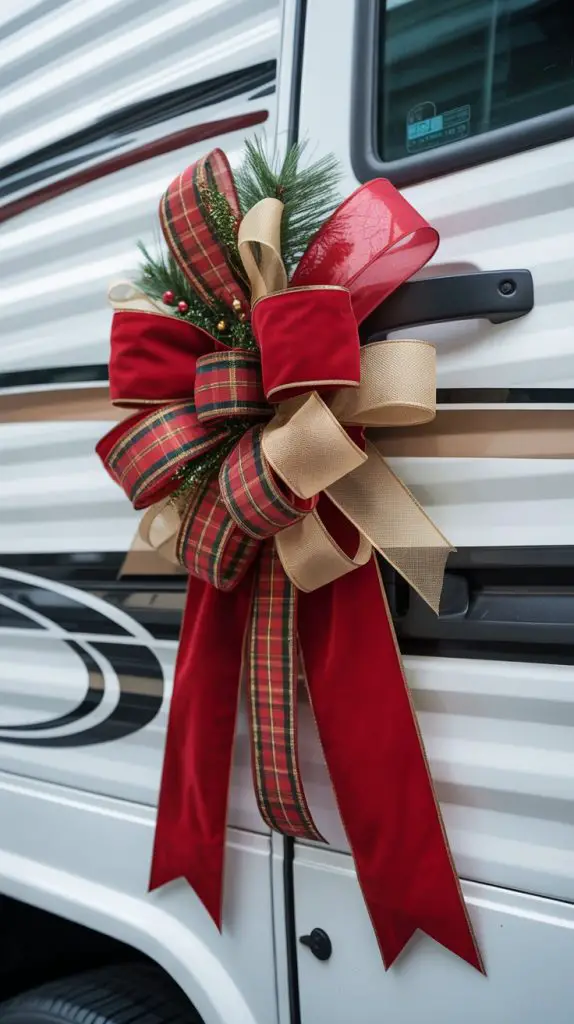
Simple ribbon and bow decorations add touches of elegance and color to various areas of your RV without requiring elaborate installation or significant space. Tie large, luxurious bows made from weather-resistant outdoor ribbon to door handles, stair railings, bike racks, and other exterior fixtures. Traditional red velvet-style bows create classic Christmas appeal, while plaid, burlap, or metallic ribbons offer alternative aesthetics. The beauty of this decorating approach lies in its versatility—bows can be as simple or elaborate as desired, from single loops to multi-layered creations with trailing tails.
Ribbon decorations work beautifully as standalone accents or as coordinating elements that tie together other decorations in your display. Use ribbon to attach ornaments, secure garland, or create custom swags for doorways and windows. Choose wired ribbon that holds its shape and resists flattening, making it easier to create and maintain attractive bows. Weather-resistant outdoor ribbon withstands moisture and temperature changes without fading or deteriorating. This decoration style requires minimal storage space—a few spools of ribbon pack flat and provide materials for dozens of bows and accents.
PRO TIP: Pre-make your bows at home before your trip, securing the centers with floral wire. Store completed bows in tissue paper inside a sturdy box to maintain their shape during travel. Bring extra ribbon and wire for on-site repairs or additional decorating inspiration. Learn a few different bow-making techniques—classic loops, pom-pom style, or elegant long-tail bows—to create variety and visual interest throughout your display.
17. Miniature Christmas Village Display
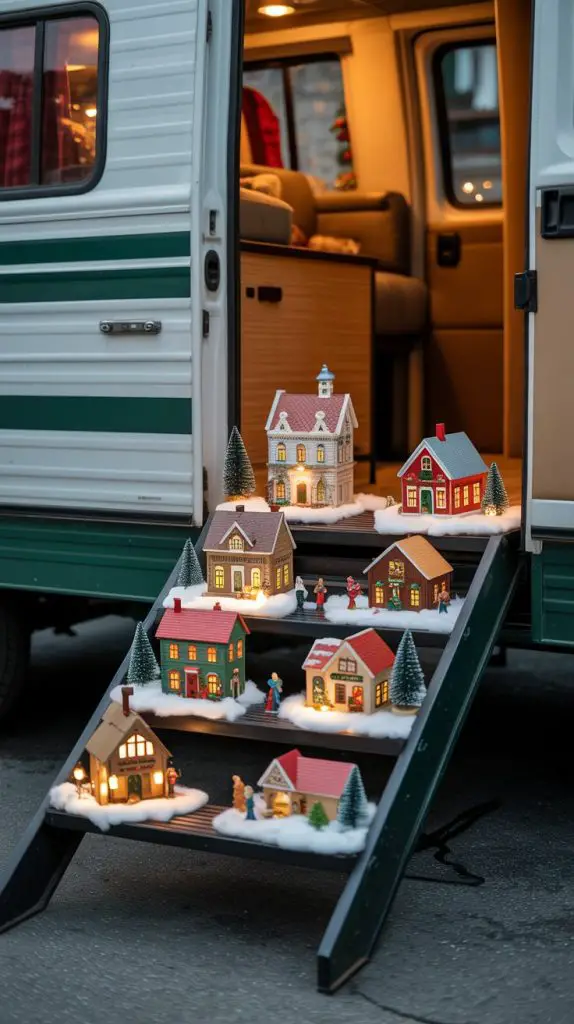
Create a charming miniature world by setting up a Christmas village scene on your RV’s exterior stairs or on a dedicated table beside your rig. These nostalgic displays feature tiny illuminated houses, churches, shops, and figurines that evoke memories of simpler times and traditional holiday celebrations. Modern Christmas villages often include moving parts, sound effects, and coordinated lighting that brings the scene to life. Arrange buildings on cotton batting “snow,” add miniature trees and street lamps, and position small figures engaged in winter activities to tell a story within your display.
Christmas village displays offer endless creative possibilities and can be expanded over time as you collect new pieces during your travels. Many RVers start with a small basic set and add region-specific buildings that commemorate places they’ve visited. The modular nature of village pieces makes them ideal for RV storage—each building packs individually in protective wrapping. Set up your village in a protected area like under your awning or on covered steps to shield delicate pieces from weather. The warm glow from illuminated buildings creates magical ambiance during evening hours and draws visitors who want a closer look at your detailed arrangement.
PRO TIP: Secure village pieces to their display surface using museum putty or removable adhesive to prevent tipping or movement from wind and vibration. Wrap each building individually in bubble wrap and store in a divided box or dedicated village storage container. Take photos of your favorite arrangements for reference when setting up at future locations, making recreation quick and easy.
18. Safe Battery-Operated Lanterns
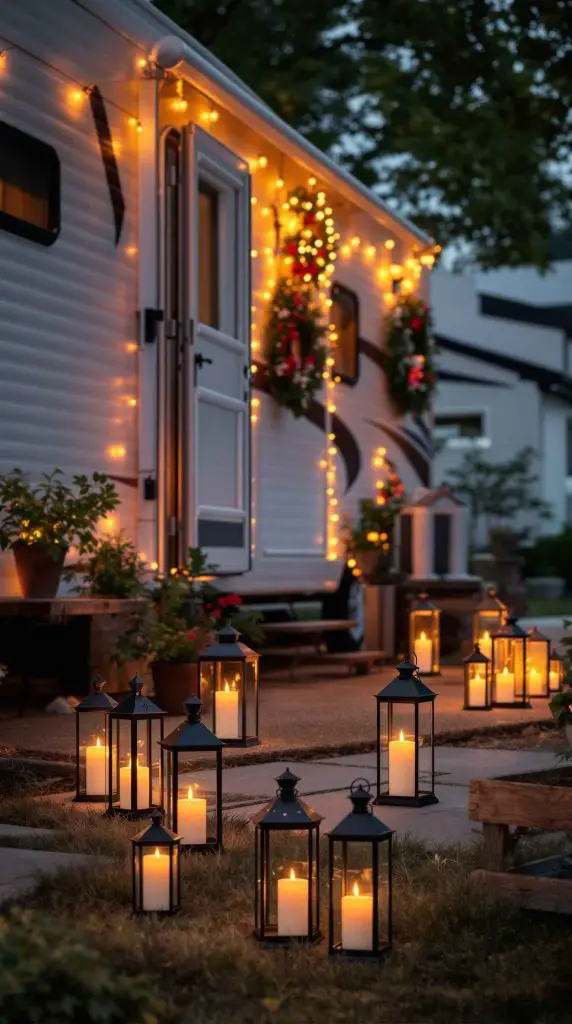
Battery-operated lanterns containing LED candles provide atmospheric lighting around your RV entrance and campsite while eliminating fire hazards associated with real flames. These lanterns come in various styles—traditional metal designs, rustic wood and glass combinations, or classic railroad lantern shapes—allowing you to match your aesthetic preferences. The flickering LED “flames” convincingly mimic real candlelight, creating warm, inviting pools of light that guide visitors to your door and enhance the cozy ambiance of winter camping. Arrange multiple lanterns on steps, tables, and along pathways for maximum impact.
The safety and convenience of battery-operated lanterns make them superior to real candles for RV decorating. There’s no worry about wind extinguishing flames, no fire risk from unattended candles, and no melted wax cleanup. Most LED candles feature timers that automate operation, turning on for several hours each evening and conserving battery life when not needed. Many lanterns are weather-resistant and can remain outdoors throughout your stay without concern for rain damage. The soft, gentle light complements rather than competes with other holiday lighting, adding layers of illumination that create depth and dimension in your overall display.
PRO TIP: Choose lanterns with easily replaceable batteries—AA or AAA rather than button cells—and always travel with spare batteries. LED candles with remote controls allow you to turn all lanterns on or off simultaneously without walking around your campsite. Store lanterns with newspaper or tissue paper stuffed inside to maintain their shape and prevent glass breakage during transit.
19. Creative Bike Rack Reindeer
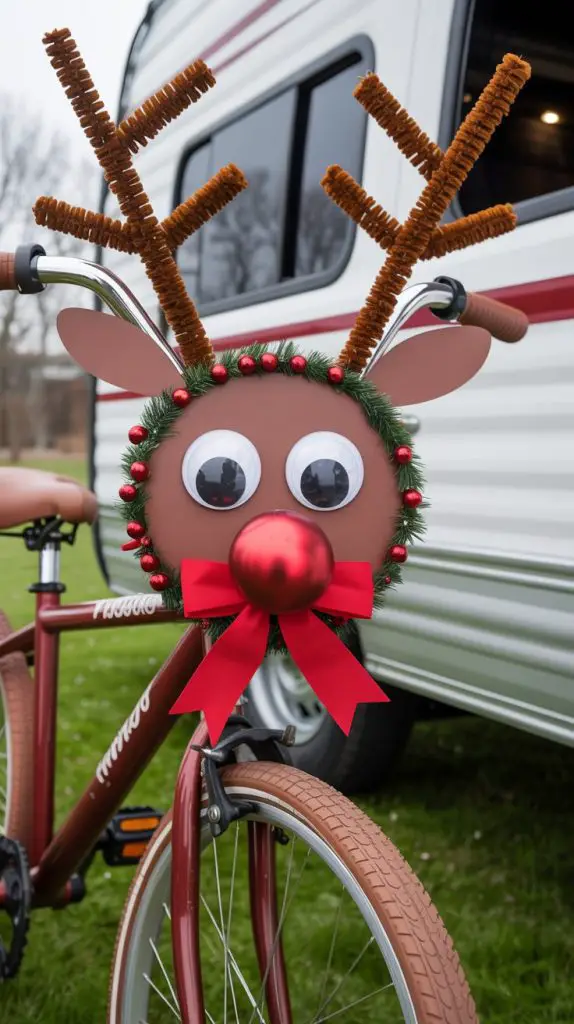
Transform your RV’s bike rack into a whimsical Rudolph the Red-Nosed Reindeer with this clever and playful decoration idea. Using simple craft materials—brown pipe cleaners or branches for antlers, a large red ornament or ball for the nose, and googly eyes—you can turn bicycles on your rack into festive reindeer that delight children and adults alike. This creative approach takes advantage of the bicycle’s existing structure, with handlebars becoming antlers and the front wheel becoming Rudolph’s face. Add a jingle bell collar or red bow for additional charm and Christmas spirit.
The bike rack reindeer concept has become increasingly popular in the RV community, with creative variations appearing throughout social media. Some RVers attach antlers directly to their bike rack when no bicycles are mounted, creating reindeer “pulling” their RV like Santa’s sleigh. Others add names to multiple bikes, recreating the full team of Dasher, Dancer, Prancer, and company. This decoration requires minimal materials and storage space while providing maximum fun and personality. It’s particularly effective on the rear of your RV, visible to other travelers and creating smiles wherever you go.
PRO TIP: Use zip ties or elastic cords to secure antlers and decorations to your bikes, ensuring they won’t shift or fall off. If planning to ride your decorated bikes, ensure decorations don’t interfere with steering or braking. For travel, remove loose decorations from bikes on external racks to prevent loss due to wind resistance. Store reindeer accessories in a labeled bag hung near your bike gear for quick access and setup at each destination.
20. Colorful Window Clings
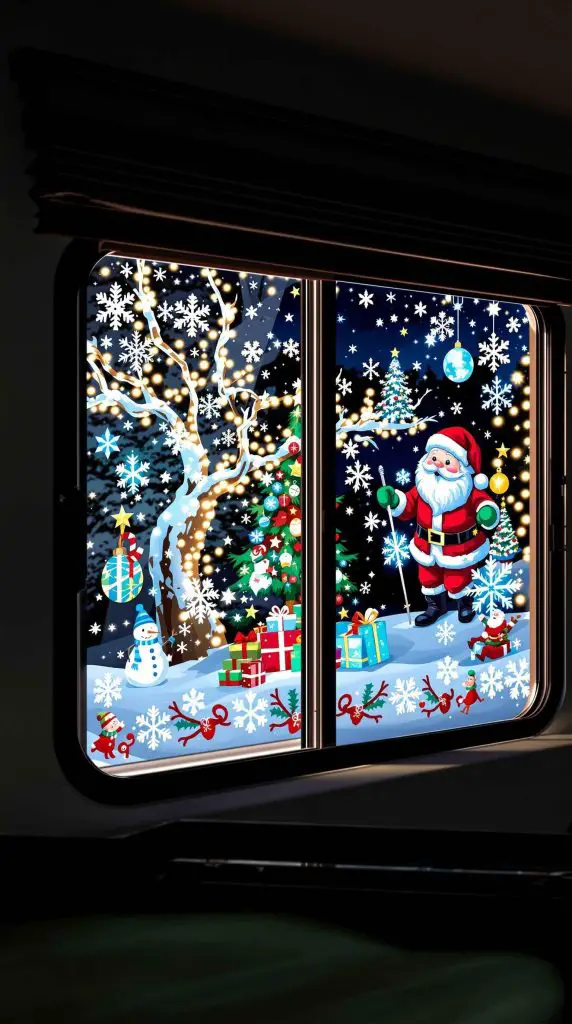
Static-cling window decorations offer a mess-free, damage-free way to add festive designs to your RV’s windows from inside or outside. These reusable vinyl clings adhere through static electricity rather than adhesives, making them perfect for RV windows where you want to avoid any residue or potential damage to tinted glass. Choose from countless designs—snowflakes, Santa faces, winter scenes, or religious imagery—that range from subtle and elegant to bold and colorful. Window clings create a stained-glass effect when light shines through them, casting colorful patterns into your RV’s interior or illuminating designs for outside visibility at night.
The versatility of window clings allows you to change your display as often as desired throughout the season without commitment or mess. Create themed windows coordinating with specific holidays, or tell a story across multiple windows with sequential scenes. Children especially enjoy helping arrange window clings, making this a fun family decorating activity. Clings work on any smooth glass surface—windshields, side windows, mirrors, or even smooth wall panels inside your RV. They’re lightweight, pack flat, and take up virtually no storage space, making them ideal for the space-conscious RV lifestyle.
PRO TIP: Clean windows thoroughly with glass cleaner before applying clings to ensure maximum adhesion and clarity. Store clings on their original backing sheets or wax paper to maintain their static-cling properties and prevent curling. Roll rather than fold clings for storage to avoid permanent creases. If clings lose their cling over time, wash them gently with water and mild soap, let them air dry, and they’ll regain their adhesive properties.
21. Fire Pit Stocking Display
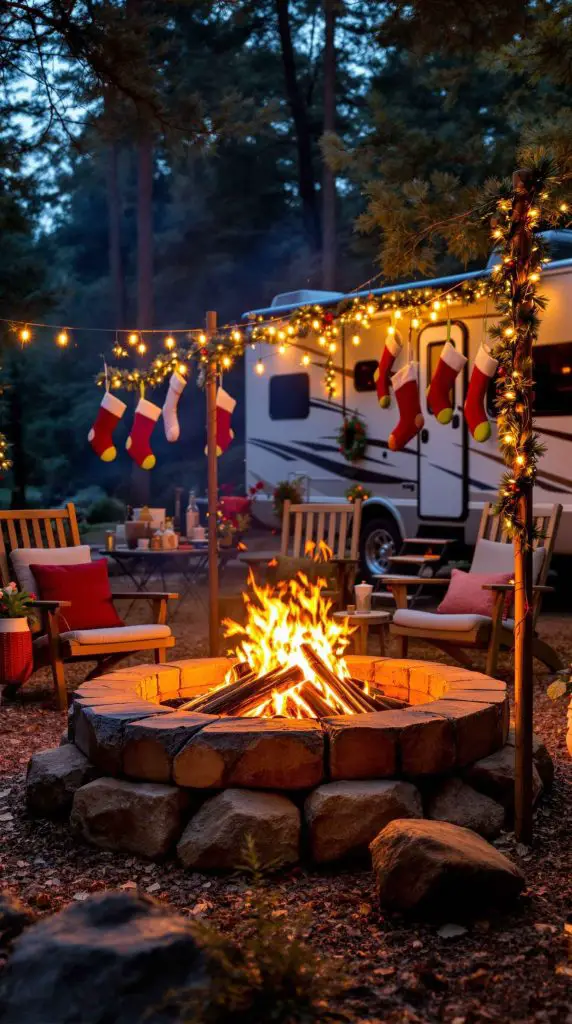
Recreate the classic hearth tradition by hanging Christmas stockings around your campfire area, transforming your outdoor fire pit into a cozy gathering spot reminiscent of traditional fireplaces. Use shepherd hooks, decorative poles, or a custom stocking holder frame positioned safely away from the fire pit to display personalized stockings for each family member. This brings the beloved tradition of hanging stockings into your RV camping lifestyle, creating a focal point for Christmas morning gift exchanges or evening story-telling sessions around the fire.
The fire pit stocking display becomes a central element of your outdoor Christmas celebration, combining warmth, light, and tradition in one meaningful space. Choose weather-resistant outdoor stockings or bring your indoor stockings outside for special occasions, removing them afterward to preserve them. Arrange comfortable seating around the fire pit with blankets and pillows, creating an inviting area for holiday gatherings. Add lanterns, string lights, or tiki torches around the perimeter to enhance the ambiance when the fire is not lit. This setup works beautifully for Christmas Eve celebrations, hot cocoa gatherings, or caroling sessions with fellow campers.
PRO TIP: Always maintain proper safety distances between stockings and the actual fire—at least 3-4 feet minimum to prevent heat damage or fire hazards. Use metal or powder-coated stocking holders that won’t melt or warp from heat exposure. Consider flame-retardant outdoor stockings specifically designed for fire pit areas. Create a photo op sign explaining your fire pit tradition to share the holiday spirit and inspire fellow campers.
22. Decorative Christmas Tire Covers
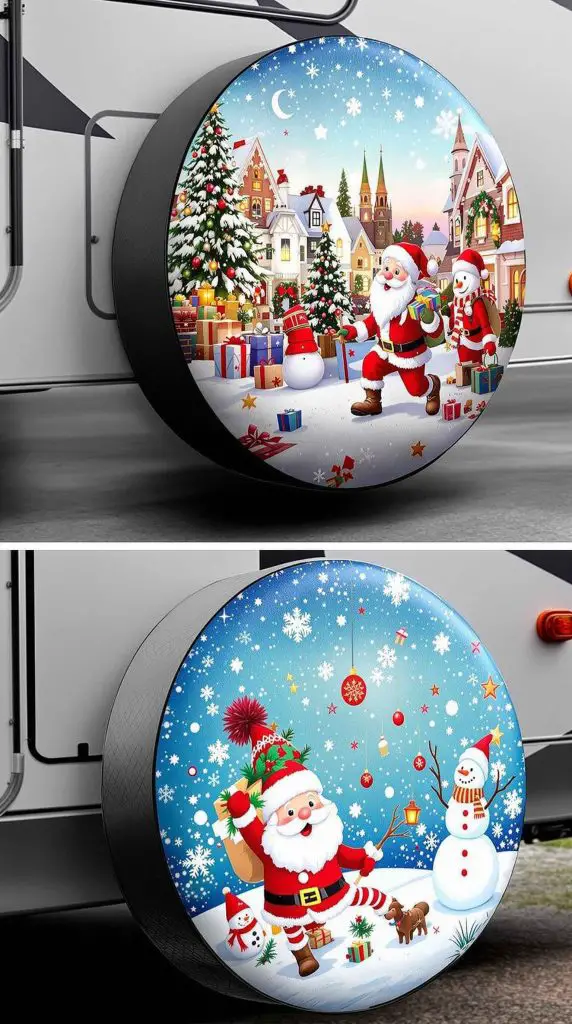
Replace your standard tire covers with festive Christmas-themed versions featuring holiday graphics, turning functional accessories into decorative elements. Tire covers decorated with Santa, snowmen, reindeer, wreaths, or holiday greetings add pops of color and Christmas cheer to your RV’s profile. These covers serve the dual purpose of protecting your tires from UV damage and weather exposure while contributing to your overall holiday aesthetic. Quality Christmas tire covers are made from durable, weather-resistant materials that withstand sun, rain, and snow without fading or deteriorating.
Seasonal tire covers are available in sizes to fit everything from small travel trailer tires to large Class A motorhome duals. Many designs feature vibrant, full-color graphics that remain visible from a distance, making your RV stand out in crowded campgrounds. Some RVers collect different holiday covers throughout the year—Halloween, Thanksgiving, Christmas, New Year’s—rotating them seasonally to maintain fresh, current displays. The covers install quickly using elastic edges or drawstrings, and they remove just as easily for storage or when switching back to standard covers. This simple swap makes an immediate visual impact with minimal effort or expense.
PRO TIP: Measure your tire diameter and width accurately before purchasing Christmas tire covers to ensure proper fit—covers that are too loose blow off in wind, while too-tight covers are difficult to install. Store off-season tire covers rolled rather than folded to prevent permanent creases in the graphics. Consider purchasing two sets if you frequently change locations during the holiday season, keeping one set on the RV while the other is packed away clean and ready to alternate.
23. Natural Pinecone and Berry Garland
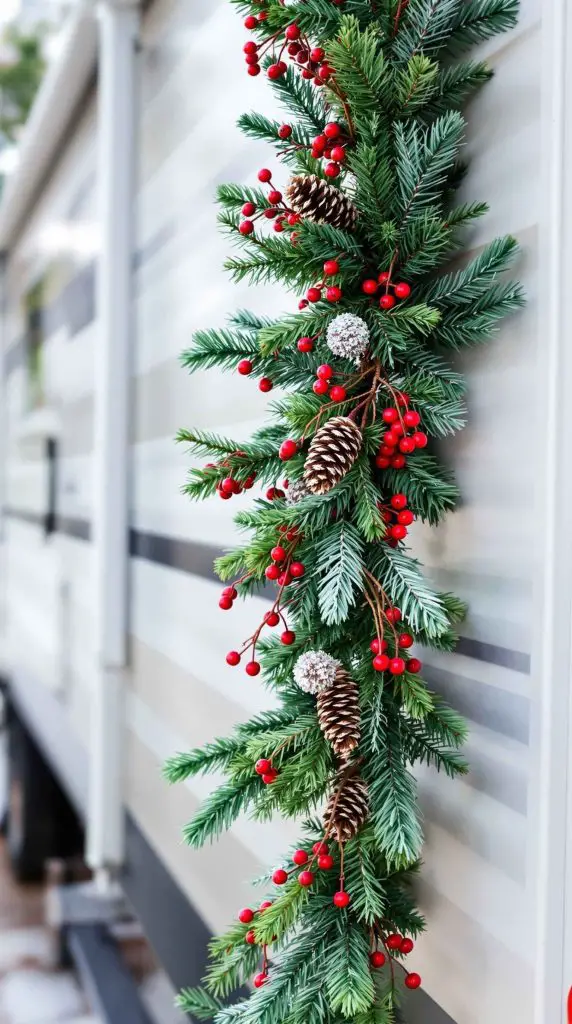
Embrace a rustic, woodland Christmas aesthetic with garland made from natural pinecones, red berries, and evergreen branches. This organic decoration style connects your RV decorating to the natural environment of your campground, creating harmony between your holiday display and the outdoor setting. Natural element garlands offer texture and dimension that synthetic decorations sometimes lack, with irregular shapes and varied colors that catch light beautifully. Drape this garland along your roofline, around windows and doors, or across railings for an earthy, elegant look that feels both timeless and fresh.
While some dedicated crafters create their own natural garlands from foraged materials, high-quality artificial versions capture the authentic look without the maintenance concerns of real organic materials. Faux pinecone and berry garlands won’t attract insects, decay over time, or drop needles and seeds around your campsite. Look for garland with realistic details—varied pinecone sizes, different evergreen textures, and berries in multiple shades of red. This decoration style pairs beautifully with burlap accents, wooden signs, and vintage-style lanterns for a cohesive rustic theme. The neutral colors and natural materials complement virtually any RV exterior color and style.
PRO TIP: If using real pinecones and branches, bake pinecones at 200°F for 30 minutes before crafting to kill any insects and remove sap. For artificial natural garland, choose UV-resistant materials to prevent fading if your RV is parked in full sun. Store natural-style garland in breathable cotton bags rather than plastic to prevent moisture buildup and preserve the materials’ appearance for multiple seasons.
24. Vintage Neon Christmas Sign
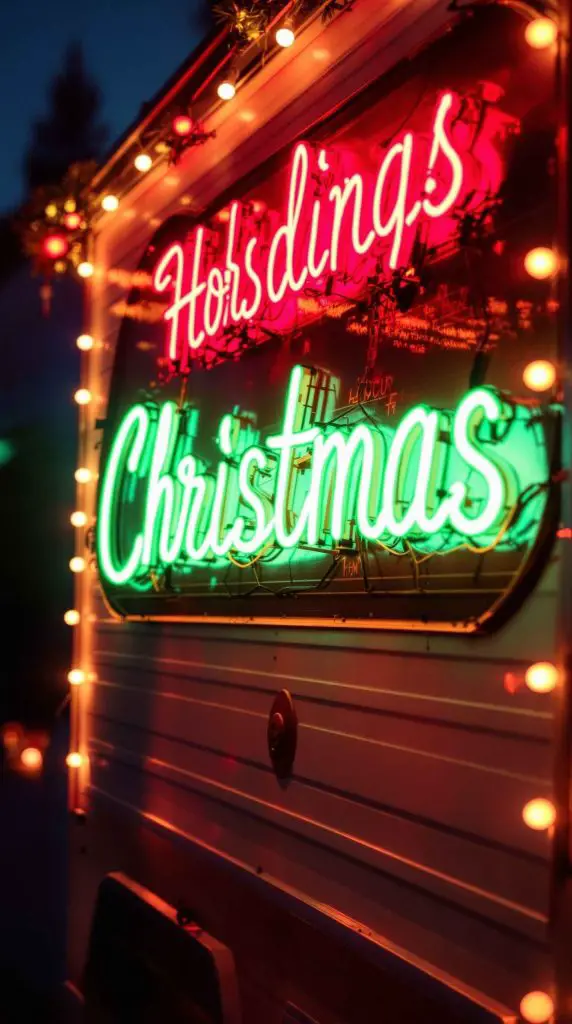
Make a bold, retro statement with a vintage-style neon Christmas sign mounted on your RV’s exterior. These eye-catching signs feature classic holiday messages like “Merry Christmas,” “Season’s Greetings,” or “Happy Holidays” in glowing neon tubes or modern LED neon-style alternatives. The distinctive glow of neon adds a nostalgic, mid-century aesthetic that stands out from traditional Christmas decorations. Modern LED neon signs consume less power than authentic neon, run cool to the touch, and are much more durable for travel, making them practical choices for RV applications.
Neon signs work particularly well on RVs with modern or minimalist exteriors, where the simple, graphic nature of the signage complements clean lines and contemporary styling. Mount signs on smooth exterior surfaces using command strips, suction cups, or hanging hardware appropriate for your RV’s construction. The concentrated light of a neon sign creates a strong focal point without requiring extensive decoration around it—sometimes one striking element makes more impact than multiple dispersed decorations. This approach appeals to RVers seeking a distinctive, memorable display that differs from conventional Christmas decorating.
PRO TIP: Choose LED neon signs over traditional glass neon tubes for RV use—they’re virtually unbreakable, lightweight, and available in battery-operated versions that eliminate outlet requirements. Look for signs with multiple lighting modes like steady-on, flashing, or breathing patterns to customize your display. Secure signs thoroughly before traveling, or better yet, treat them as setup-only decorations that you remove and store during transit to prevent damage from road vibration.
25. Coordinated Color Theme Display
Create a sophisticated, cohesive look by selecting a specific color palette and coordinating all your outdoor Christmas decorations within that scheme. Rather than using every Christmas color available, limit yourself to two or three complementary colors—classic red and gold, elegant silver and blue, rustic burgundy and cream, or modern white and metallics. This disciplined approach to color creates visual harmony and elevates your display from random collection to intentional design. Every element, from lights and ornaments to wreaths and ribbons, reinforces your chosen palette for maximum impact.
A coordinated color theme demonstrates attention to detail and design sophistication that impresses viewers and creates a memorable visual experience. The unified color story makes your RV appear professionally decorated and thoughtfully styled. This approach also simplifies shopping and decision-making—you quickly assess whether new decorations fit your scheme before purchasing. Over time, you build a cohesive collection of decorations that work together seamlessly, regardless of how you arrange or combine them. Coordinated themes photograph beautifully, making your RV Instagram-worthy and Pinterest-ready for sharing your holiday adventures.
PRO TIP: Before committing to a color theme, consider how it complements your RV’s exterior color and existing camping gear. Take paint chip samples or fabric swatches representing your chosen colors when shopping to ensure accurate color matching. Organize your stored decorations by color theme in labeled bins, making setup faster and ensuring you have balanced quantities of each color for proper distribution throughout your display. Don’t be afraid to evolve your theme—many RVers choose a new color palette every 2-3 years to keep their decorating fresh and exciting.


