
If you’re looking to spark romance while cooking in your RV, there are plenty of tasty options that’ll impress your partner without a lot of fuss. With limited space and resources, you can whip up cozy, delicious dinners that set the stage for a memorable night under the stars. From simple pasta dishes to a gourmet take on camping classics, let’s get straight into some charming ideas that will make your RV feel like a five-star dining experience.
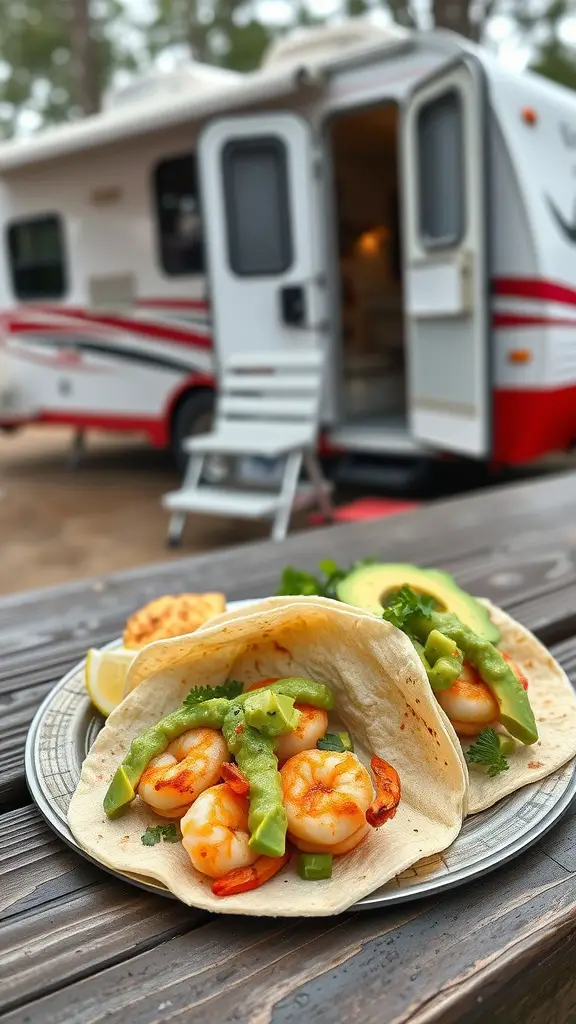
Sizzling Shrimp Tacos with Avocado Salsa
Would you like to save this article?
These sizzling shrimp tacos are a perfect dish for your RV romance. Quick to prepare and packed with flavor, they bring a taste of the coast right to your campsite. Top them off with fresh avocado salsa for a delightful dinner under the stars.
Ingredients:
- 1 lb shrimp, peeled and deveined
- 2 tbsp olive oil
- 1 tbsp lime juice
- 1 tsp chili powder
- 1/2 tsp cumin
- Salt and pepper to taste
- 8 small tortillas
- 1 avocado, diced
- 1 small red onion, finely chopped
- 1 jalapeño, seeded and finely chopped
- 1/4 cup fresh cilantro, chopped
- 1 tbsp lime juice (for salsa)
- Salt to taste
Instructions:
- In a bowl, combine shrimp, olive oil, lime juice, chili powder, cumin, salt, and pepper. Mix well to coat the shrimp.
- Heat a skillet over medium-high heat.
- Add the shrimp to the skillet and cook for 2-3 minutes on each side, or until shrimp are pink and cooked through.
- In a separate bowl, combine diced avocado, red onion, jalapeño, cilantro, lime juice, and salt. Mix gently to create the avocado salsa.
- Warm the tortillas over the campfire or on a portable stove.
- Assemble the tacos by placing a few shrimp on each tortilla.
- Top with a generous spoonful of avocado salsa.
- Serve immediately and enjoy!
Beef Tenderloin with Garlic Mashed Potatoes
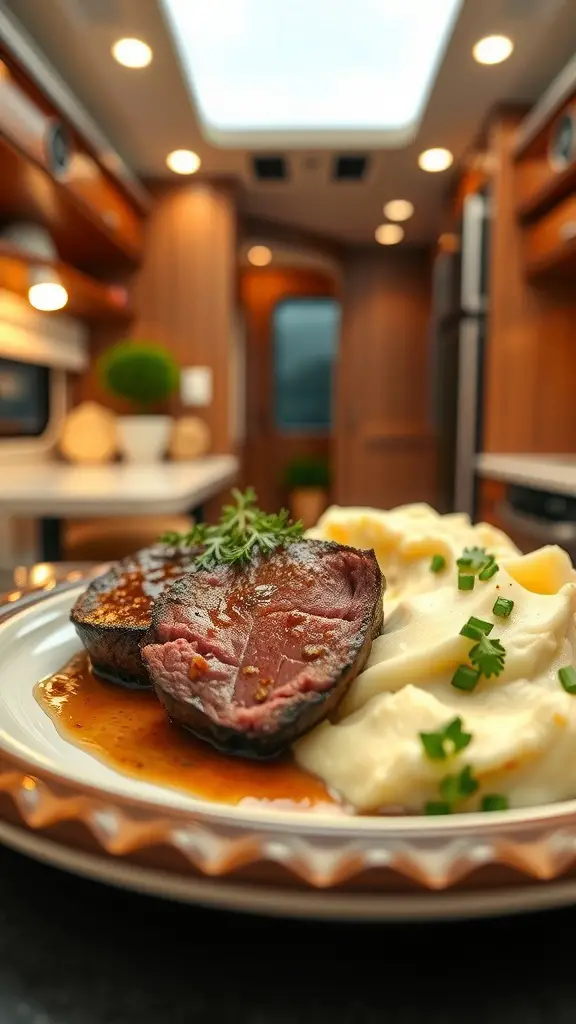
Cooking beef tenderloin with garlic mashed potatoes is a wonderful way to make your RV feel like a cozy restaurant. The tenderloin is juicy and flavorful, perfect for a special night. Pair it with creamy mashed potatoes for a comforting side, and you’ve got a meal that will impress your partner.
Ingredients:
- 2 lbs beef tenderloin
- 2 tbsp olive oil
- 4 cloves garlic, minced
- 1 tbsp fresh rosemary, chopped
- 1 tbsp fresh thyme, chopped
- Salt and pepper to taste
- 2 lbs potatoes, peeled and cubed
- 4 cloves garlic, peeled
- 1/2 cup heavy cream
- 4 tbsp butter
- Salt and pepper to taste
- Fresh parsley, chopped (for garnish)
Instructions:
- Preheat your campfire grill or portable stove.
- Rub the beef tenderloin with olive oil, minced garlic, rosemary, thyme, salt, and pepper.
- Heat a skillet over medium-high heat.
- Sear the beef tenderloin on all sides until browned.
- Transfer the skillet to a cooler part of the campfire or reduce heat and cook until the internal temperature reaches your desired doneness (about 130°F for medium-rare).
- Remove the beef from the heat and let it rest for 10 minutes before slicing.
- Meanwhile, in a large pot, add the cubed potatoes and garlic cloves.
- Cover with water and bring to a boil over the campfire or portable stove.
- Cook until potatoes are tender, about 15-20 minutes.
- Drain the potatoes and garlic, then return them to the pot.
- Add heavy cream, butter, salt, and pepper.
- Mash the potatoes and garlic until smooth and creamy.
- Serve slices of beef tenderloin alongside a generous portion of garlic mashed potatoes.
- Garnish with chopped fresh parsley.
- Enjoy your delicious meal!
Grilled Lemon Herb Chicken

Grilled lemon herb chicken is a perfect choice for a romantic dinner in your RV. The juicy chicken paired with fresh herbs and a hint of citrus will impress your partner. It’s simple to make and brings a burst of flavor to your cozy evening together.
Ingredients:
- 4 boneless, skinless chicken breasts
- 1/4 cup olive oil
- 1/4 cup fresh lemon juice
- 2 cloves garlic, minced
- 1 tbsp fresh rosemary, chopped
- 1 tbsp fresh thyme, chopped
- 1 tbsp fresh parsley, chopped
- Salt and pepper to taste
- Lemon wedges (for serving)
Instructions:
- In a bowl, whisk together olive oil, lemon juice, minced garlic, rosemary, thyme, parsley, salt, and pepper.
- Place the chicken breasts in a resealable plastic bag or a shallow dish.
- Pour the marinade over the chicken, ensuring each piece is well-coated.
- Seal the bag or cover the dish and refrigerate for at least 30 minutes, or up to 2 hours for more flavor.
- Preheat your campfire grill or portable grill to medium-high heat.
- Remove the chicken from the marinade and discard the remaining marinade.
- Place the chicken breasts on the grill.
- Grill the chicken for 6-8 minutes on each side, or until the internal temperature reaches 165°F and the chicken is cooked through.
- Remove the chicken from the grill and let it rest for a few minutes.
- Serve the grilled lemon herb chicken with lemon wedges for squeezing over the top.
- Enjoy your flavorful and juicy chicken!
Pasta Primavera with Fresh Vegetables
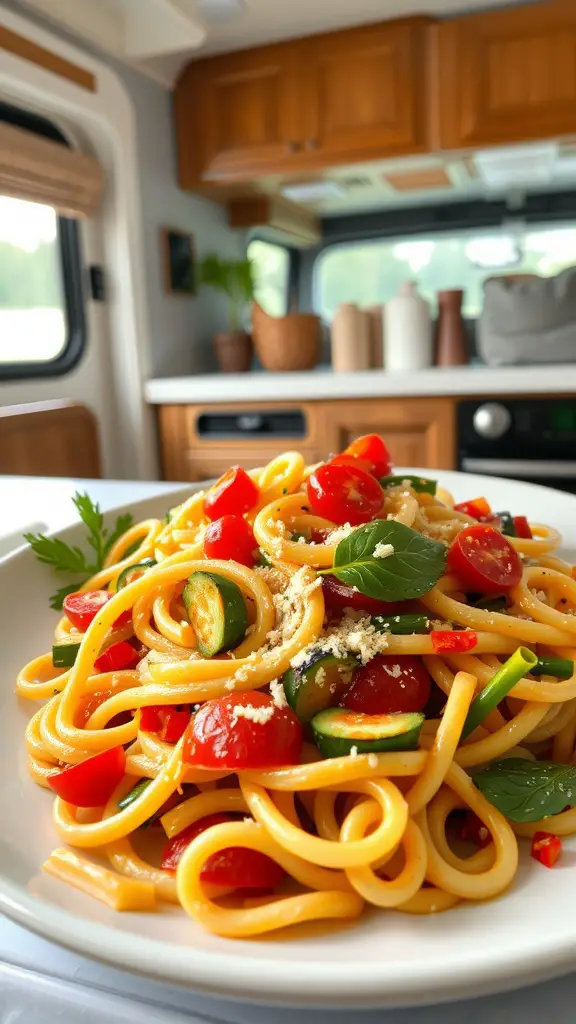
Pasta primavera is a quick and tasty dish that’s perfect for a romantic dinner in your RV. Toss together your favorite pasta with fresh veggies like zucchini, bell peppers, and cherry tomatoes for a vibrant meal. Finish it off with a sprinkle of cheese and some fresh herbs for extra flavor!
Ingredients:
- 12 oz pasta (penne or rotini work well)
- 1 zucchini, sliced
- 1 yellow squash, sliced
- 1 bell pepper, sliced
- 1 cup cherry tomatoes, halved
- 1 cup broccoli florets
- 2 cloves garlic, minced
- 2 tbsp olive oil
- 4 cups vegetable broth
- 1/2 cup grated Parmesan cheese
- Salt and pepper to taste
- Fresh basil for garnish
Instructions:
- Heat a large pot over the campfire or portable stove.
- Add olive oil and garlic, and sauté until fragrant.
- Add zucchini, yellow squash, bell pepper, cherry tomatoes, and broccoli. Cook for a few minutes until vegetables start to soften.
- Add pasta and vegetable broth to the pot.
- Bring to a boil, then reduce heat and simmer until pasta is cooked and most of the liquid is absorbed, about 10-12 minutes.
- Stir in Parmesan cheese, salt, and pepper.
- Garnish with fresh basil.
- Serve hot and enjoy your vibrant, fresh pasta primavera!
Creamy Mushroom Risotto
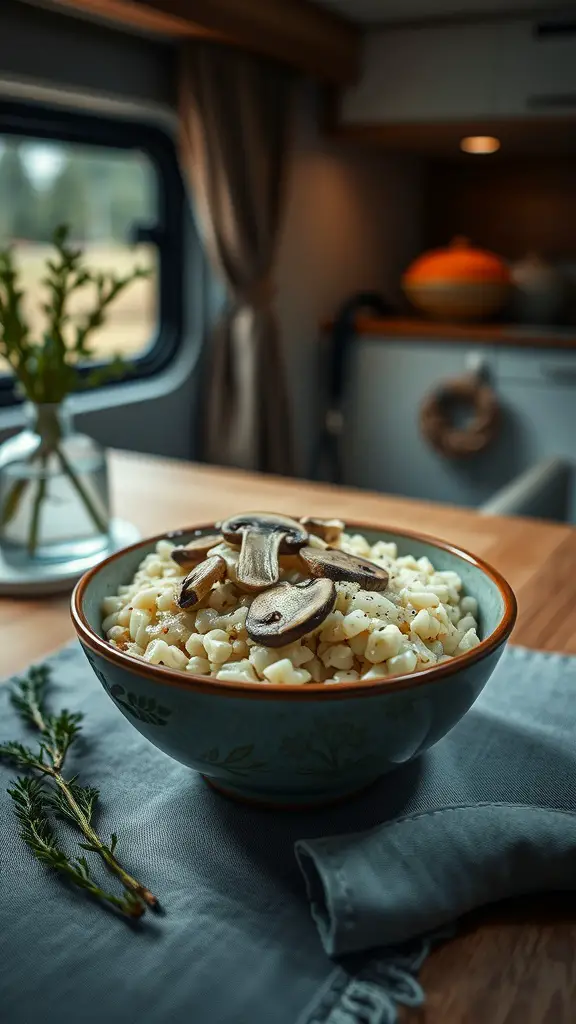
Cooking creamy mushroom risotto in your RV is a fantastic way to impress your partner. Start with arborio rice, fresh mushrooms, and a splash of white wine for that perfect touch. Enjoy the creamy texture and rich flavors while soaking up the stunning views outside your window.
Ingredients:
- 1 1/2 cups Arborio rice
- 4 cups chicken or vegetable broth, kept warm
- 1 cup white wine
- 2 tbsp olive oil
- 1 small onion, finely chopped
- 3 cloves garlic, minced
- 2 cups mushrooms, sliced (such as cremini or button mushrooms)
- 1/2 cup grated Parmesan cheese
- 2 tbsp butter
- Salt and pepper to taste
- Fresh parsley, chopped (for garnish)
Instructions:
- Heat olive oil in a large skillet or pot over medium heat.
- Add the chopped onion and sauté until translucent, about 5 minutes.
- Add the minced garlic and sliced mushrooms, and cook until the mushrooms are softened and any liquid has evaporated.
- Stir in the Arborio rice and cook for 1-2 minutes, ensuring each grain is coated with oil.
- Pour in the white wine and stir continuously until the wine is mostly absorbed by the rice.
- Begin adding the warm broth one ladle at a time, stirring frequently. Allow each addition to be absorbed before adding the next ladle of broth.
- Continue this process until the rice is creamy and cooked to al dente, which should take about 18-20 minutes.
- Stir in the Parmesan cheese and butter, then season with salt and pepper to taste.
- Remove from heat and let the risotto rest for a couple of minutes.
- Garnish with chopped fresh parsley.
- Serve immediately and enjoy your creamy mushroom risotto!
Stuffed Bell Peppers with Quinoa and Black Beans
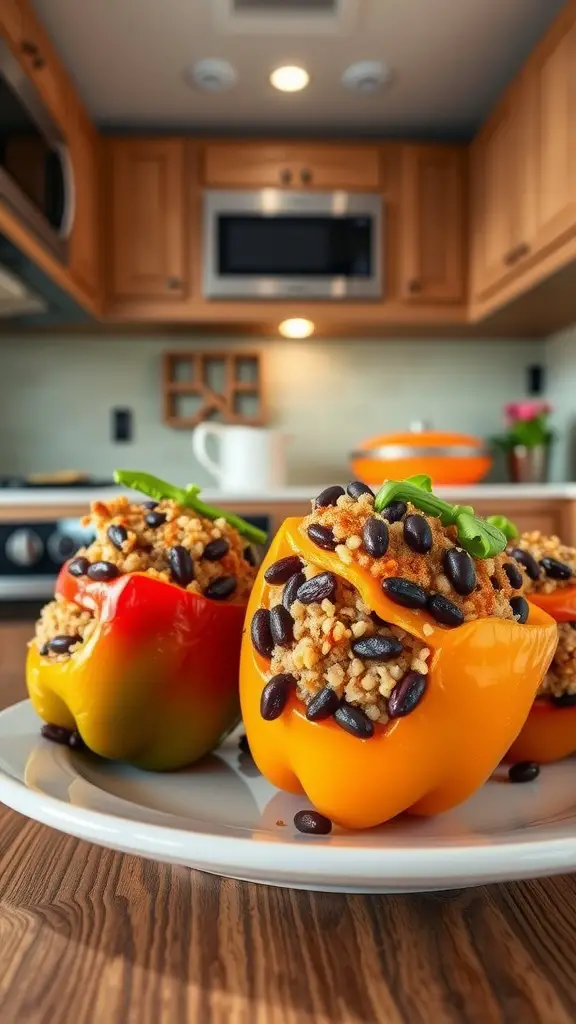
Stuffed bell peppers are a fantastic choice for a cozy dinner in your RV. Just hollow out some colorful peppers and fill them with a mix of quinoa, black beans, and your favorite spices. They’re not only easy to make, but also packed with flavor and nutrients, making them a perfect dish to enjoy under the stars.
Stuffed Bell Peppers with Quinoa and Black Beans
Ingredients:
- 4 large bell peppers (any color), tops cut off and seeds removed
- 1 cup quinoa, rinsed
- 2 cups vegetable broth or water
- 1 can (15 oz) black beans, drained and rinsed
- 1 cup corn kernels (fresh, canned, or frozen)
- 1 small onion, finely chopped
- 2 cloves garlic, minced
- 1 tsp cumin
- 1 tsp chili powder
- Salt and pepper to taste
- 1 cup shredded cheese (cheddar or Monterey Jack)
- 1/4 cup fresh cilantro, chopped (for garnish)
- Lime wedges (for serving)
Instructions:
- Preheat your campfire grill or portable stove to medium heat.
- In a pot, bring the vegetable broth or water to a boil.
- Add the rinsed quinoa, reduce heat to low, cover, and simmer for about 15 minutes or until the quinoa is cooked and the liquid is absorbed.
- In a skillet, heat a bit of oil over medium heat.
- Add the chopped onion and sauté until translucent, about 5 minutes.
- Add the minced garlic, cumin, and chili powder, and cook for another minute.
- Stir in the cooked quinoa, black beans, and corn. Season with salt and pepper to taste.
- Remove the skillet from heat and mix in half of the shredded cheese.
- Stuff each bell pepper with the quinoa mixture, pressing down to pack it in well.
- Place the stuffed bell peppers on a grill grate or in a cast-iron skillet over the campfire or portable stove.
- Cook for about 20-25 minutes, until the peppers are tender and the filling is heated through.
- During the last few minutes of cooking, sprinkle the remaining cheese on top of the stuffed peppers and allow it to melt.
- Remove from heat and garnish with fresh cilantro.
- Serve with lime wedges for squeezing over the top.
- Enjoy your delicious and nutritious stuffed bell peppers!
Ratatouille with Crusty Bread
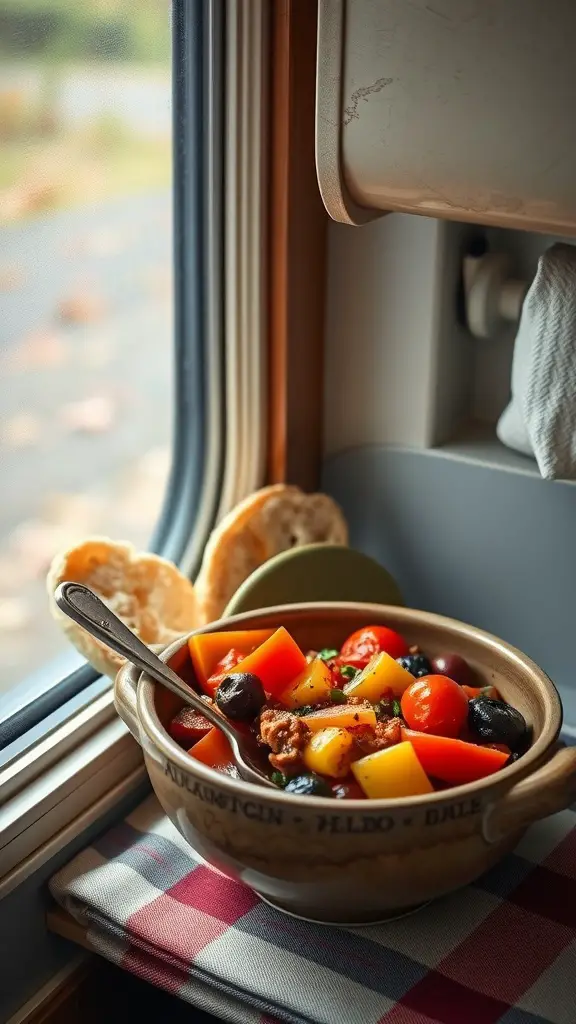
Cooking ratatouille in your RV is simple and rewarding. This colorful dish makes use of fresh veggies, creating a tasty meal perfect for a cozy evening. Pair it with crusty bread, and you’ve got a delightful dinner to enjoy while on the road.
Ingredients:
- 1 large eggplant, diced
- 2 zucchinis, sliced
- 1 yellow squash, sliced
- 1 red bell pepper, diced
- 1 yellow bell pepper, diced
- 1 large onion, chopped
- 4 cloves garlic, minced
- 4 large tomatoes, chopped
- 1/4 cup olive oil
- 1 tsp dried thyme
- 1 tsp dried oregano
- Salt and pepper to taste
- Fresh basil, chopped (for garnish)
- Crusty bread (baguette or artisan loaf)
Instructions:
- Heat olive oil in a large pot or Dutch oven over medium heat.
- Add the chopped onion and sauté until translucent, about 5 minutes.
- Add the minced garlic and cook for another minute until fragrant.
- Stir in the diced eggplant and cook for about 5 minutes, until it begins to soften.
- Add the sliced zucchinis, yellow squash, red bell pepper, and yellow bell pepper. Cook for another 5-7 minutes, stirring occasionally.
- Add the chopped tomatoes, dried thyme, dried oregano, salt, and pepper. Stir to combine.
- Reduce heat to low, cover, and let the ratatouille simmer for about 20-25 minutes, stirring occasionally, until all the vegetables are tender and the flavors are well combined.
- Taste and adjust seasoning with more salt and pepper if needed.
- Garnish with freshly chopped basil.
- Serve hot with slices of crusty bread on the side for dipping.
- Enjoy your hearty and flavorful ratatouille with crusty bread!
Caprese Salad with Balsamic Drizzle
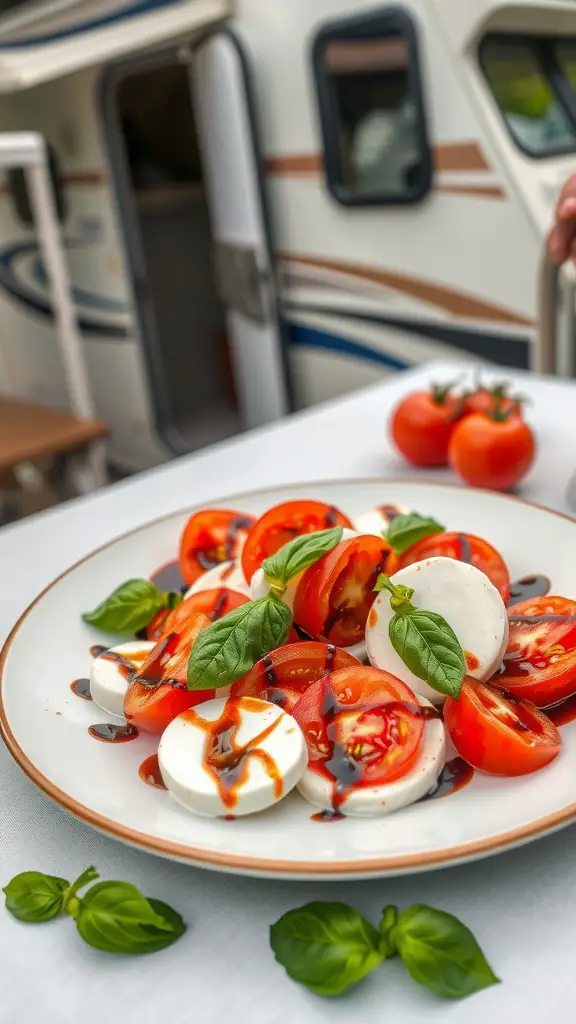
A Caprese salad is a light and fresh option for a romantic dinner in your RV. Simply layer slices of ripe tomatoes and creamy mozzarella, then drizzle with balsamic glaze for a touch of sweetness. Add some basil leaves on top for that extra burst of flavor and color!
Ingredients:
- 4 large ripe tomatoes, sliced
- 1 lb fresh mozzarella, sliced
- 1 bunch fresh basil leaves
- 1/4 cup extra virgin olive oil
- Salt and pepper to taste
- 1/2 cup balsamic vinegar
- 1 tbsp honey (optional, for sweetness)
Instructions:
- Arrange the tomato slices and mozzarella slices alternately on a serving platter.
- Tuck fresh basil leaves between the slices of tomato and mozzarella.
- Drizzle extra virgin olive oil over the arranged salad.
- Season with salt and pepper to taste.
- In a small saucepan, bring the balsamic vinegar to a boil over medium heat.
- Reduce the heat to low and let it simmer until the vinegar has reduced by half and has a syrupy consistency, about 10-15 minutes. If desired, stir in honey for added sweetness.
- Allow the balsamic reduction to cool slightly.
- Drizzle the balsamic reduction over the Caprese salad.
- Serve immediately and enjoy the fresh, vibrant flavors of your Caprese salad with balsamic drizzle!
Chocolate Fondue for Two

Chocolate fondue is a sweet way to create a romantic moment in your RV. Melt rich chocolate and dip fresh strawberries and marshmallows for a fun treat. It’s simple, delicious, and perfect for sharing with your partner under the stars.
Ingredients:
- 1 cup semi-sweet or dark chocolate chips
- 1/2 cup heavy cream
- 1 tsp vanilla extract
- Assorted dippers: strawberries, banana slices, apple slices, marshmallows, pretzels, pound cake cubes
Instructions:
- In a small saucepan, heat the heavy cream over medium heat until it begins to simmer. Do not let it boil.
- Remove the saucepan from the heat and add the chocolate chips.
- Let the mixture sit for about 2 minutes to allow the chocolate to melt.
- Stir the mixture until smooth and fully combined.
- Stir in the vanilla extract.
- Transfer the chocolate mixture to a fondue pot or a heatproof bowl.
- Arrange the assorted dippers on a platter around the fondue pot or bowl.
- Use fondue forks or skewers to dip the assorted dippers into the warm chocolate.
- Enjoy your romantic and indulgent chocolate fondue for two!
Seared Salmon with Asparagus
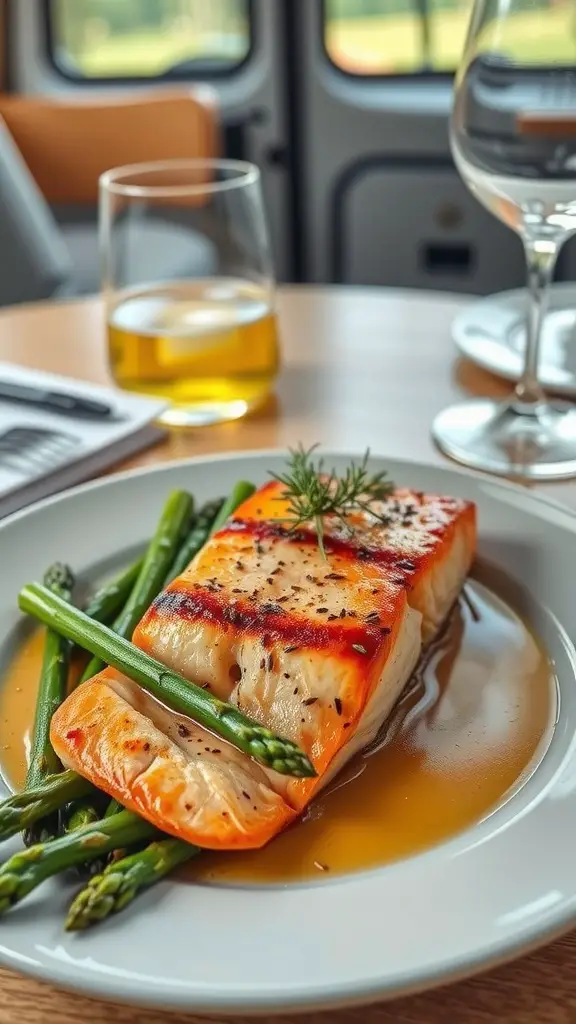
Seared salmon with asparagus is a simple yet elegant dish perfect for a romantic dinner in your RV. Just season the salmon with salt, pepper, and a bit of lemon, then cook it to a golden brown. Serve it alongside tender asparagus for a meal that feels gourmet without the fuss!
Ingredients:
- 2 salmon fillets (about 6 oz each)
- 1 bunch asparagus, trimmed
- 2 tbsp olive oil
- 2 cloves garlic, minced
- 1 lemon (half sliced, half for juice)
- Salt and pepper to taste
- Fresh dill or parsley for garnish (optional)
Instructions:
- Preheat your campfire grill or portable stove to medium-high heat.
- Season the salmon fillets with salt and pepper on both sides.
- In a skillet, heat 1 tablespoon of olive oil over medium-high heat.
- Add the salmon fillets, skin-side down, and cook for about 4-5 minutes, until the skin is crispy and the salmon is cooked halfway up the sides.
- Carefully flip the salmon fillets and cook for another 2-3 minutes, until the salmon is cooked through but still moist. Remove from the skillet and set aside.
- In the same skillet, add the remaining 1 tablespoon of olive oil.
- Add the minced garlic and sauté until fragrant, about 1 minute.
- Add the asparagus and lemon slices to the skillet, and season with salt and pepper.
- Cook the asparagus, stirring occasionally, until tender-crisp and slightly charred, about 5-7 minutes.
- Squeeze the juice from the remaining half of the lemon over the asparagus and stir to combine.
- Plate the seared salmon fillets alongside the cooked asparagus.
- Garnish with fresh dill or parsley if desired.
- Serve immediately and enjoy your delicious and healthy seared salmon with asparagus!
Herbed Flatbread Pizza with Fresh Toppings
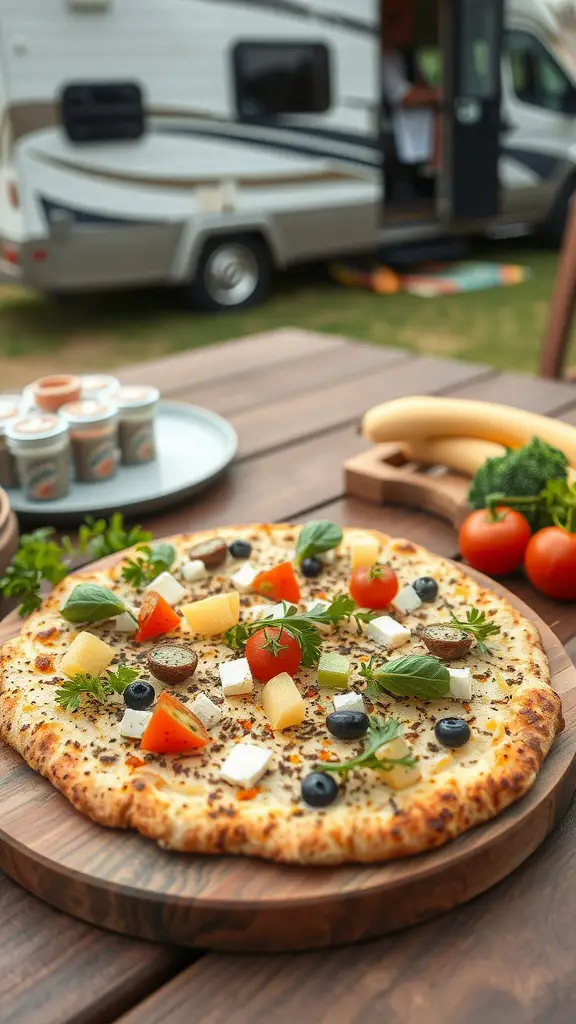
Making herbed flatbread pizza in your RV is a fun way to enjoy a cozy meal. Top your pizza with fresh veggies and herbs for a burst of flavor. It’s quick, easy, and perfect for a romantic evening under the stars.
Herbed Flatbread Pizza with Fresh Toppings
Ingredients:
- 2 flatbreads or naan
- 1/4 cup olive oil
- 2 cloves garlic, minced
- 1 tsp dried oregano
- 1 tsp dried basil
- 1 cup shredded mozzarella cheese
- 1/2 cup cherry tomatoes, halved
- 1/4 red onion, thinly sliced
- 1/2 cup baby spinach leaves
- 1/4 cup Kalamata olives, pitted and sliced
- 1/4 cup crumbled feta cheese
- Fresh basil leaves for garnish
- Salt and pepper to taste
Instructions:
- Preheat your campfire grill or portable stove to medium heat.
- In a small bowl, mix the olive oil, minced garlic, dried oregano, and dried basil.
- Brush the flatbreads with the herbed olive oil mixture, ensuring an even coating.
- Place the flatbreads on a grill grate or in a cast-iron skillet over the campfire or portable stove.
- Grill for about 2-3 minutes on each side until they are lightly toasted and crispy.
- Remove the flatbreads from the heat and sprinkle with shredded mozzarella cheese.
- Evenly distribute the cherry tomato halves, red onion slices, baby spinach leaves, and Kalamata olives over the flatbreads.
- Sprinkle the crumbled feta cheese on top.
- Place the flatbreads back on the grill or in the skillet and cook for another 3-5 minutes, until the cheese is melted and bubbly.
- Remove from the heat and season with salt and pepper to taste.
- Garnish with fresh basil leaves.
- Slice the flatbreads into pieces and serve immediately.
- Enjoy your delicious and fresh herbed flatbread pizza with vibrant toppings!
Lemon Garlic Butter Scallops
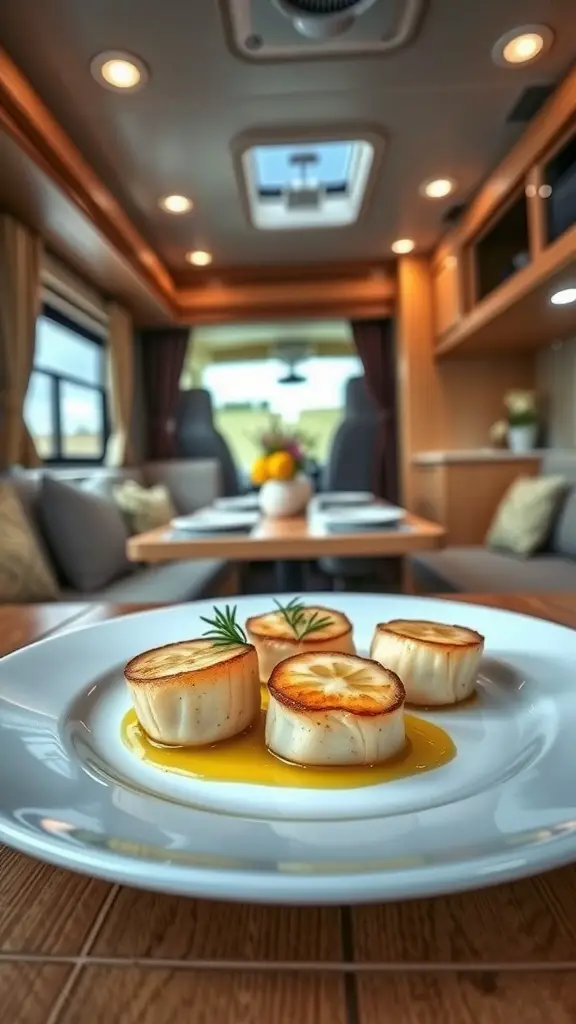
Lemon garlic butter scallops make for a tasty treat in your RV. They cook quickly and taste amazing, perfect for a cozy dinner. Just sear them for a few minutes, and you’ll impress your partner with minimal effort!
Ingredients:
- 1 lb large sea scallops
- Salt and pepper to taste
- 2 tbsp olive oil
- 3 tbsp unsalted butter, divided
- 4 cloves garlic, minced
- Juice of 1 lemon
- 2 tbsp fresh parsley, chopped
- Lemon wedges (for serving)
Instructions:
- Pat the scallops dry with paper towels and season both sides with salt and pepper.
- Heat the olive oil and 1 tablespoon of butter in a large skillet over medium-high heat.
- Once the butter has melted and the skillet is hot, add the scallops in a single layer. Make sure not to overcrowd the pan.
- Sear the scallops for about 2-3 minutes on each side, until they are golden brown and opaque in the center. Remove the scallops from the skillet and set aside.
- In the same skillet, add the remaining 2 tablespoons of butter.
- Add the minced garlic and sauté for about 1 minute, until fragrant.
- Stir in the lemon juice and bring the sauce to a simmer.
- Return the scallops to the skillet and spoon the lemon garlic butter sauce over them.
- Cook for an additional 1-2 minutes to heat the scallops through.
- Remove from heat and sprinkle with fresh parsley.
- Serve immediately with lemon wedges on the side.
- Enjoy your elegant and flavorful lemon garlic butter scallops!
Roasted Vegetable Quinoa Bowl

A roasted vegetable quinoa bowl is a tasty and easy dish to whip up in your RV. Load it with your favorite veggies and toss in some quinoa for a satisfying meal. It’s colorful, healthy, and perfect for a romantic dinner under the stars!
Ingredients:
- 1 cup quinoa, rinsed
- 2 cups vegetable broth or water
- 1 red bell pepper, diced
- 1 zucchini, diced
- 1 yellow squash, diced
- 1 red onion, diced
- 1 cup cherry tomatoes, halved
- 2 tbsp olive oil
- 1 tsp dried oregano
- 1 tsp dried thyme
- Salt and pepper to taste
- 1/4 cup feta cheese, crumbled (optional)
- 2 tbsp fresh parsley, chopped (for garnish)
- 1 lemon (for zest and juice)
Instructions:
- Preheat your campfire grill or portable stove to medium heat.
- In a pot, bring the vegetable broth or water to a boil.
- Add the rinsed quinoa, reduce heat to low, cover, and simmer for about 15 minutes or until the quinoa is cooked and the liquid is absorbed. Fluff with a fork and set aside.
- In a large bowl, combine the diced red bell pepper, zucchini, yellow squash, red onion, and cherry tomatoes.
- Drizzle the vegetables with olive oil and sprinkle with dried oregano, dried thyme, salt, and pepper. Toss to coat evenly.
- Spread the vegetables in a single layer on a grill grate or in a cast-iron skillet over the campfire or portable stove.
- Roast the vegetables for about 15-20 minutes, stirring occasionally, until they are tender and slightly charred.
- In a large mixing bowl, combine the cooked quinoa and roasted vegetables.
- Add the zest and juice of the lemon, and toss to combine.
- If using, sprinkle the crumbled feta cheese over the top.
- Garnish with fresh parsley.
- Serve immediately and enjoy your nutritious and flavorful roasted vegetable quinoa bowl!
Fruit and Cheese Platter

Setting up a fruit and cheese platter is easy and fun. Choose your favorite cheeses and pair them with a variety of fresh fruits like strawberries, grapes, and bananas. This colorful spread is perfect for enjoying a cozy evening outside your RV.
Ingredients:
- 1 block of sharp cheddar cheese, sliced
- 1 block of brie cheese, sliced
- 1 block of gouda cheese, sliced
- 1 cup seedless grapes (red or green)
- 1 apple, sliced
- 1 pear, sliced
- 1/2 cup dried apricots
- 1/2 cup mixed nuts (such as almonds, walnuts, and cashews)
- 1/4 cup honey or fig jam (for drizzling or dipping)
- Crackers or sliced baguette
Instructions:
- Arrange the cheese slices on a large serving platter, spacing them out evenly.
- Place the seedless grapes, apple slices, and pear slices around the cheese.
- Add the dried apricots and mixed nuts to the platter, filling in any gaps.
- Place a small bowl of honey or fig jam on the platter for drizzling or dipping.
- Arrange crackers or sliced baguette around the edges of the platter or in a separate basket.
- Garnish with fresh herbs, such as rosemary or thyme, for an added touch of elegance (optional).
- Serve immediately and enjoy your delightful and visually appealing fruit and cheese platter!
Homemade Pesto Pasta with Cherry Tomatoes
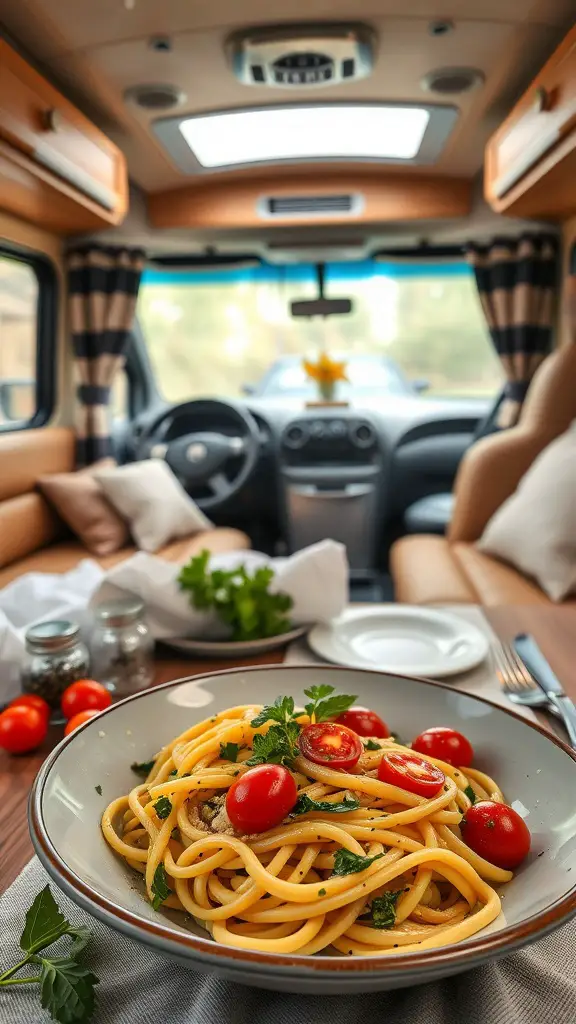
Making homemade pesto pasta with cherry tomatoes is a breeze in your RV kitchen. Just blend fresh basil, garlic, and olive oil to whip up a quick pesto, then toss it with al dente pasta and juicy cherry tomatoes. This dish not only tastes amazing but also brings a splash of color to your cozy dining space.
Homemade Pesto Pasta with Cherry Tomatoes
Ingredients:
- 12 oz pasta (such as penne or fusilli)
- 2 cups fresh basil leaves
- 1/2 cup grated Parmesan cheese
- 1/3 cup pine nuts
- 2 cloves garlic, minced
- 1/2 cup extra virgin olive oil
- Salt and pepper to taste
- 1 cup cherry tomatoes, halved
- Extra Parmesan cheese for garnish
- Fresh basil leaves for garnish
Instructions:
- Cook the pasta according to the package instructions until al dente. Drain and set aside.
- In a food processor or blender, combine the fresh basil leaves, grated Parmesan cheese, pine nuts, and minced garlic.
- Pulse until the ingredients are finely chopped.
- With the machine running, slowly add the extra virgin olive oil in a steady stream until the mixture is smooth and well combined. Season with salt and pepper to taste.
- In a large mixing bowl, toss the cooked pasta with the homemade pesto until the pasta is evenly coated.
- Gently fold in the halved cherry tomatoes.
- Transfer the pesto pasta to a serving dish.
- Garnish with extra grated Parmesan cheese and fresh basil leaves.
- Serve immediately and enjoy your fresh and flavorful homemade pesto pasta with cherry tomatoes!


