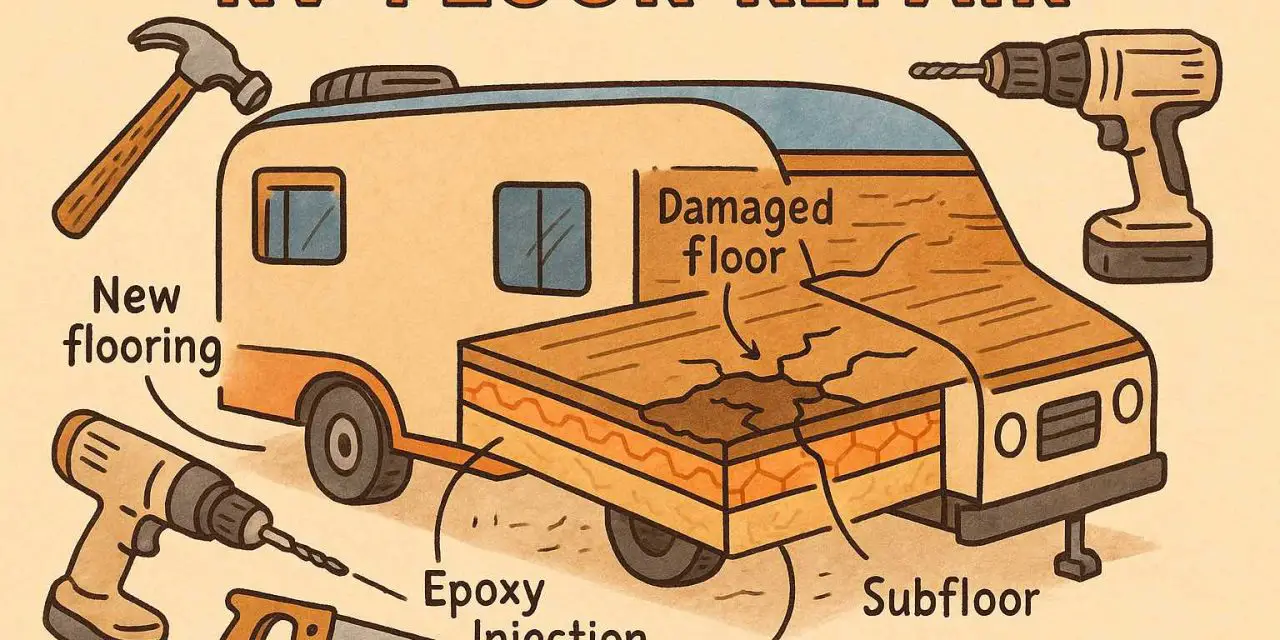
Feeling that dreaded soft spot under your feet when you walk through your RV? Don’t panic! Your RV floor can absolutely be repaired, and you don’t need to break the bank or replace your entire rig to do it.
The short answer is YES – RV floors can definitely be repaired! Whether you’re dealing with a small soft spot or extensive water damage, there are proven methods to restore your RV floor’s strength and safety.
From simple epoxy injections costing under $50 to complete subfloor replacements, this guide covers every repair method you need to know.
What Causes RV Floor Damage? (Know Your Enemy)
Before diving into repairs, let’s understand what you’re fighting against. Water is your RV floor’s biggest enemy, but it’s not the only culprit:
Primary Causes:
- Water leaks from roof, windows, or plumbing
- Humidity buildup in enclosed spaces
- Normal wear and tear from foot traffic
- Poor construction in some RV models
- Overloaded areas near slides or heavy appliances
Warning Signs to Watch For:
- Spongy or bouncy feeling when walking
- Squeaking or creaking sounds underfoot
- Visible sagging or uneven surfaces
- Musty odors indicating mold growth
- Discoloration around damaged areas
The key is catching these problems early – a $100 repair today can save you thousands later!
How to Assess Your RV Floor Damage (Detective Work)
Before grabbing tools, you need to play detective. Here’s your step-by-step damage assessment:
The Poke Test:
- Walk your entire RV and note any soft spots
- Use a screwdriver to gently probe suspicious areas
- Check moisture levels with a moisture meter (under $30)
- Look for water sources – roof leaks, window seals, plumbing
Damage Scale Guide:
| Damage Level | Description | Best Repair Method |
|---|---|---|
| Minor | Small soft spot, no rot visible | Epoxy injection |
| Moderate | Larger soft area, some discoloration | Partial subfloor replacement |
| Severe | Extensive rot, structural damage | Full subfloor replacement |
| Critical | Floor joists affected | Professional repair recommended |
Would you like to save this article?
15 Proven RV Floor Repair Methods (From Simple to Advanced)
Quick Fix Methods (Under $100)
1. Epoxy Injection Technique Perfect for small soft spots without visible rot
What You’ll Need:
- Marine-grade epoxy resin
- Drill with small bits
- Injection pump or syringe
Steps:
- Drill small holes in a grid pattern over the soft area
- Mix epoxy according to manufacturer instructions
- Inject epoxy into holes until they overflow
- Weight down the area for 24-48 hours
- Sand smooth and apply finish
This method works great for compressed foam cores and minor water damage.
2. Wood Hardener Application Ideal for early-stage dry rot
Process:
- Clean the damaged area completely
- Apply wood hardener with a brush
- Let cure for recommended time
- Sand and refinish as needed
Moderate Repair Methods ($100-$500)
3. Partial Subfloor Replacement Best for localized damage
Materials Needed:
- Marine-grade plywood (matching thickness)
- Circular saw
- Wood glue and screws
- Moisture barrier
Step-by-Step Process:
- Remove flooring around damaged area
- Cut out rotted section in a clean rectangle
- Check surrounding wood for stability
- Install new plywood piece with glue and screws
- Sand edges smooth and seal
- Install new flooring over repair
4. Foam Core Restoration Specifically for RVs with foam core construction
- Remove damaged foam carefully
- Dry area completely (use fans if needed)
- Apply mold killer to prevent future growth
- Install new foam insulation
- Cover with thin plywood or composite material
Advanced Repair Methods ($500-$1,500)
5. Complete Subfloor Replacement When damage is extensive
This is a weekend project requiring intermediate DIY skills:
Phase 1: Removal
- Strip all flooring materials
- Remove damaged subfloor completely
- Inspect floor joists for damage
- Replace any rotted joists if necessary
Phase 2: Installation
- Install moisture barrier over joists
- Cut new subfloor to exact measurements
- Secure with construction adhesive and screws
- Ensure level surface throughout
Phase 3: Finishing
- Sand any uneven areas
- Apply primer/sealer to new wood
- Install chosen flooring material
Professional vs. DIY: Making the Right Choice
DIY is Perfect When:
- Damage is localized (under 4 square feet)
- You have basic tools and skills
- No structural damage to floor joists
- Budget is tight (save 50-70% on labor)
Call Professionals If:
- Extensive water damage throughout RV
- Floor joists need replacement
- Electrical or plumbing runs through damaged area
- You lack time or tools for the project
Cost Breakdown: What You’ll Really Spend
| Repair Type | DIY Cost | Professional Cost | Time Required |
|---|---|---|---|
| Epoxy injection | $30-$80 | $200-$400 | 4-6 hours |
| Small patch repair | $100-$250 | $500-$800 | 1-2 days |
| Partial replacement | $200-$500 | $800-$1,500 | 2-3 days |
| Complete replacement | $500-$1,200 | $2,000-$4,000 | 3-5 days |
Costs vary based on RV size, damage extent, and regional labor rates.
Essential Tools and Materials List
Basic Tool Kit:
- Circular saw with fine-tooth blade
- Drill/driver with various bits
- Pry bar and hammer
- Shop vacuum for cleanup
- Safety gear (goggles, gloves, mask)
- Moisture meter for testing
- Level for checking flatness
Materials You’ll Need:
- Marine-grade plywood (¾” typical)
- Epoxy resin for strengthening
- Wood glue (waterproof type)
- Stainless steel screws (won’t rust)
- Mold killer/treatment
- Primer and sealant
- New flooring material
Pro Shopping Tips:
- Buy 10% extra materials – mistakes happen!
- Choose marine-grade materials for durability
- Match existing thickness exactly
- Consider future maintenance when selecting materials
Step-by-Step Video Tutorials
Here are the most helpful video tutorials from experienced RV repair professionals:
Epoxy Injection Method:
Water Damage Floor Repair:
Complete Floor Replacement:
Flooring Material Options (Upgrade While You Repair)
Best Flooring Types for RVs:
Luxury Vinyl Plank (LVP)
- 100% waterproof – perfect for RVs
- Easy installation with click-lock system
- Looks like hardwood but much more durable
- Cost: $2-$5 per square foot
Sheet Vinyl
- Seamless installation reduces leak potential
- Budget-friendly option
- Easy to clean and maintain
- Cost: $1-$3 per square foot
Laminate Flooring
- Attractive wood appearance
- Moderate water resistance
- Good for dry areas only
- Cost: $1.50-$4 per square foot
Ceramic Tile
- Extremely durable
- 100% waterproof
- Heavy – consider weight limits
- Cost: $2-$8 per square foot
Prevention: Stop Problems Before They Start
Regular Maintenance Checklist:
- Inspect roof seals every 6 months
- Check window seals for cracks
- Test plumbing connections annually
- Use dehumidifiers in humid climates
- Clean up spills immediately
- Monitor moisture levels with a meter
Smart Prevention Tips:
- Install moisture alarms in high-risk areas
- Use protective mats in heavy-traffic zones
- Ensure proper ventilation throughout RV
- Address small leaks immediately
- Choose quality sealants for exterior work
Common Mistakes to Avoid (Learn from Others)
Top 5 DIY Mistakes:
- Skipping moisture testing – always verify area is dry
- Using wrong materials – marine-grade is worth the cost
- Rushing the process – patience prevents problems
- Ignoring the source – fix leaks before repairing floors
- Poor ventilation – work safely with proper airflow
Material Selection Errors:
- Particle board instead of plywood – it fails when wet
- Interior-grade adhesives – use exterior/marine types
- Mismatched thickness – creates uneven surfaces
- Cheap fasteners – they rust and fail
When to Walk Away: Knowing Your Limits
Red Flags for Professional Help:
- Structural damage to floor joists
- Electrical wiring runs through damage area
- Multiple leak sources requiring expertise
- Mold contamination throughout RV
- Slide-out mechanism involvement
Safety Considerations:
- Structural integrity compromised
- Toxic mold present
- Electrical hazards in work area
- Propane lines nearby
- Your skill level insufficient for complexity
Frequently Asked Questions
Q: How long do RV floor repairs last? A: Properly done repairs can last 10-15 years or more. The key is using quality materials and addressing the root cause of damage.
Q: Can I repair an RV floor from underneath? A: Yes, in some cases. If you can access the underside, you can often make repairs without removing interior flooring. This works well for epoxy injection and reinforcement methods.
Q: What’s the strongest material for RV subfloors? A: Marine-grade plywood is the gold standard. It’s specifically designed to resist moisture and maintain strength in harsh conditions.
Q: How do I know if my floor joists need replacement? A: Visual inspection is key. Look for soft spots, discoloration, or crumbling wood. If a screwdriver easily penetrates the joist, it needs replacement.
Q: Can I use regular home improvement materials? A: Not recommended. RVs face unique challenges with vibration, moisture, and weight restrictions. Always use RV or marine-grade materials.
Q: How do I prevent future floor problems? A: Prevention is everything: Regular inspections, prompt leak repairs, proper ventilation, and moisture control are your best defenses.
Final Thoughts: Your RV Floor Can Be Saved
Yes, RV floors can absolutely be repaired – and often for much less than you might expect! Whether you’re dealing with a small soft spot that needs a $50 epoxy injection or extensive damage requiring a complete subfloor replacement, there’s a solution within your budget and skill level.
The key to success is acting quickly when you notice problems, choosing the right repair method for your situation, and using quality materials that will stand up to RV life.
Remember: Every RV owner faces floor issues eventually. You’re not alone, and your RV isn’t doomed. With the right approach, your repaired floor can actually be stronger and more durable than the original!
Ready to get started? Begin with a thorough damage assessment, choose your repair method, gather quality materials, and take your time. Your future self will thank you for the investment in keeping your home-on-wheels road-ready for years to come.
Sources:


