So you’ve just arrived at your dream campsite after hours of driving, and you’re eager to set up camp and start relaxing. Your RV isn’t quite level, but those slide-outs are calling your name – wouldn’t it be easier to just extend them first and then worry about leveling? This common scenario raises a critical question that every RV owner should know the answer to: can you level RV with slides out?
The short answer might surprise you, and getting it wrong could lead to costly structural damage or safety hazards that turn your perfect getaway into a nightmare.
Key Takeaways
• Safety First: It’s almost always safest to level your RV with slides retracted, then extend them only after achieving proper stability [1]
• Auto-Leveling Exception: Some RVs with automatic leveling systems can handle slides being out, but you must verify this capability in your owner’s manual [1]
• No Manual Adjustments: Never adjust leveling jacks while slides are extended – this can cause structural damage and safety issues [4]
• Stabilizers vs. Levelers: Understand the difference between stabilizing jacks (for support) and leveling jacks (for positioning) [1][2]
• Manufacturer Guidelines: Always consult your specific RV model’s documentation before attempting any leveling procedure [1]
Understanding RV Leveling Systems and Slide-Out Mechanics
Would you like to save this article?
The Fundamentals of RV Leveling
RV leveling serves multiple critical purposes beyond just comfort. A properly leveled RV ensures that:
- Appliances function correctly 🏠 (refrigerators, water systems, propane equipment)
- Doors and drawers operate smoothly
- Slide-outs extend and retract without binding
- Structural stress is distributed evenly
- Safety systems work as designed
When considering whether you can level RV with slides out, it’s essential to understand that your RV’s frame and leveling system work together as an integrated unit. The relationship between these components becomes more complex when slide-outs are extended.
Types of RV Leveling Systems
Manual Leveling Systems
- Require physical operation of individual jacks
- Operator controls each corner independently
- More time-consuming but offer precise control
- Generally require slides to be retracted during leveling [2]
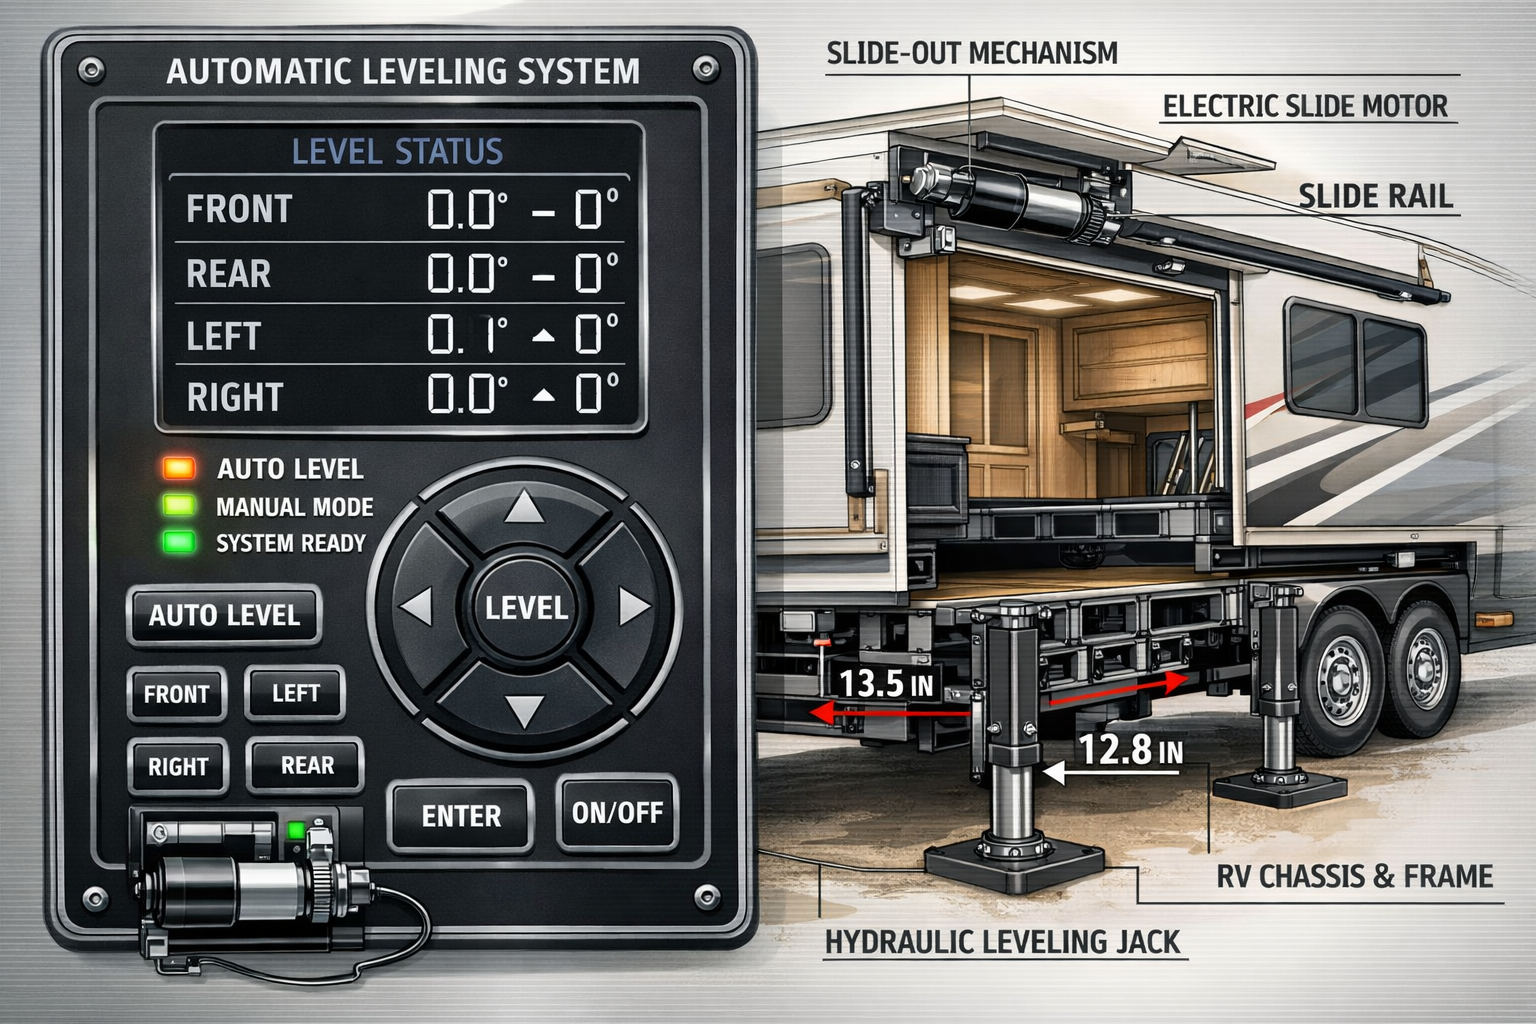
Automatic Leveling Systems
- Computer-controlled hydraulic or electric systems
- Can level the entire RV with the push of a button
- Some models can accommodate extended slides
- Must verify capability in owner’s manual [1]
Semi-Automatic Systems
- Combination of automatic and manual controls
- Often allow for fine-tuning after initial auto-leveling
- Capabilities vary significantly by manufacturer
How Slide-Outs Affect RV Structure
When slide-outs extend, they fundamentally change your RV’s:
- Weight distribution
- Structural rigidity
- Center of gravity
- Stress points on the frame
These changes are why the question “can you level RV with slides out” doesn’t have a universal answer – it depends entirely on your specific RV’s design and engineering.
Can You Level RV With Slides Out? Expert Analysis and Safety Considerations
The Professional Consensus
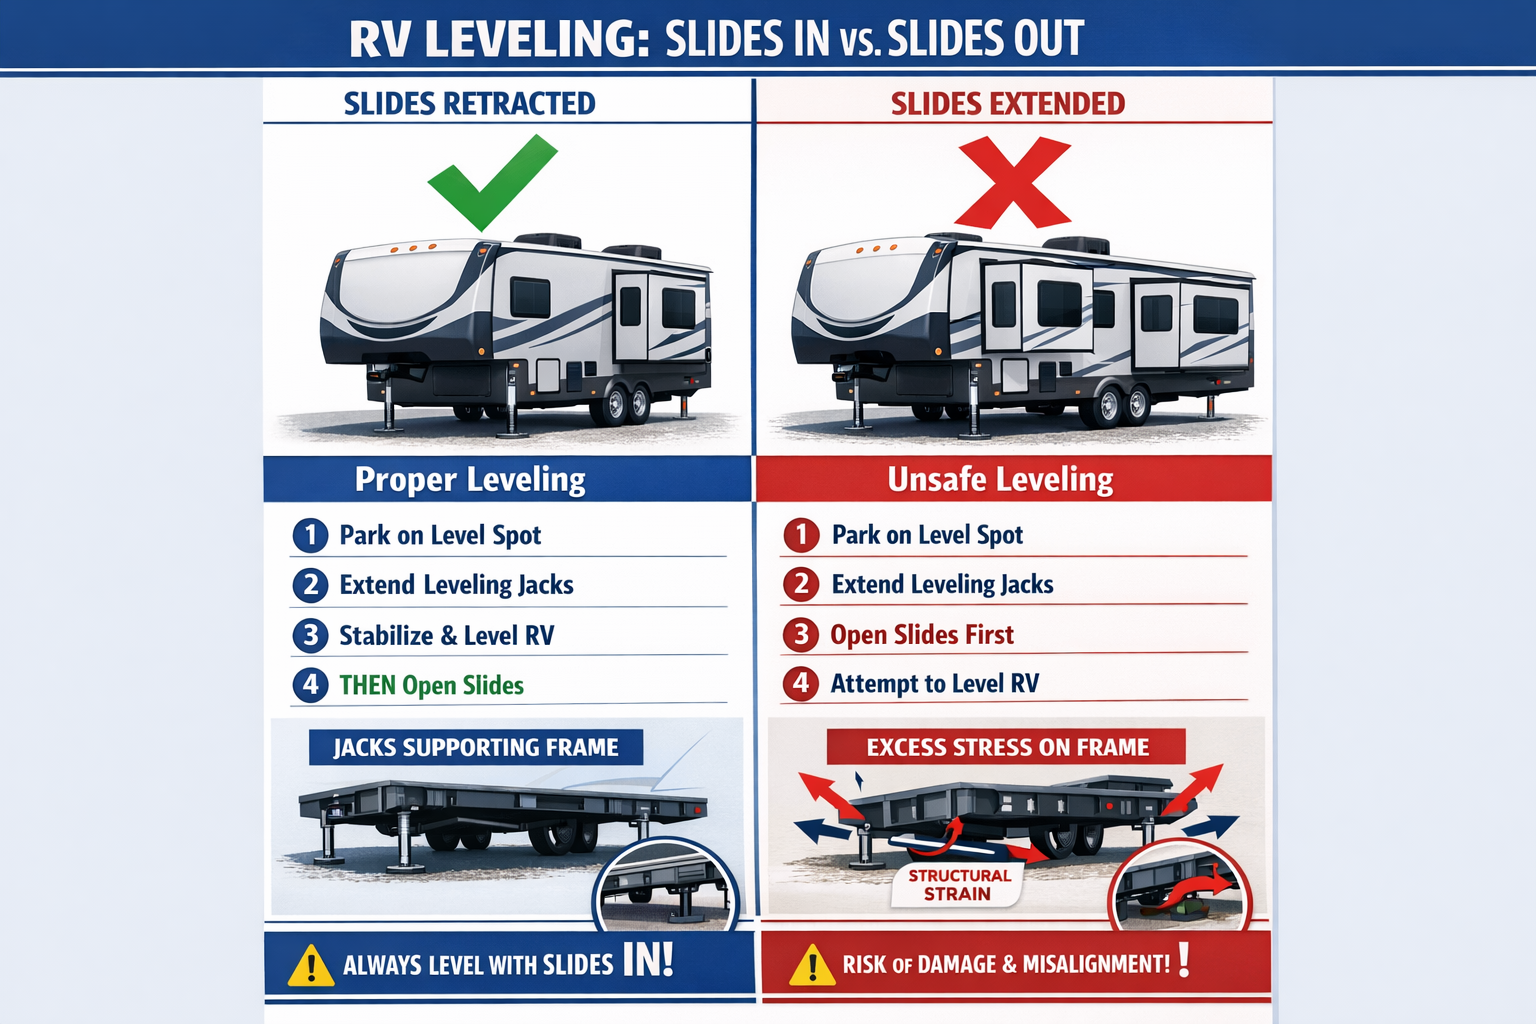
According to industry experts and RV manufacturers, the overwhelming recommendation is clear: it is “almost always safest to level your RV with the slides in, extending only once the RV is level and stable” [1]. This guidance isn’t arbitrary – it’s based on decades of engineering experience and real-world performance data.
Why Slides-In Leveling Is Preferred
Structural Integrity Protection 🔧
When slides are retracted, your RV maintains its designed structural rigidity. The frame can handle the stresses of leveling without the additional complexity of extended rooms that may flex or bind during the process.
Precise Leveling Achievement
With slides retracted, you’re working with the RV’s core structure, making it easier to achieve accurate leveling. This precision becomes the foundation for everything else – including smooth slide-out operation.
Reduced Risk of Binding
Slide-out mechanisms are designed to operate on level surfaces. Attempting to level with slides extended can cause binding, which may damage the slide mechanisms or require costly repairs.
When Might Leveling With Slides Out Be Acceptable?
Automatic Leveling Systems with Manufacturer Approval
Some RVs equipped with sophisticated automatic leveling systems can handle the complexity of leveling with slides extended. However, this capability must be explicitly verified in your specific model’s owner’s manual [1]. Never assume your system can handle this without documentation.
Emergency Situations Only
There may be rare circumstances where minor adjustments are necessary with slides out, but these should be:
- Minimal adjustments only
- Performed with extreme caution
- Followed by proper releveling with slides retracted when possible
Critical Safety Warnings
⚠️ Never Adjust Leveling Jacks With Slides Extended for Initial Leveling
The research is clear: you should not adjust leveling jacks with slides out to achieve proper leveling [4]. Instead, the proper sequence is:
- Get the RV perfectly level first
- Extend slides
- Reset calibration if needed (without major adjustments)
Structural Damage Concerns
Experienced RV owners report avoiding jack adjustments with slides extended due to concerns about potential flexing damage to the structure [3]. The additional weight and changed dynamics can create stress points that weren’t designed to handle leveling forces.
Step-by-Step Guide: Proper RV Leveling Sequence
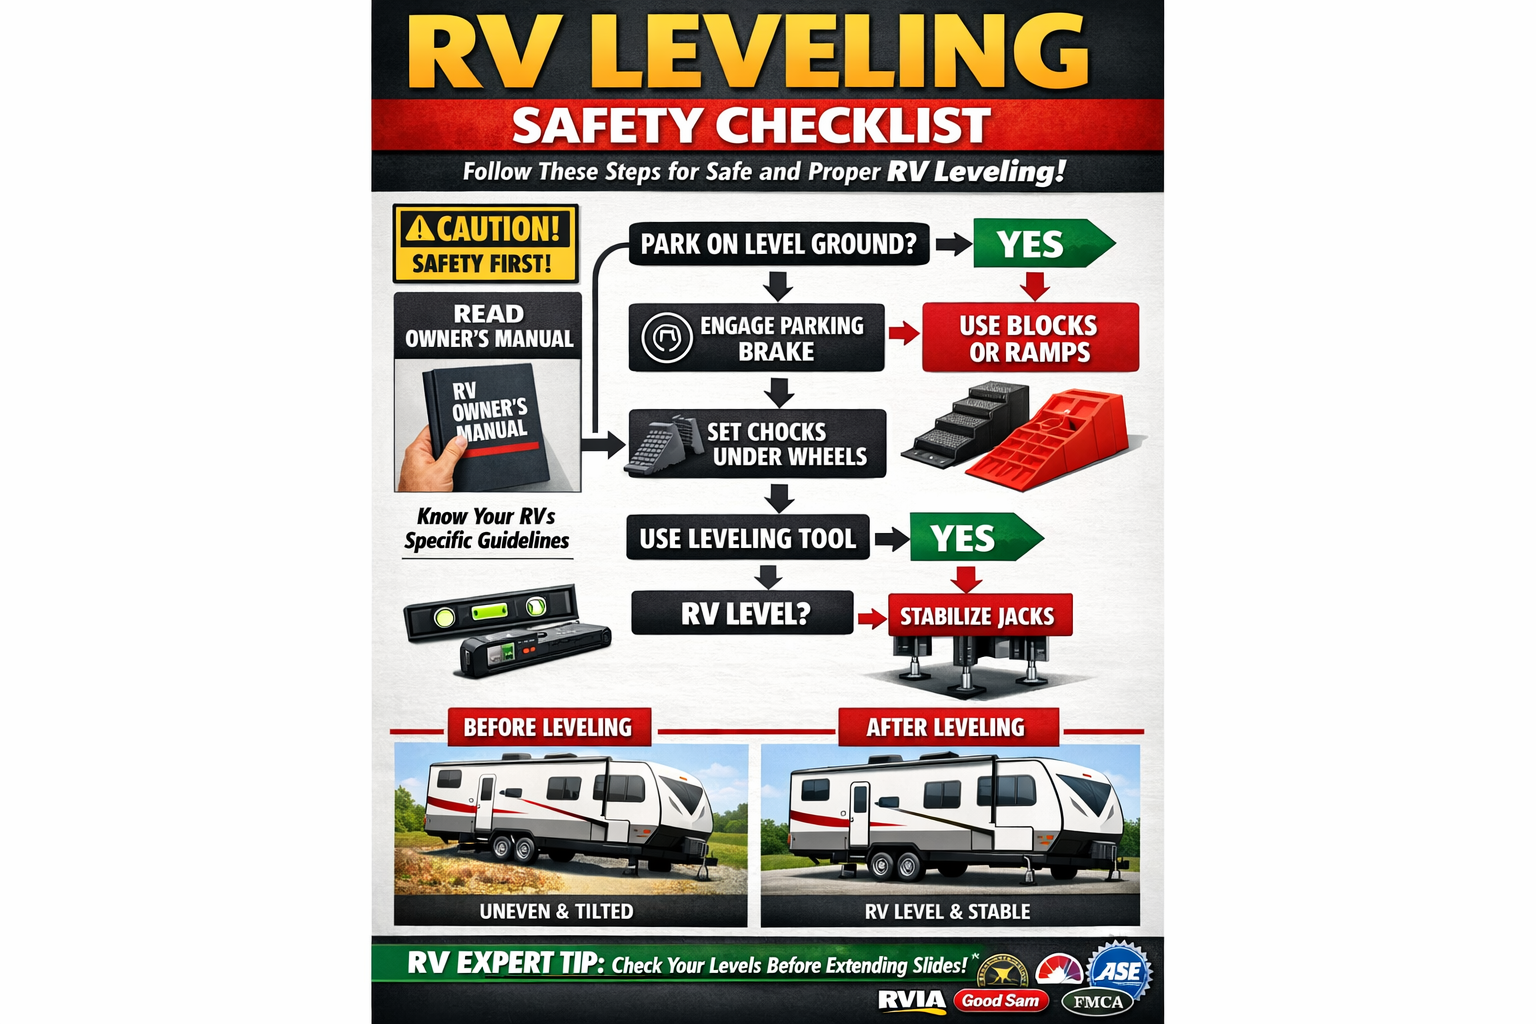
Phase 1: Pre-Leveling Preparation
1. Site Assessment 📍
- Choose the most level spot available
- Clear debris and check for soft ground
- Ensure adequate clearance for slide-outs when extended
- Verify electrical hookups are accessible
2. Initial Positioning
- Park with slides fully retracted
- Engage parking brake
- Turn off propane (safety precaution)
- Gather leveling tools and equipment
3. Safety Setup
- Place wheel chocks (if required by your system)
- Ensure all passengers are out of the RV
- Have your owner’s manual readily available
Phase 2: The Leveling Process
Step 1: Check Initial Level
Use a quality bubble level or your RV’s built-in leveling system to assess the current state. Check both side-to-side and front-to-back level.
Step 2: Begin Leveling (Slides Retracted)
- For Manual Systems: Start with the low corner and work systematically [2]
- For Automatic Systems: Follow manufacturer’s button sequence
- For All Systems: Make gradual adjustments
Step 3: Achieve Precise Level
Take your time to get the RV perfectly level. This precision will pay dividends when you extend your slides. Always keep slides retracted during the initial leveling process [2].
Step 4: Verify Stability
Before proceeding, ensure your RV is:
- Completely level in all directions
- Stable with no rocking or movement
- Properly supported by all leveling points
Phase 3: Post-Leveling and Slide Extension
Step 5: Extend Slides
Only after achieving perfect level should you extend slides once the RV is level and stable [2]. This sequence ensures:
- Smooth slide operation
- No binding or stress on mechanisms
- Proper weight distribution
Step 6: Deploy Stabilizer Jacks
Now deploy your stabilizer jacks. Remember: stabilizing jacks are only for support after leveling is complete and should be equally extended [1]. These jacks are not intended to lift the full weight of the RV during the leveling process [1][2].
Step 7: Final Verification
- Recheck level with slides extended
- Test slide operation (retract and extend once to ensure smooth operation)
- Verify all systems are functioning properly
Common Mistakes to Avoid
❌ Don’t confuse stabilizer jacks with leveling jacks
❌ Don’t attempt major leveling adjustments with slides out
❌ Don’t skip consulting your owner’s manual
❌ Don’t rush the leveling process
❌ Don’t ignore signs of binding or stress
Troubleshooting Common Leveling Scenarios
Scenario 1: RV Goes Out of Level After Extending Slides
What’s Happening: This is actually normal in many RVs. The extended slides change weight distribution, which can affect level readings.
Solution:
- Do NOT attempt to re-level with slides extended
- Retract slides
- Re-level the RV properly
- Extend slides again
- If problem persists, consult your dealer
Scenario 2: Slides Won’t Extend After Leveling
Possible Causes:
- RV not level enough for slide mechanisms
- Electrical issues
- Mechanical binding
- Low battery voltage
Troubleshooting Steps:
- Verify RV is truly level (use multiple measurement points)
- Check electrical connections and battery voltage
- Inspect slide mechanisms for obstructions
- Consult owner’s manual for specific error codes
Scenario 3: Automatic Leveling System Errors
When It Happens: Your auto-leveling system displays error codes or fails to complete the cycle.
Response Protocol:
- Stop immediately – don’t force the system
- Consult error code meanings in owner’s manual
- Check for obvious obstructions or issues
- Contact manufacturer support if needed
- Have manual override procedures ready
Scenario 4: Ground Conditions Complicate Leveling
Soft or Uneven Ground:
- Use leveling blocks or pads to create stable foundation
- Consider moving to a different spot if conditions are too poor
- Never compromise safety for convenience
Sloped Sites:
- Assess whether the slope exceeds your system’s capabilities
- Use wheel chocks appropriately
- Consider alternative parking positions
Advanced Tips for Different RV Types and Systems
Class A Motorhomes
Class A motorhomes typically have the most sophisticated leveling systems and may offer more flexibility regarding slide operation. However, the fundamental safety principle remains: verify capabilities in your owner’s manual before attempting to level with slides extended [1].
Special Considerations:
- Larger size means greater structural stresses
- More complex slide systems
- Often equipped with advanced auto-leveling
- Higher stakes for getting it wrong
Travel Trailers and Fifth Wheels
These RVs typically require manual or semi-automatic leveling and generally should follow the strict slides-in leveling protocol.
Key Points:
- Manual systems require more operator skill
- Weight distribution changes more dramatically with slides
- Stabilizer jack placement is critical [2]
- Tongue weight affects leveling (fifth wheels)
Class B and Class C Motorhomes
Smaller RVs may have simpler systems but still require proper procedures.
Considerations:
- Often have fewer or smaller slides
- May have less sophisticated leveling systems
- Still subject to structural stress concerns
- Owner’s manual guidance remains critical
Manufacturer-Specific Guidelines and System Variations
Reading Your Owner’s Manual Effectively
Your owner’s manual contains the definitive answer to whether you can level RV with slides out for your specific model. Look for:
Key Sections to Review:
- Leveling system operation
- Slide-out operation procedures
- Safety warnings and cautions
- Troubleshooting guides
- System limitations
What to Look For:
- Explicit statements about leveling with slides extended
- Sequence requirements
- System capabilities and limitations
- Warning about what NOT to do
Popular Leveling System Brands
Lippert Components
- Offers various automatic and manual systems
- Provides detailed operation guides [2]
- Emphasizes proper sequencing
HWH Corporation
- Specializes in hydraulic leveling systems
- Known for robust automatic systems
- Provides comprehensive training materials
Bigfoot Leveling Systems
- Electric leveling solutions
- Focus on ease of use
- Detailed operational procedures
When to Contact Manufacturer Support
Don’t hesitate to contact manufacturer support when:
- Owner’s manual guidance is unclear
- You experience system malfunctions
- You’re unsure about your system’s capabilities
- You need clarification on proper procedures
Safety Protocols and Best Practices
Pre-Trip Planning
Campground Research 🏕️
- Look for level sites when making reservations
- Read reviews mentioning site conditions
- Have backup plans for challenging locations
Equipment Maintenance
- Regularly inspect leveling jacks and mechanisms
- Keep leveling blocks and tools in good condition
- Test systems before departure
Knowledge Updates
- Stay current with manufacturer updates
- Join RV forums for shared experiences
- Attend RV shows and educational seminars
Emergency Procedures
System Failure Response
- Stop all operations immediately
- Ensure RV is stable and safe
- Consult emergency procedures in owner’s manual
- Contact roadside assistance if needed
- Document issues for warranty/service purposes
Manual Override Procedures
- Know how to manually operate your leveling system
- Keep necessary tools accessible
- Practice procedures in safe environments
- Understand limitations of manual operation
Regular Maintenance Requirements
Monthly Checks:
- Inspect leveling jacks for damage or wear
- Test system operation
- Check fluid levels (hydraulic systems)
- Verify electrical connections
Annual Service:
- Professional system inspection
- Lubrication of moving parts
- Calibration verification
- Component replacement as needed
Cost Considerations and Damage Prevention
Financial Impact of Improper Leveling
Potential Repair Costs:
- Slide mechanism damage: $2,000-$8,000+
- Structural frame damage: $5,000-$15,000+
- Interior damage from shifting: $1,000-$5,000+
- Appliance damage: $500-$3,000+
Insurance Considerations:
- Many policies exclude damage from improper operation
- Manufacturer warranties may be voided
- Document proper procedures for claims
Preventive Measures
Investment in Quality Equipment:
- Professional-grade leveling tools
- Quality leveling blocks and pads
- Reliable bubble levels or digital systems
- Emergency manual override tools
Education and Training:
- Manufacturer training programs
- RV dealer orientation sessions
- Online educational resources
- Hands-on practice in controlled environments
Technology Trends and Future Developments
2026 Leveling System Innovations
Smart Leveling Technology 📱
- Smartphone app integration
- Remote monitoring capabilities
- Predictive maintenance alerts
- GPS-based site condition databases
Enhanced Safety Features:
- Automatic slide lockout during leveling
- Advanced stress monitoring
- Fail-safe mechanisms
- Improved error diagnostics
Integration Improvements:
- Better coordination between leveling and slide systems
- More sophisticated weight distribution calculations
- Enhanced user interfaces
- Simplified operation procedures
Looking Ahead
As RV technology continues to evolve, the question “can you level RV with slides out” may have different answers for future models. However, the fundamental principles of safety, proper procedure, and manufacturer guidance will remain constant.
Conclusion
The question of whether you can level RV with slides out has a clear answer rooted in safety and engineering principles: it’s almost always safest to level your RV with slides retracted first, then extend them once the RV is properly level and stable [1]. While some advanced automatic leveling systems may offer exceptions to this rule, these capabilities must be explicitly verified in your owner’s manual before attempting [1].
The proper sequence – level first, then extend slides – isn’t just a recommendation; it’s a critical safety protocol that protects your investment and ensures your family’s safety. Attempting to adjust leveling jacks with slides extended can lead to structural damage, mechanism failure, and costly repairs that could have been easily avoided [4].
Your Action Plan
- Locate and thoroughly read your RV’s owner’s manual – particularly sections on leveling and slide operation
- Practice the proper leveling sequence in a safe, controlled environment before your next trip
- Invest in quality leveling equipment and learn to use it properly
- When in doubt, contact your RV manufacturer or dealer for clarification on your specific model’s capabilities
- Never compromise safety for convenience – the few extra minutes to do it right can save thousands in repairs
Remember, every RV is different, and specific guidance varies by RV model and leveling system type, making consultation of the manufacturer’s instructions essential before attempting any leveling procedure [1]. Your owner’s manual is the ultimate authority for your specific RV.
By following these guidelines and maintaining a safety-first approach, you’ll enjoy many years of trouble-free RV adventures with properly functioning slides and leveling systems. The investment in doing it right pays dividends in safety, longevity, and peace of mind on every trip.
References
[1] Tips Tricks To Level Your Rv – https://www.transwest.com/rv/blog/tips-tricks-to-level-your-rv/
[2] Tools And Steps To Leveling Your Rv Travel Trailer – https://www.lippert.com/blog/tools-and-steps-to-leveling-your-rv-travel-trailer
[3] Relevel Slides Out Ok – https://www.mygrandrv.com/threads/relevel-slides-out-ok.71231/
[4] brinkleyowners – https://brinkleyowners.com/t/intimidated-by-leveling-system-s-for-my-2026-z3610/9150
[5] Watch – https://www.youtube.com/watch?v=lnw1BJ27M4k
[6] Do Rvs With Slide Rooms Need Leveling Jacks What About Units On Lots Rvdt 2222 – https://www.rvtravel.com/do-rvs-with-slide-rooms-need-leveling-jacks-what-about-units-on-lots-rvdt-2222/


