Would you like to save this article?
Picture your once-vibrant RV now sporting faded paint, stubborn oxidation, and outdated colors that scream “last decade.” The question “can you paint an RV exterior?” isn’t just about aesthetics—it’s about protecting your investment and personalizing your home on wheels. Yes, you absolutely can paint an RV exterior, and many RV owners successfully tackle this project themselves with proper preparation, the right materials, and patience.
Key Takeaways
- Painting an RV exterior is achievable for DIY enthusiasts willing to invest time in thorough surface preparation and proper technique
- Automotive-grade polyurethane paint delivers the most durable, professional results for RV exteriors, though marine-grade epoxy and exterior latex are viable alternatives
- Surface preparation accounts for 80% of success—power washing, sanding, and priming are non-negotiable steps
- Budget between $300-$1,500 for DIY projects depending on RV size and paint quality, compared to $3,000-$15,000 for professional repaints
- Proper technique matters more than speed—multiple thin coats applied with a paint sprayer produce better results than rushing with thick applications
Quick Answer: Can You Paint an RV Exterior?
Yes, RV owners can successfully paint their RV exteriors with proper preparation and materials. The process involves thorough cleaning, surface sanding, removal or coverage of decals, application of automotive or RV-specific primer, and multiple thin coats of appropriate exterior paint. Automotive-grade polyurethane paint is the gold standard used on most new RVs and professional repaints[4], though marine-grade epoxy and high-quality exterior latex paints also deliver durable results when properly applied.
Why Would You Want to Paint Your RV Exterior?
RV owners paint their exteriors for several compelling reasons beyond simple cosmetic updates. Understanding these motivations helps determine whether painting makes sense for your specific situation.
Fading and oxidation represent the most common reason for RV repaints. RV paint typically includes multiple clear coat layers that fade under constant UV exposure[5], leaving once-vibrant colors looking chalky and dull. This degradation accelerates in sunny climates where RVs spend significant time outdoors.
Protection and preservation matter just as much as appearance. A fresh paint job seals the underlying fiberglass or aluminum from moisture intrusion, preventing more costly structural damage down the road. Think of paint as armor for your RV’s exterior surfaces.
Personalization and resale value also drive painting decisions. Many RV owners inherit or purchase used units with dated color schemes or advertising graphics they’d rather remove. A fresh, modern paint job can:
- Increase resale value by $2,000-$5,000 on average
- Transform an outdated look into contemporary styling
- Remove commercial branding or previous owner customizations
- Match tow vehicles or personal aesthetic preferences
- Cover minor damage like scratches, dings, or discoloration
Cost savings compared to professional work make DIY painting attractive. Professional RV paint jobs range from $3,000 for small travel trailers to $15,000+ for large Class A motorhomes, while DIY projects typically cost $300-$1,500 in materials.
What Type of Paint Should You Use on an RV Exterior?
Choosing the right paint determines how long your hard work lasts and how professional the finished product looks. RV exteriors face harsher conditions than houses—constant vibration, extreme temperature swings, UV bombardment, and road debris.
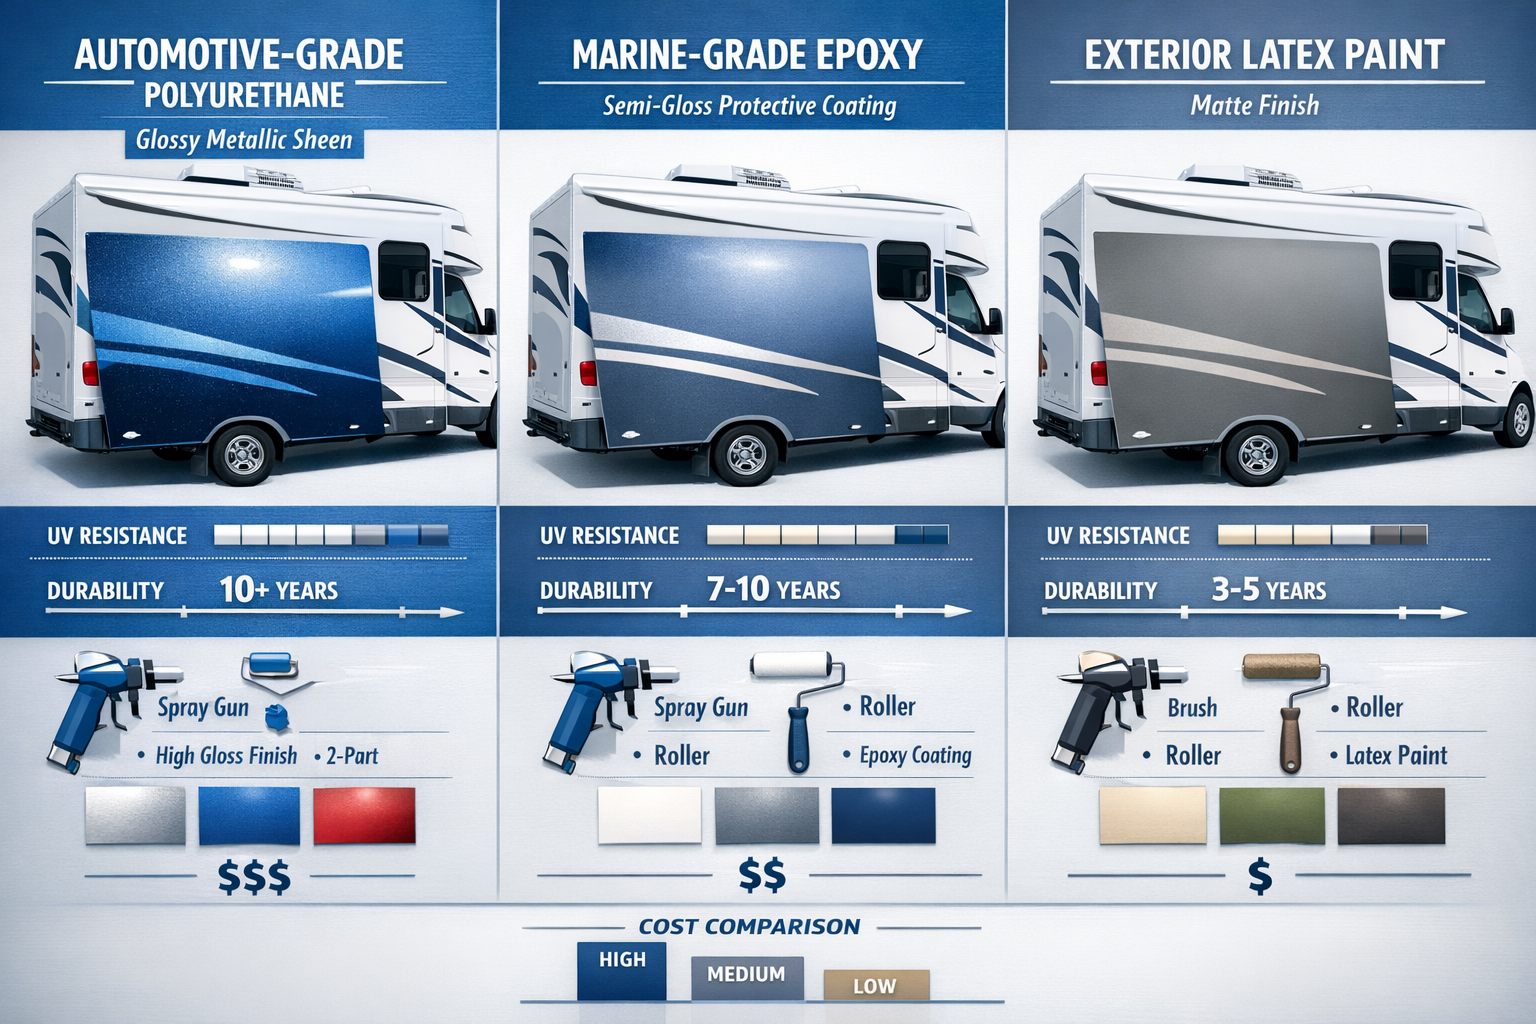
Automotive-grade polyurethane paint stands as the gold standard for most new RVs and professional repaints[4]. This paint type offers:
- Superior UV resistance that prevents fading
- Excellent adhesion to fiberglass and aluminum
- High gloss finish that looks factory-fresh
- Chemical resistance against road salt and cleaners
- Flexibility that moves with RV body flex during travel
Marine-grade epoxy paint provides another excellent option for RV painting[4]. Originally designed for boats, this paint handles moisture exposure exceptionally well and bonds tenaciously to various substrates. Marine epoxy works particularly well for RVs stored in humid climates or near coastal areas.
Exterior latex paint has proven durability in real-world applications. One experienced RV owner reported successful results lasting 10+ years with exterior latex, while oil-based exterior paint flaked within one year on the same RV[2]. This surprising finding challenges conventional wisdom, though results vary based on surface preparation and specific product formulations.
Paint Type Comparison
| Paint Type | Durability | UV Resistance | Cost (per gallon) | Best For |
|---|---|---|---|---|
| Automotive Polyurethane | Excellent (8-12 years) | Excellent | $150-$300 | Full-time RVers, hot climates |
| Marine Epoxy | Excellent (8-15 years) | Very Good | $120-$250 | Humid climates, coastal storage |
| Exterior Latex | Good (5-10 years) | Good | $40-$80 | Budget builds, weekend warriors |
| Oil-Based Exterior | Poor on RVs (1-3 years) | Fair | $50-$90 | Not recommended |
Choose automotive polyurethane if you want the longest-lasting, most professional results and can invest in quality materials. Choose marine epoxy if moisture resistance matters most or you’re painting an RV stored near water. Choose exterior latex if you’re on a tight budget and willing to repaint more frequently.
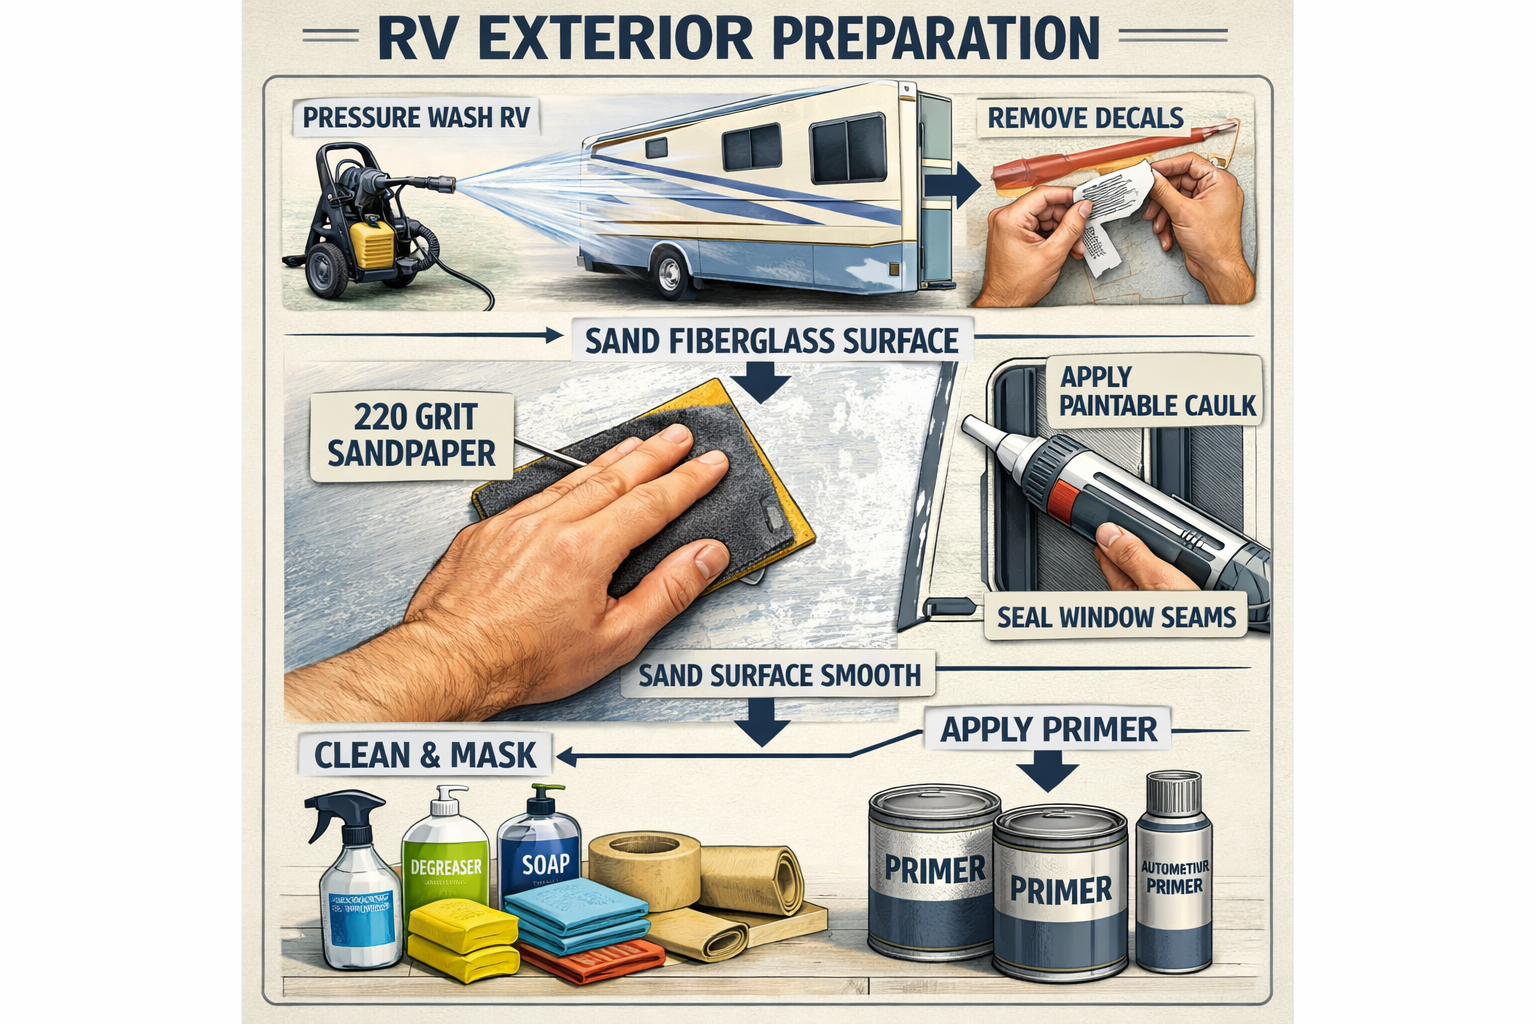
How Do You Prepare an RV Exterior for Painting?
Surface preparation determines whether your paint job lasts one year or ten. Rushing this phase guarantees disappointing results, while methodical preparation creates a foundation for professional-quality finishes.
Power wash the entire exterior, including the roof, to remove dirt, mold, road grime, and oxidized paint residue[2]. Use a pressure washer set to 1,500-2,000 PSI—high enough to clean effectively but not so powerful it damages seals or forces water into seams. Pay special attention to:
- Roof vents and air conditioner areas
- Slide-out mechanisms and seals
- Wheel wells and undercarriage edges
- Window and door frames
- Any textured or patterned surfaces
Sand the surface with 180-220 grit sandpaper to improve paint adhesion[1][2]. This step creates microscopic scratches that give paint something to grip. You don’t need to remove all existing paint—just scuff the surface enough to eliminate gloss and create texture. For large RVs, rent or purchase an orbital sander to save days of hand-sanding labor.
Remove old decals or paint over them if removal proves too difficult[1][2]. Decal removal requires patience—heat them with a hair dryer or heat gun, then peel slowly while applying adhesive remover. Stubborn decals can be painted over if they’re smooth and firmly adhered, though slight edges may show through thin paint coats.
Seal corners and windows with paintable caulk before painting[2]. Inspect every seam, joint, and penetration for gaps or cracks. Fresh caulk prevents moisture intrusion and creates smooth transitions that look professional when painted. Use caulk specifically labeled as paintable—standard silicone caulk repels paint.
Mask off areas you don’t want painted with quality painter’s tape and plastic sheeting. Protect:
- Windows and windshields
- Lights and reflectors
- Vents and access panels
- Tires and wheels
- Door handles and locks
- Awning hardware
Common preparation mistakes that ruin paint jobs include:
- Painting over dirt or oxidation (paint peels within months)
- Skipping primer on bare fiberglass or aluminum (adhesion fails)
- Painting in direct sunlight or extreme temperatures (causes bubbling and poor flow)
- Insufficient drying time between coats (creates soft spots that never fully cure)
What’s the Step-by-Step Process for Painting an RV Exterior?
Following a systematic approach ensures consistent results across your entire RV exterior. This process works for travel trailers, fifth wheels, and motorhomes alike.
Step 1: Apply primer using automotive or RV-specific primer before topcoat[1]. Primer creates a uniform surface that helps paint adhere and provides a consistent base color. Apply primer in thin, even coats using a paint sprayer for best results. Allow primer to dry completely according to manufacturer specifications—usually 4-6 hours minimum.
Step 2: Mix and strain your topcoat paint according to manufacturer directions. Most automotive paints require mixing with hardeners or reducers at specific ratios. Strain paint through a fine mesh filter to remove any lumps or debris that could clog your sprayer or create imperfections.
Step 3: Apply multiple thin coats rather than one thick coat[1]. Thin coats dry faster, level better, and resist runs or sags. Plan for 3-5 coats minimum to achieve full coverage and depth of color. Each coat should look slightly translucent when wet—if you can’t see any underlying color showing through, you’re applying too much at once.
Step 4: Use a paint sprayer for the most even, professional finish, holding the gun 6-8 inches from the surface[1]. Move in steady, overlapping passes with consistent speed. Start each pass before reaching the RV surface and continue past the edge to avoid heavy spots at the beginning and end of each stroke.
Step 5: Allow each coat to dry completely before applying the next[1]. Drying times vary based on temperature, humidity, and paint type:
- Latex paints: 2-4 hours between coats
- Automotive polyurethane: 4-6 hours between coats
- Marine epoxy: 6-12 hours between coats
Step 6: Apply clear coat (if using automotive paint systems) for maximum UV protection and gloss. Clear coat typically requires 2-3 coats applied using the same thin-coat technique as color coats.
Step 7: Allow full cure time before removing masking or exposing the RV to weather. Full cure takes:
- Latex paints: 7-14 days
- Automotive polyurethane: 14-30 days
- Marine epoxy: 7-14 days
During cure time, avoid washing, waxing, or subjecting the paint to harsh conditions.
Can You Paint an RV Exterior with a Roller or Brush?
While spraying produces the smoothest finish, rollers and brushes work for RV painting when spraying isn’t practical. Budget constraints, lack of spray equipment, or small touch-up areas make manual application methods viable alternatives.
Foam rollers create surprisingly smooth finishes on large flat surfaces like RV sidewalls. Use 4-inch foam rollers designed for smooth surfaces, not textured paint rollers meant for walls. Apply paint in thin, even coats using long, overlapping strokes in one direction. The key is patience—multiple thin coats eliminate roller texture better than trying to achieve full coverage in one thick application.
High-quality brushes work for detailed areas, trim, and touch-ups. Use brushes with fine, synthetic bristles designed for the paint type you’re using. Brush marks show more than roller texture, so reserve brushes for areas where texture won’t be noticeable or where precision matters more than smoothness.
Combination approaches often work best for DIY RV painters on budgets. Roll large flat areas, brush detailed sections, and consider renting a paint sprayer for a day to handle the most visible surfaces. This hybrid method balances cost, time, and quality.
Limitations of manual application include:
- Visible texture on glossy finishes (less noticeable on matte or satin)
- Longer application time (3-4x slower than spraying)
- Difficulty achieving even coverage on textured RV surfaces
- More physical effort required for large motorhomes
Choose manual application if you’re painting a small travel trailer, working with a tight budget, or comfortable with a slightly textured finish. Choose spraying if you want professional results, have a large RV, or can rent/borrow equipment.
How Much Does It Cost to Paint an RV Exterior Yourself?
Understanding the full cost breakdown helps RV owners budget appropriately and compare DIY savings against professional quotes.
Paint and primer costs represent the largest expense:
- Small travel trailer (under 20 feet): 2-3 gallons paint, 1-2 gallons primer = $200-$600
- Medium travel trailer or fifth wheel (20-30 feet): 4-6 gallons paint, 2-3 gallons primer = $400-$1,200
- Large fifth wheel or Class C (30-40 feet): 6-8 gallons paint, 3-4 gallons primer = $600-$1,600
- Class A motorhome (over 40 feet): 8-12 gallons paint, 4-6 gallons primer = $800-$2,400
Equipment and supplies add to the total:
- Paint sprayer rental (3-day rental): $75-$150
- Paint sprayer purchase (entry-level HVLP): $100-$300
- Sandpaper and sanding supplies: $30-$60
- Painter’s tape and masking materials: $40-$80
- Paintable caulk and sealants: $20-$40
- Cleaning supplies and solvents: $30-$50
- Safety equipment (respirator, goggles, gloves): $40-$80
Total DIY cost estimates:
- Small travel trailer: $300-$800
- Medium RV: $600-$1,500
- Large RV: $900-$2,200
- Class A motorhome: $1,200-$3,000
Time investment matters as much as money. Expect to invest:
- Preparation: 2-4 days (power washing, sanding, masking, repairs)
- Priming: 1 day (application plus drying time)
- Painting: 2-3 days (multiple coats with drying time between)
- Finishing and cleanup: 1 day
- Total: 6-10 days of actual work spread over 2-3 weeks to allow proper drying
Compare these costs to professional services ranging from $3,000-$15,000 depending on RV size and paint quality. DIY painting saves $2,000-$12,000 but requires significant time and effort.
What Are Common Mistakes When Painting an RV Exterior?
Learning from others’ errors saves time, money, and frustration. These mistakes appear repeatedly in RV painting projects gone wrong.
Painting in poor weather conditions tops the list. Temperature and humidity dramatically affect paint performance:
- Too cold (below 50°F): Paint doesn’t cure properly, remains soft
- Too hot (above 90°F): Paint dries too fast, prevents proper leveling
- High humidity (above 70%): Extends drying time, can cause blushing or hazing
- Direct sunlight: Creates hot spots that cause bubbling and uneven drying
Insufficient surface preparation guarantees premature paint failure. Skipping sanding, painting over dirt or oxidation, or failing to remove loose paint creates a weak foundation. Paint only adheres as well as the surface beneath it—if that surface is compromised, the entire paint job fails.
Using incompatible products causes adhesion problems or finish defects. Common incompatibility issues include:
- Applying latex paint over uncured polyurethane
- Using non-automotive primer under automotive topcoats
- Mixing paint brands without testing compatibility
- Applying water-based products over oil-based without proper prep
Rushing between coats prevents proper curing and creates soft spots that never fully harden. Follow manufacturer-specified recoat windows—applying too soon traps solvents, while waiting too long may require re-sanding for proper adhesion.
Inadequate masking leads to overspray on windows, lights, and trim that requires tedious cleanup or permanent damage. Invest time in thorough masking—it’s faster than scraping dried paint off glass or replacing damaged components.
Poor spray technique creates runs, sags, dry spots, and uneven coverage. Common spraying errors include:
- Holding the gun too close (causes runs and heavy spots)
- Moving too slowly (applies too much paint)
- Starting and stopping on the RV surface (creates heavy edges)
- Inconsistent distance or speed (produces uneven texture)
Neglecting proper ventilation and safety when using automotive paints exposes painters to harmful fumes. Always wear an appropriate respirator rated for the paint type, work in well-ventilated areas, and follow all safety precautions on product labels.
How Long Does RV Exterior Paint Last?
Paint longevity depends on paint type, application quality, climate conditions, and maintenance practices. Understanding these factors helps set realistic expectations.
Automotive-grade polyurethane typically lasts 8-12 years when properly applied and maintained. This matches or exceeds factory paint jobs on new RVs. Expect the first signs of fading around year 6-8 in harsh sun climates, later in moderate climates.
Marine-grade epoxy offers similar or better longevity at 8-15 years, particularly in humid or coastal environments where moisture resistance matters most. The harder finish resists scratching and chemical damage better than softer paints.
Exterior latex paint delivers 5-10 years of service based on real-world reports[2]. While not as durable as automotive or marine paints, quality latex products provide acceptable longevity for budget-conscious RV owners willing to repaint more frequently.
Factors that shorten paint life include:
- Constant sun exposure without shade or covers
- Storage in extreme climates (desert heat, northern freeze-thaw cycles)
- Poor surface preparation during initial application
- Skipping clear coat or UV protection layers
- Lack of regular washing and maintenance
- Road salt and chemical exposure without prompt cleaning
Extending paint longevity requires consistent care:
- Wash RV monthly with pH-neutral soap
- Wax 2-3 times per year with quality RV wax
- Store under cover when possible
- Park in shade during extended stays
- Touch up chips and scratches promptly
- Avoid harsh chemicals and abrasive cleaners
Climate impact varies significantly. RVs in Arizona or Florida experience faster UV degradation than those in Oregon or Michigan. Adjust maintenance frequency and expectations based on your primary storage and travel locations.
Should You Paint or Wrap Your RV Exterior?
Vinyl wraps offer an alternative to traditional painting with distinct advantages and limitations. Understanding both options helps RV owners make informed decisions.
Vinyl wraps involve applying large sheets of colored or printed vinyl film over the existing RV exterior. Professional installation costs $3,000-$10,000 depending on RV size and design complexity—comparable to professional paint jobs.
Wrap advantages include:
- No surface prep beyond cleaning (faster installation)
- Unlimited color and graphic options, including custom designs
- Protection for original paint underneath
- Removable if you want to change colors later
- No curing time—use RV immediately after installation
Wrap disadvantages include:
- Shorter lifespan (3-7 years typical) compared to quality paint
- Seams visible on large surfaces
- Can peel or lift at edges if not properly installed
- Difficult to repair small damaged sections (often requires panel replacement)
- Heat can cause bubbling or lifting in extreme climates
- Not DIY-friendly—requires professional installation for quality results
Paint advantages include:
- Longer lifespan (8-12+ years with quality products)
- Seamless finish across entire RV
- DIY-friendly for budget-conscious owners
- Easier to touch up small damage areas
- Better heat resistance in extreme climates
- Can be wet-sanded and polished for perfect finish
Paint disadvantages include:
- Extensive surface preparation required
- Permanent (difficult to change colors later)
- Longer project timeline with drying and curing
- More skill required for professional-looking results
Choose wrapping if you want custom graphics, plan to change colors frequently, or need the project completed quickly. Choose painting if you want maximum durability, prefer DIY projects, or need a budget-friendly option with long-term value.
Frequently Asked Questions
Can you paint an RV exterior yourself without experience?
Yes, beginners can successfully paint RV exteriors by following proper techniques and taking time with surface preparation. Start with thorough cleaning and sanding, use quality automotive or marine-grade paint, and apply multiple thin coats rather than rushing with thick applications. Expect a learning curve, but the process is achievable for patient DIYers.
How long does it take to paint an RV exterior?
Plan for 6-10 days of actual work spread over 2-3 weeks to allow proper drying time between coats. Preparation takes 2-4 days, priming requires 1 day, painting needs 2-3 days for multiple coats, and finishing adds another day. Full cure time extends the timeline before you can use the RV normally.
Can you paint over existing RV decals?
Yes, you can paint over decals if they’re smooth and firmly adhered to the surface[1][2]. However, decal edges may show through thin paint coats. For best results, remove decals using heat and adhesive remover, then fill any remaining adhesive residue before painting.
What’s the best paint for fiberglass RV exteriors?
Automotive-grade polyurethane paint is the gold standard for fiberglass RV exteriors[4], offering superior UV resistance, durability, and professional appearance. Marine-grade epoxy paint provides another excellent option, particularly for humid climates or coastal storage areas.
Do you need to sand an RV before painting?
Yes, sanding with 180-220 grit sandpaper is essential for proper paint adhesion[1][2]. Sanding creates microscopic scratches that give paint something to grip, preventing premature peeling or flaking. You don’t need to remove all existing paint—just scuff the surface to eliminate gloss.
Can you use house paint on an RV exterior?
Exterior latex house paint can work on RV exteriors, with some users reporting 10+ years of durability[2]. However, automotive or marine-grade paints perform better because they’re designed for the vibration, flex, and UV exposure that RVs experience. House paint represents a budget option with acceptable but not optimal results.
How much does professional RV painting cost?
Professional RV paint jobs range from $3,000 for small travel trailers to $15,000+ for large Class A motorhomes. Costs vary based on RV size, paint quality, amount of prep work needed, and whether you want custom colors or graphics.
What temperature should you paint an RV exterior?
Paint RV exteriors when temperatures are between 50°F and 85°F with humidity below 70%. Avoid painting in direct sunlight, extreme heat, or cold conditions that prevent proper paint curing and leveling.
Can you paint an aluminum RV exterior?
Yes, aluminum RV exteriors paint well with proper preparation and appropriate primer. Use etching primer or self-etching primer designed for aluminum, then apply automotive-grade topcoat. The process is identical to painting fiberglass except for the primer choice.
How do you paint RV rubber roofs?
Rubber RV roofs require specialized rubber roof coatings, not standard RV exterior paint. Use products specifically formulated for EPDM or TPO roofing materials. The painting process for rubber roofs differs significantly from sidewall painting and requires different preparation and materials.
Should you use a paint sprayer or roller for RV exteriors?
Paint sprayers produce the smoothest, most professional finish and are recommended for best results[1]. However, foam rollers work acceptably for budget projects on flat surfaces. Sprayers save time and create better finishes, while rollers cost less but require more effort and leave slight texture.
How many coats of paint does an RV exterior need?
Apply 3-5 thin coats of paint for full coverage and durability[1]. Multiple thin coats dry faster, level better, and resist runs compared to fewer thick coats. Add 2-3 clear coats if using automotive paint systems for maximum UV protection.
Key Takeaways
- Yes, you can paint an RV exterior yourself with proper preparation, appropriate materials, and patience—DIY projects cost $300-$1,500 compared to $3,000-$15,000 for professional work
- Surface preparation determines success—power washing, sanding with 180-220 grit sandpaper, and proper priming are non-negotiable steps that prevent premature paint failure
- Automotive-grade polyurethane paint delivers the best results for most RV exteriors[4], offering 8-12 years of durability with superior UV resistance and professional appearance
- Marine-grade epoxy and exterior latex paint provide viable alternatives[2][4], with marine epoxy excelling in humid climates and latex offering budget-friendly performance
- Multiple thin coats applied with a paint sprayer create professional finishes[1]—hold the gun 6-8 inches from the surface and allow complete drying between coats
- Paint in ideal conditions (50-85°F, humidity below 70%, no direct sun) and allow full cure time of 7-30 days depending on paint type
- Common mistakes include rushing surface prep, painting in poor weather, applying thick coats, and insufficient drying time between applications
- Vinyl wraps offer an alternative with faster installation and unlimited design options but shorter lifespan (3-7 years) and higher cost than DIY painting
- Budget 6-10 days of work spread over 2-3 weeks for complete DIY RV painting projects, with preparation accounting for nearly half the timeline
- Proper maintenance extends paint life—monthly washing, regular waxing, and covered storage help quality paint jobs last a decade or more
Conclusion: Transform Your RV with a Fresh Paint Job
Painting an RV exterior represents one of the most impactful upgrades an owner can undertake. The answer to “can you paint an RV exterior?” is definitively yes—and the results can be stunning when approached with proper planning and execution.
Success hinges on three critical elements: thorough surface preparation, appropriate paint selection, and patient application technique. RV owners who invest time in power washing, sanding, and priming create the foundation for paint jobs that rival professional work. Choosing automotive-grade polyurethane or marine-grade epoxy paint ensures durability that protects your investment for years to come.
Take these next steps to start your RV painting project:
- Assess your RV’s current condition—inspect for damage, note areas needing repair, and measure surface area to estimate paint quantities
- Choose your paint type based on budget, climate, and desired longevity—automotive polyurethane for best results, marine epoxy for humid climates, or exterior latex for budget builds
- Gather equipment and supplies—rent or purchase a quality paint sprayer, buy appropriate sandpaper and primers, and stock up on masking materials
- Plan your timeline around weather forecasts—schedule 2-3 weeks with consistently good painting conditions
- Start with thorough preparation—power wash, sand, repair damage, and prime before applying the first color coat
The transformation from faded, dated exterior to vibrant, personalized RV is achievable for DIY enthusiasts willing to invest the time and effort. Whether you’re refreshing a vintage trailer or updating a modern motorhome, a quality paint job protects your investment while creating a rolling home that truly reflects your style.
References
[1] A Step By Step Guide To Painting Your Rv Transform Your Home On Wheels – https://beachtruckrvcenter.com/blog/a-step-by-step-guide-to-painting-your-rv-transform-your-home-on-wheels
[2] Painting The Exterior Of An Rv Or Trailer – https://www.allthingswithpurpose.com/painting-the-exterior-of-an-rv-or-trailer/
[4] Yes Rv Paint Is Different Heres What You Need To Know – https://www.rvtrader.com/blog/2025/05/09/yes-rv-paint-is-different-heres-what-you-need-to-know/
[5] Ask Dave After Market Paint Protection Worth Money 2082 – https://www.rvtravel.com/ask-dave-after-market-paint-protection-worth-money-2082/
SEO Meta Title and Description
Meta Title: Can You Paint an RV Exterior? Complete 2026 Guide
Meta Description: Yes, you can paint an RV exterior! Learn the best paints, step-by-step process, costs, and pro tips for a professional DIY RV paint job in 2026.
{“@context”:”https://schema.org”,”@type”:”Article”,”headline”:”can you paint an rv exterior?”,”description”:”Yes, you can paint an RV exterior! Learn the best paints, step-by-step process, costs, and pro tips for a professional DIY RV paint job in 2026.”,”image”:”https://zsxkvszxbhpwnvzxdydv.supabase.co/storage/v1/object/public/generated-images/kie/5f9d2f78-35c4-4090-8ed8-6e64427510d3/slot-0-1771294439950.png”,”datePublished”:”2026-02-17T02:10:16.577404+00:00″,”dateModified”:”2026-02-17T02:14:57.110Z”,”author”:{“@type”:”Organization”,”name”:”RV Showoff”},”publisher”:{“@type”:”Organization”,”name”:”RV Showoff”}}


