Transform your RV from a simple vehicle into a cozy, romantic retreat on wheels with the magic of shabby chic decor. This beloved style, characterized by its soft colors, vintage charm, and comfortably worn elegance, is perfectly suited for the compact and personal space of a camper. Achieving this dreamy look is all about blending delicate florals, distressed woods, and plenty of soft textiles to create a space that feels both timeless and inviting.
Don’t be afraid to mix and match patterns or incorporate cherished heirlooms and flea market finds to add a layer of authentic personality. By focusing on a soft, neutral palette and prioritizing comfort, you can turn your mobile home into a serene sanctuary that makes every trip feel like a storybook escape. Let these 35 ideas inspire your own shabby chic camper transformation.
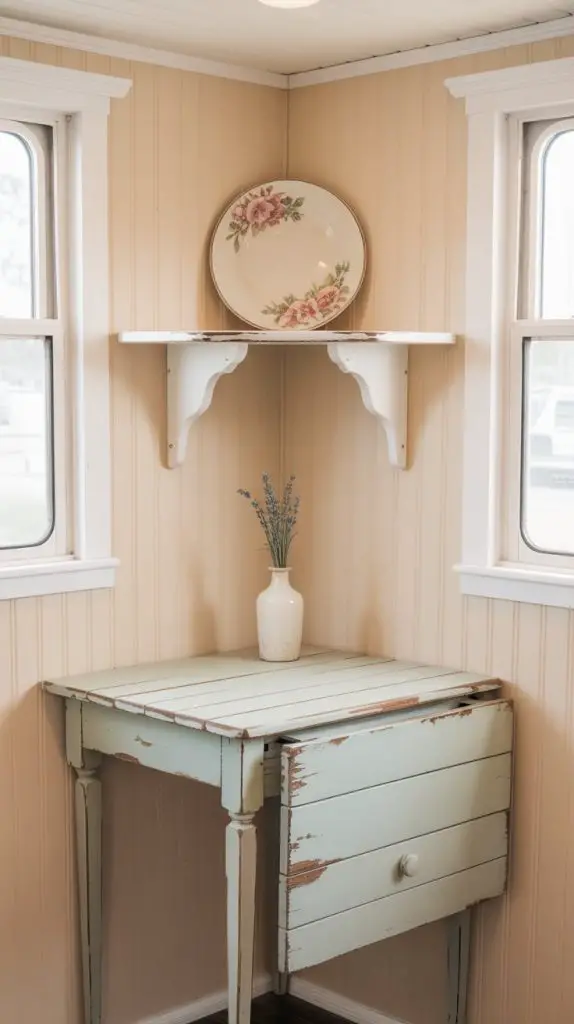
1. A Dreamy Distressed Kitchen Nook
Would you like to save this article?
Nestled in the corner of the camper’s kitchen, this nook features a small, drop-leaf table with a heavily distressed white paint finish, showing hints of a pale blue undertone. The walls are clad in beadboard, painted in a soft, buttery cream. A tiny, open shelf above the table displays a single vintage floral plate and a small milk glass vase holding a sprig of lavender, proving that even the smallest details contribute to the overall charm.
To continue the theme, the seating is a quaint, upholstered bench with a slipcover made from a faded, floral-print linen. A couple of ruffled, off-white throw pillows in different textures add depth and comfort. The key here is to avoid anything too new or shiny; look for pieces that feel like they have a history, even if you have to create that history yourself with a little strategic sanding and chalk paint.
PRO TIP: Use chalk paint for your cabinetry and furniture projects. It requires minimal surface prep, adheres to almost anything, and can be easily distressed with sandpaper along the edges and corners after it dries to instantly give it that coveted, time-worn look.
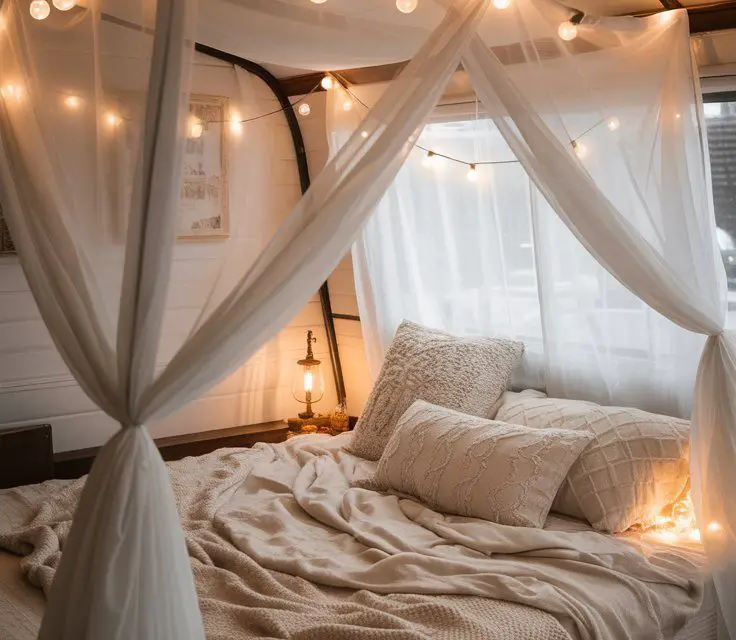
2. A Canopy of Whimsy Over the Bed
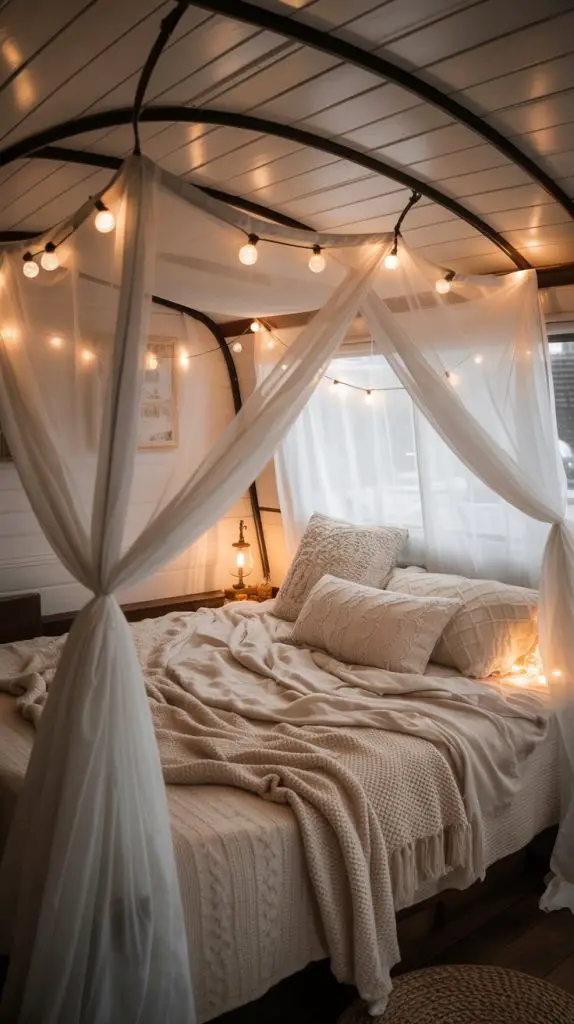
Imagine drifting off to sleep under a soft, flowing canopy in your camper bedroom. This idea uses a simple, DIY curtain rod arched over the head of the bed, from which hangs a length of sheer, ivory mosquito netting or lightweight muslin. The fabric is gathered loosely and drapes gracefully down to the floor on either side of the bed, creating an intimate and romantic focal point that draws the eye upward and makes the small space feel larger.
The bed itself is dressed in layers of texture: a white matelassé coverlet, a knitted chunky throw, and a pile of mix-and-match pillows in lace, linen, and delicate floral prints. The canopy not only adds a dramatic touch of whimsy but also helps to define the sleeping area in an open-plan camper, providing a sense of privacy and seclusion.
PRO TIP: For an effortless and non-destructive way to hang a canopy, use a tension rod placed near the ceiling or command hooks with decorative ribbon. This allows you to create the dreamy effect without drilling into your RV’s walls or ceiling, making it renter-friendly and easy to adjust.
3. A Vintage Vanity Corner with Repurposed Charm
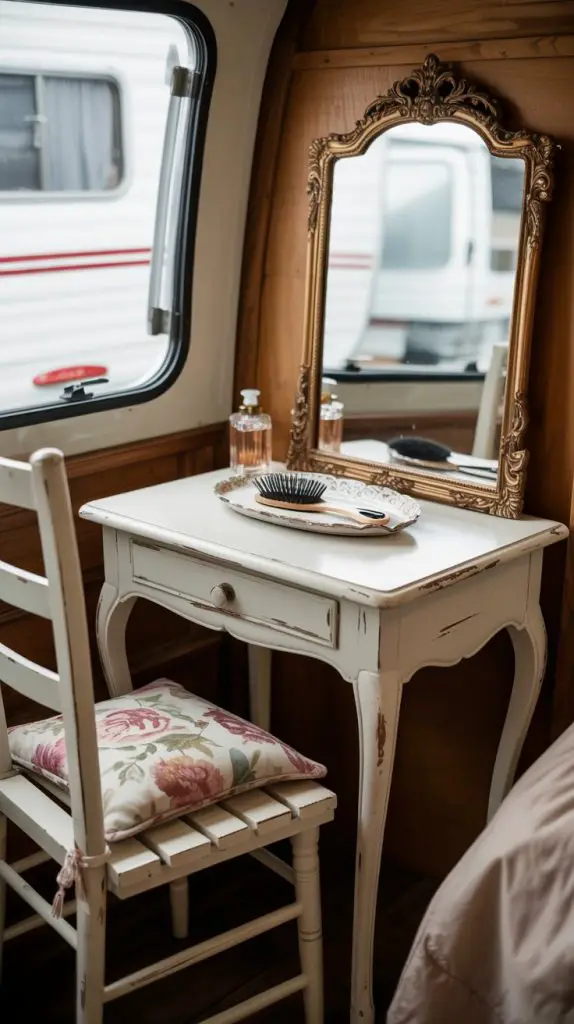
Every dreamy escape needs a spot for preparation and quiet reflection. This vanity corner is created using a repurposed, petite wooden desk with a gracefully curved front and peeling white paint that reveals glimpses of old, dark wood. The mirror above it isn’t a standard one; it’s an ornate, gilded frame with the mirror itself slightly spotted and aged, adding to the vintage character.
On the desk’s surface, a dainty porcelain tray holds a few cherished items: a silver-handled hairbrush, a cut-crystal perfume bottle, and a small ceramic dish for jewelry. A simple, white-painted ladder-back chair sits tucked in, with a floral-print cushion tied to its seat. This setup shows that your vanity doesn’t need to be large or modern to be both functional and beautifully thematic.
PRO TIP: Look for vintage printer’s trays or shallow shadow boxes to hang on the wall next to your vanity. They are perfect for organizing and displaying small jewelry, trinkets, and keepsakes, turning your everyday essentials into a curated piece of shabby chic wall art.
4. Softly Lit Outdoor Ambiance
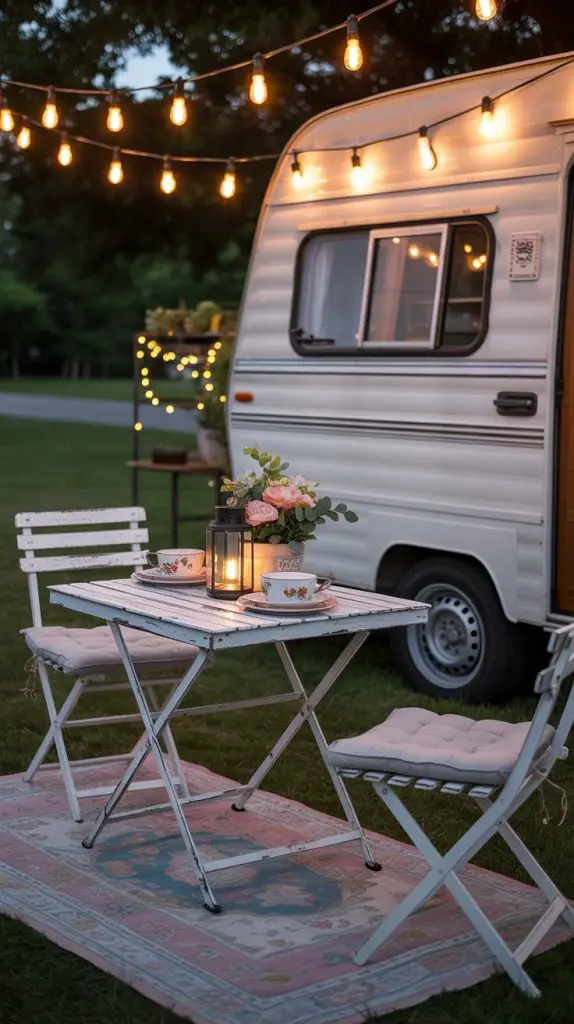
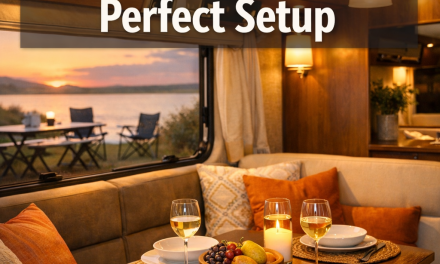
Extend the shabby chic charm to your campsite with a beautifully appointed outdoor sitting area. A small, wrought-iron bistro table with a scrolled base and a chipped white finish is set for two with mismatched china: a floral-patterned plate and a simple white cup and saucer. The true magic comes from the lighting—a string of Edison bulbs is draped above, and a vintage-style lantern with a flickering LED candle sits on the table.
The seating consists of two folding wooden chairs adorned with thick, comfortable cushions covered in a durable outdoor fabric with a subtle stripe or ticking pattern. A worn, pastel-colored oriental rug defines the space underfoot, making the outdoor area feel like a true extension of your cozy indoor living space.
PRO TIP: To create a safe and enchanting glow, always use battery-operated LED candles and fairy lights for your outdoor decor. They provide the same warm ambiance without the fire hazard, and many are now solar-powered, making them perfect for off-grid camping.
5. A Cozy Reading Nook by the Window
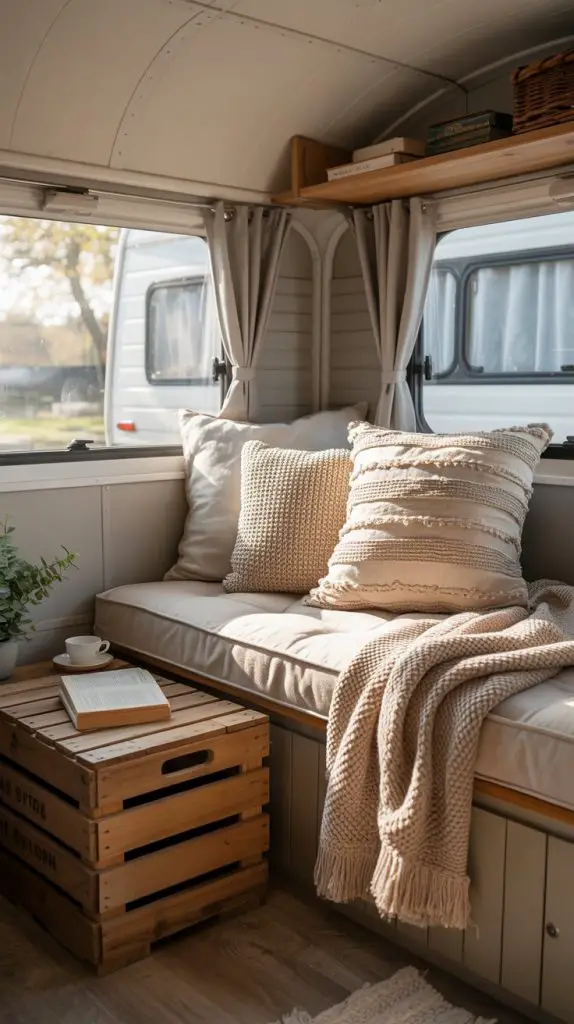
Utilize a camper’s best feature—the window—to create a serene reading nook. This idea features a built-in bench seat fitted with a plush, custom-made cushion in a cream-colored linen. A stack of throw pillows in various sizes and textures—a ruffled one, a knitted one, a delicate floral one—invites you to sink in and relax. A soft, chunky knit throw is casually draped over the corner.
A small, rustic wooden crate serves as a side table, holding a cup of tea and a well-loved book with a fabric cover. Natural light floods the space, highlighting the soft textures and creating a perfect spot for afternoon daydreaming. This nook proves that even the narrowest of spaces can be transformed into a dedicated corner for comfort and leisure.
PRO TIP: To make the most of small spaces, ensure your reading nook cushion has built-in storage. Have a carpenter create a hinged lid or use a storage bin that fits perfectly beneath the bench to stow away extra blankets, books, or games, combining style with smart, space-saving utility.
6. A Wall of Whimsical, Mismatched Frames
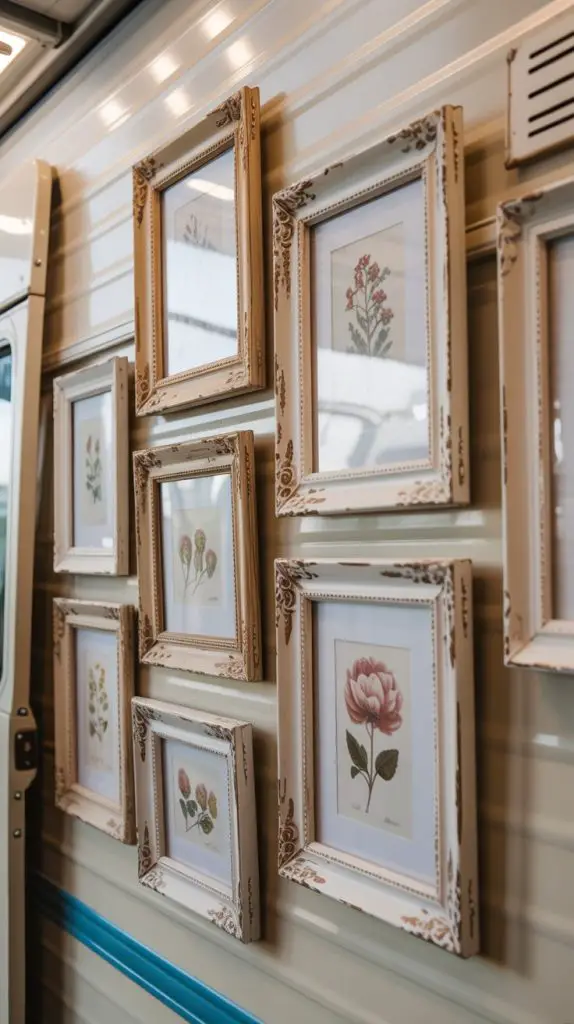
Create a stunning focal point by dedicating one wall of your camper to a gallery of mismatched, vintage-inspired frames. The frames are all in varying shades of white, cream, and pale gray, with intricate carvings and different levels of distressed finishes. Inside the frames, you’ll find a curated collection of delicate botanical prints, vintage postcards, and faded floral illustrations, all with soft, muted colors that complement the shabby chic palette.
The arrangement is intentionally asymmetrical, clustering the frames together for maximum impact in the small space. This design approach draws the eye and adds a deeply personal and collected-over-time feel to your mobile home. It’s a powerful way to cover a plain RV wall with character and charm, telling a visual story of romance and nostalgia.
PRO TIP: Before hammering nails into your RV wall, lay out your entire gallery on the floor first. Take a photo for reference. Then, use removable adhesive strips designed for picture hanging. This allows you to achieve the look without permanent damage and lets you easily adjust the layout later.
7. A Rustic-Chic Hanging Storage Ladder
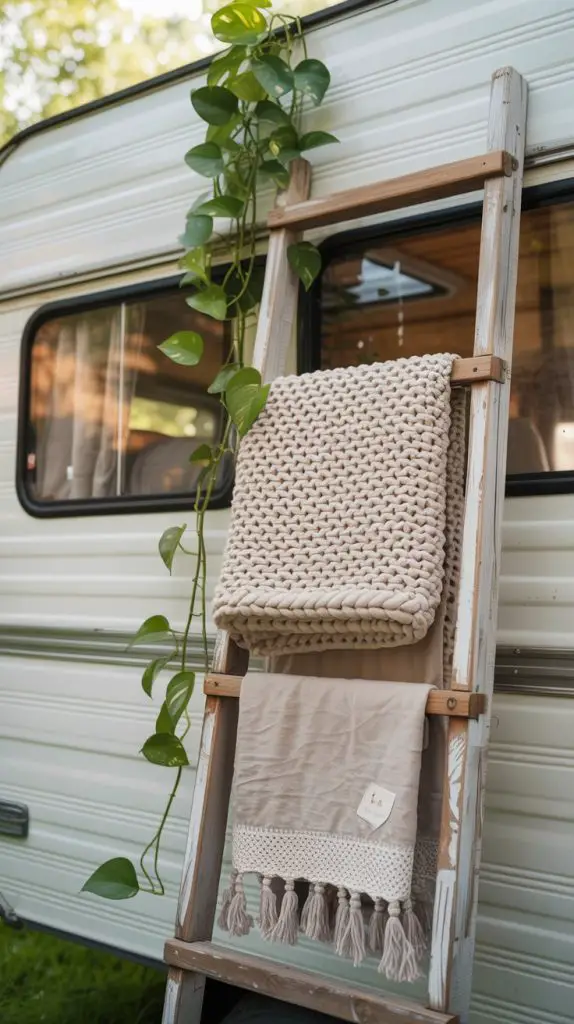
Maximize both storage and style with a repurposed wooden ladder. This isn’t a standard stepladder, but a tall, slender wooden ladder with a worn, whitewashed finish, leaning gracefully in a corner. From its rungs, you can hang an assortment of cozy, textural essentials: a chunky knit blanket is folded over one rung, while a few linen towels with crocheted edges hang from another.
The top of the ladder can also be utilized, perhaps displaying a trailing pothos plant in a terracotta pot or a small, vintage suitcase. This solution is as practical as it is picturesque, providing easy access to blankets and textiles while adding a strong vertical element that draws the eye upward and makes the ceiling feel higher.
PRO TIP: For a safe and stable setup in a moving vehicle, use a clear museum gel or adhesive putty at the points where the ladder touches the wall and floor. This will prevent it from shifting during travel while remaining easy to remove without leaving a mark.
8. A Delicate Floral Accent Wall
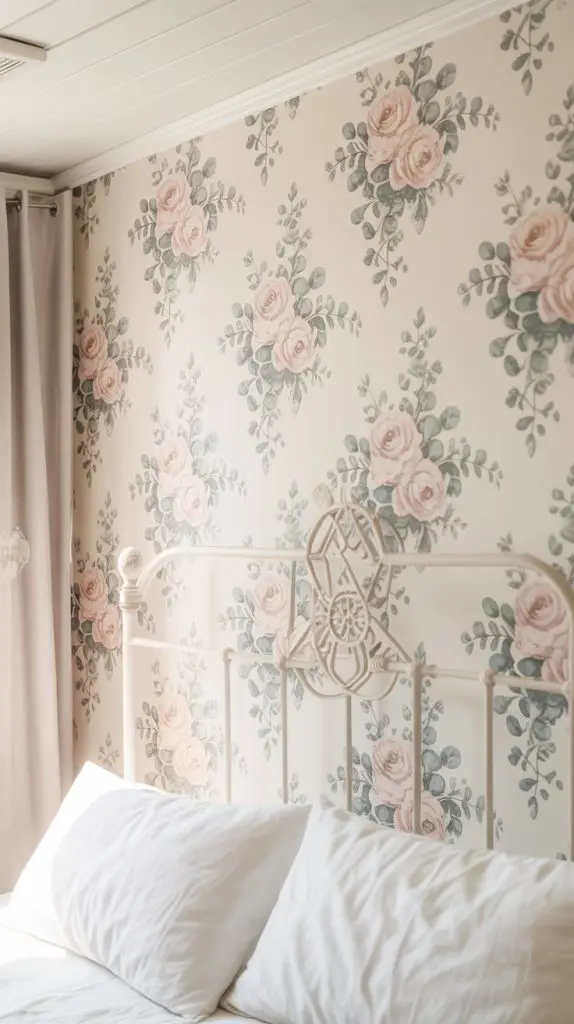
Infuse your camper with a touch of romantic botanicals by creating a subtle floral accent wall. Instead of bold, modern wallpaper, this wall features a soft, off-white background with a faint, trailing pattern of pale pink roses and green eucalyptus leaves. The pattern is delicate and almost faded, as if it’s been there for decades, perfectly capturing the shabby chic ethos.
This wall serves as a beautiful backdrop for a simple, iron bed frame or a rustic wooden dresser. The key is that the pattern is soft and muted, adding visual interest and depth without overwhelming the small space. It provides a sense of luxury and custom design, transforming a standard RV interior into a unique, garden-inspired haven.
PRO TIP: For a renter-friendly and non-permanent floral wall, look for high-quality, peel-and-stick wallpaper. Test a small patch first to ensure it adheres well and removes cleanly from your RV’s wall material. This allows you to create a dramatic feature without the commitment of traditional paste.
9. A Touch of Lace and Crochet
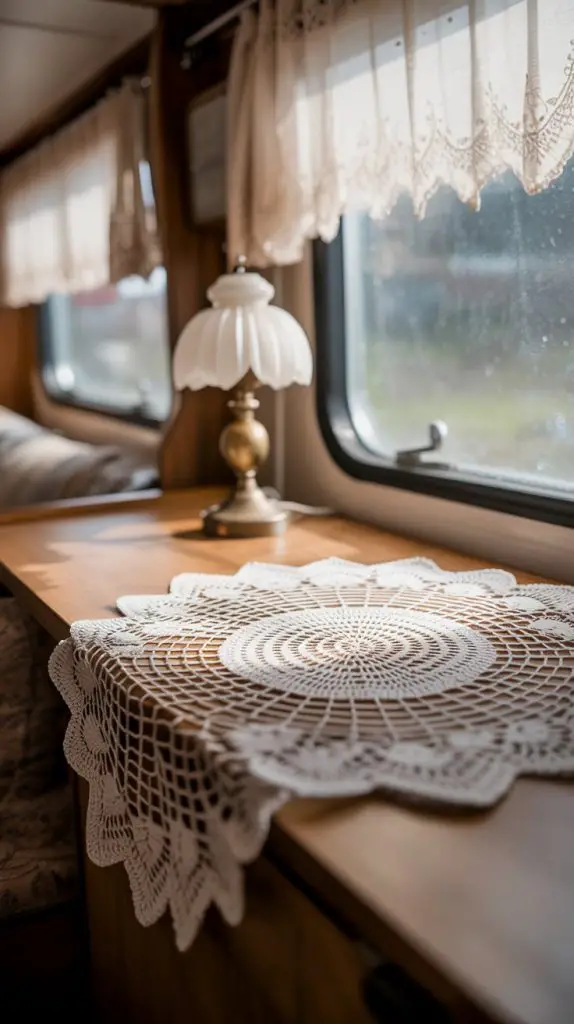
Drape your camper in the timeless elegance of lace and crochet. This idea focuses on the small, textural details that make a big impact. A beautifully crocheted, off-white doily rests under a small lamp on a side table, its intricate pattern casting delicate shadows. On the sofa back, a lace runner is draped gracefully, softening the lines of the furniture.
Even the windows are adorned with simple, lace-trimmed sheers that filter the sunlight into a soft, dappled glow. These handmade-looking elements introduce a layer of artisanal craft and vintage femininity, evoking the feeling of a cherished family heirloom. They are inexpensive touches that collectively build a deeply cozy and authentic atmosphere.
PRO TIP: To give new lace or crochet pieces an instant vintage feel, steep them in a bath of strong black tea or cooled coffee for 10-15 minutes. Rinse and air dry; this will dye the white fibers a soft, creamy, off-white tone, making them look authentically aged.
10. A Shiplap Wall with Weathered Character
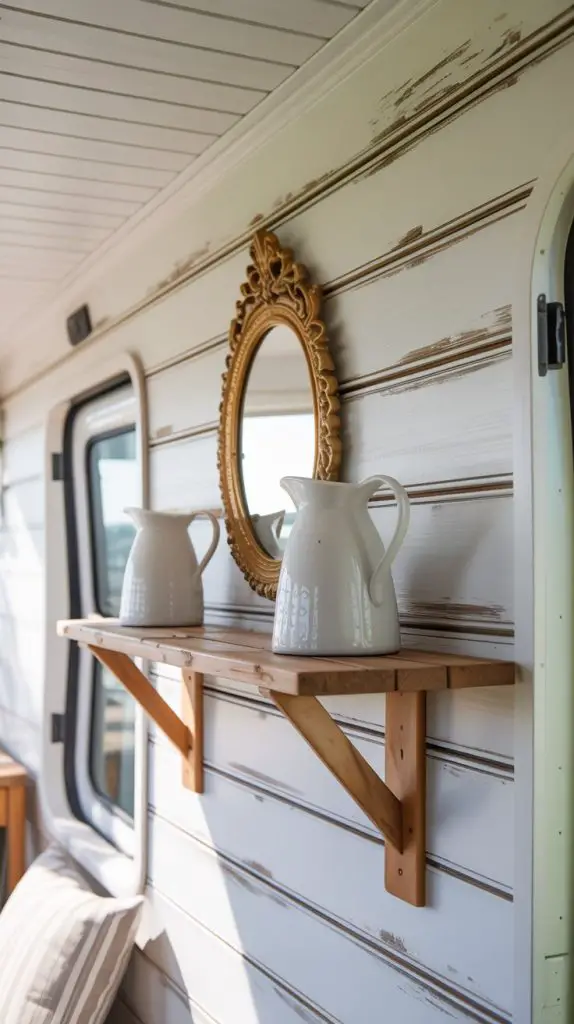
Introduce classic cottage charm with a shiplap wall. The shiplap planks are painted in a soft, chalky white, but the finish is not perfect. There are gentle streaks and slight variations in color, with a lightly sanded surface that allows a hint of the wood grain to show through, giving it a beautifully weathered and authentic character.
This wall provides the perfect textural backdrop for other shabby chic elements, like a hanging, distressed-wood shelf holding white ceramic vases or a large, ornate mirror with a faded gold frame. The horizontal lines of the shiplap can also help to visually widen a narrow space, making your camper feel more open and airy while staying true to the style’s rustic roots.
PRO TIP: For a lightweight and easy-to-install shiplap look, use thin PVC shiplap planks or even peel-and-stick shiplap wallpaper. These options are much lighter than real wood, which is crucial for RV weight management, and are often easier to install and remove.
11. A Vintage Suitcase Nightstand
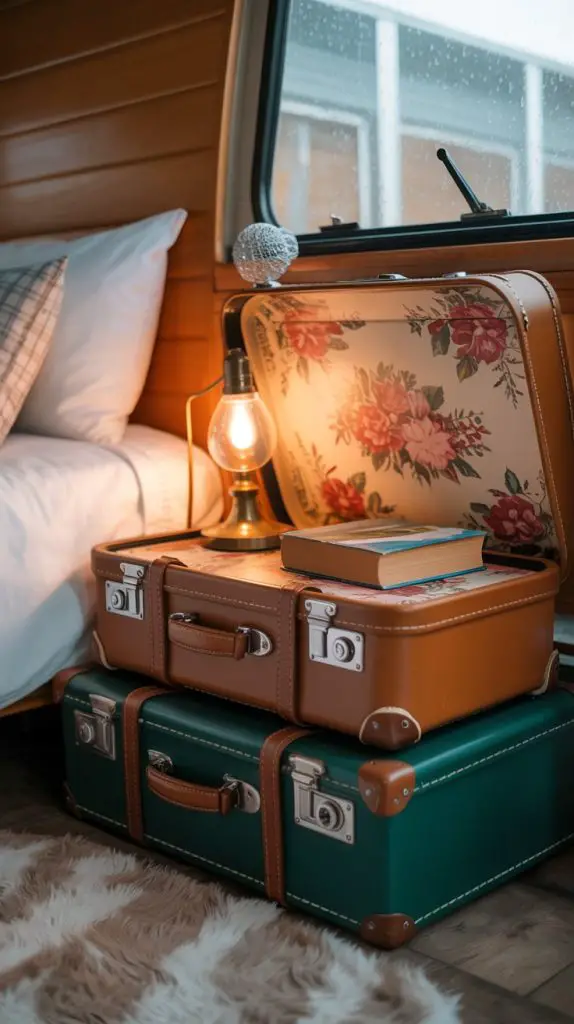
Stack a couple of vintage hard-sided suitcases next to your bed to create a unique and storage-savvy nightstand. The suitcases should feature worn leather straps, faded floral or travel-themed stickers, and a soft, distressed patina. The top suitcase is left open to reveal a delicate interior lining, where a small, battery-operated vintage lamp and a hardcover book are placed.
This idea is not only incredibly charming but also highly functional. The interior of the suitcases provides hidden storage for bedtime essentials, reading materials, or off-season clothing. It celebrates the nomadic spirit of RV life while perfectly adhering to the shabby chic aesthetic of repurposing and nostalgia.
PRO TIP: For stability during travel, secure the stacked suitcases together with a strap or ribbon, and use museum putty underneath the bottom suitcase to keep the entire stack from shifting. You can also line the interiors with scented drawer liners for a fresh, clean smell.
12. A Wrought-Iron Spice Rack
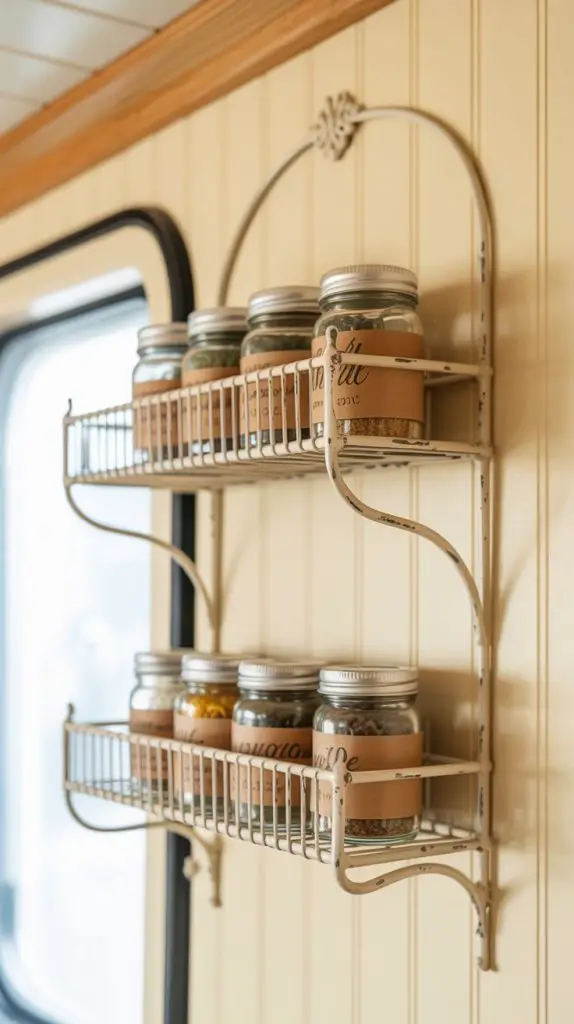
Bring shabby chic organization to your kitchen with a beautiful wrought-iron spice rack. The rack features ornate, scrolled metalwork in a black or white finish, with small shelves that hold uniform glass jars filled with herbs and spices. Each jar is labeled with a cursive script on a rustic, kraft paper tag, creating a sense of orderly charm.
Mounted on the inside of a cabinet door or on a small section of wall, this rack keeps essentials within easy reach while turning a practical item into a decorative feature. The combination of the delicate metalwork and the simple glass jars adds a touch of vintage apothecary style to your camper’s galley.
PRO TIP: Use small, powerful neodymium magnets glued to the back of your spice jars. They will stick securely to a wrought-iron rack during travel, preventing a culinary avalanche every time you move your RV.
13. A Ruffled Pillow Paradise
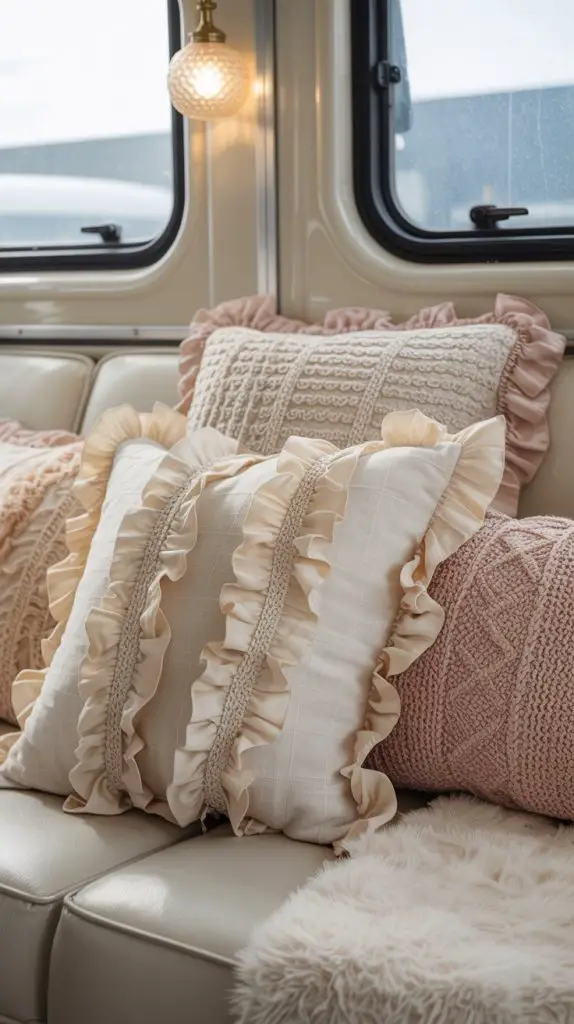
Create an irresistible nest of comfort by layering your seating with an abundance of ruffled and textured pillows. The pillows are a mix of sizes and fabrics, but all in a coordinated palette of ivory, cream, and pale blush. Key features include pillows with deep, delicate ruffles, others with crocheted covers, and some with subtle embroidered floral details.
Piled high on a bench seat or the camper sofa, this collection invites relaxation and adds immense visual softness. The varying textures play with the light, creating a rich, tactile landscape that is the epitome of shabby chic comfort and femininity.
PRO TIP: To make storage and cleaning easier, sew your own ruffled pillow covers or buy standard sizes and use an envelope closure in the back. This allows you to easily remove them for washing and to compactly store the inserts when not in use, saving precious space.
14. A Fairy Light Canopy Over the Dinette
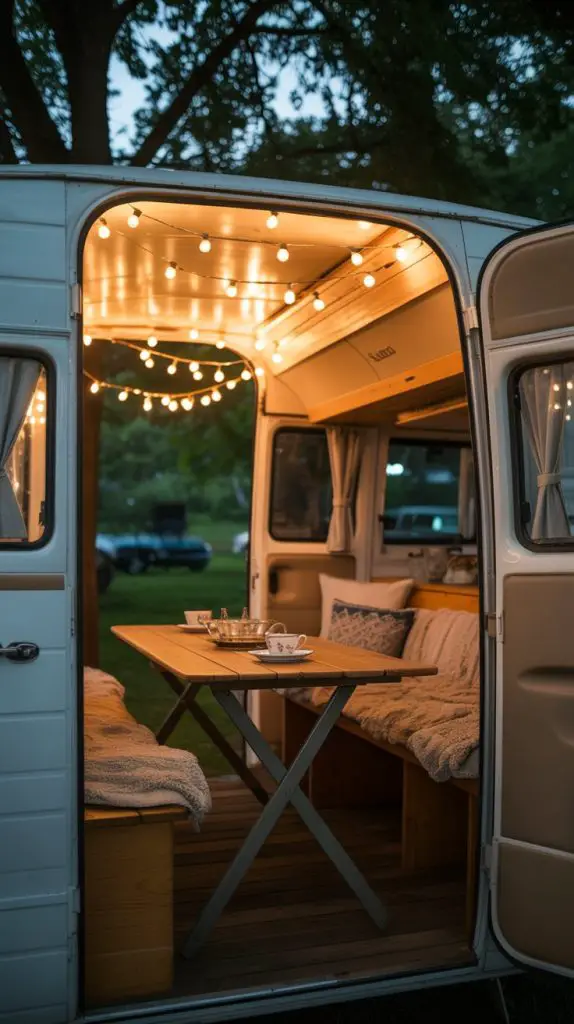
Transform your dinette into an enchanting evening retreat by draping a cascade of fairy lights from the ceiling. The delicate string lights are woven through a piece of sheer fabric or simply hung in loose, swooping loops above the table. The warm, twinkling glow they cast replaces harsh overhead lighting, creating an intimate and magical ambiance for meals, games, or conversation.
This simple addition makes the dinette area feel special and separate from the rest of the camper after dark. It’s a low-cost, high-impact idea that embodies the “dreamy escape” promise, turning an ordinary mealtime into a romantic occasion.
PRO TIP: For a seamless look, use battery-operated fairy lights with a built-in timer. They will turn on automatically each evening and shut off after a few hours, saving battery life and ensuring your camper always has a welcoming glow without you having to remember to switch them on.
15. A Chalkboard Menu for Campfire Meals
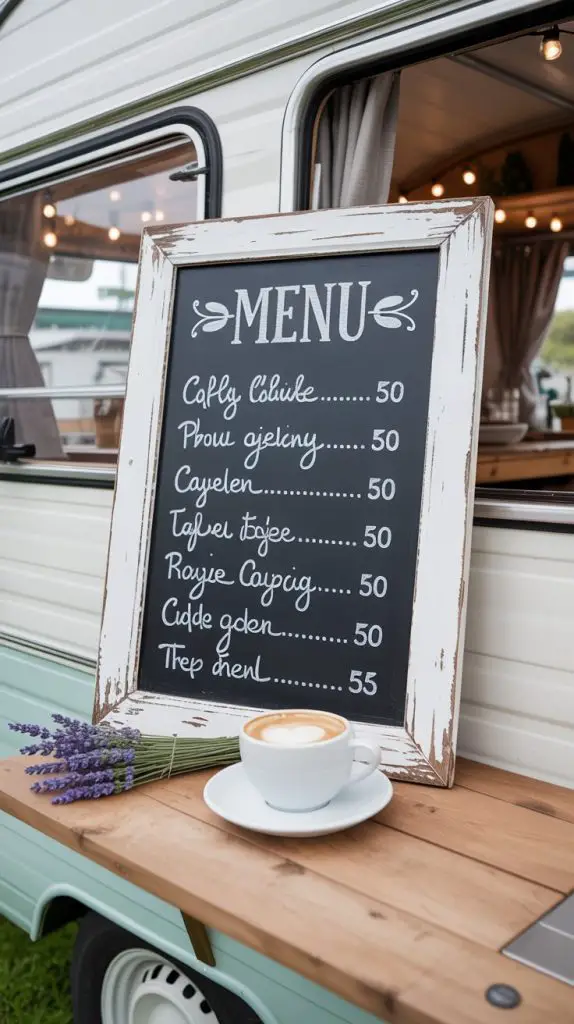
Add a touch of rustic cafe charm with a small, framed chalkboard. The frame is ornate and painted in distressed white, while the board itself is a deep slate gray. Use a white chalk marker to elegantly script the day’s menu, a favorite quote, or the name of your next destination. This personalizes your space and adds a fun, interactive element.
Prop it on the countertop or hang it near the entrance. It’s a practical way to plan meals but also serves as a beautiful, changeable piece of decor that celebrates the simple, intentional living of the RV lifestyle.
PRO TIP: Before writing your message, “season” the new chalkboard by rubbing the side of a piece of chalk over the entire surface and then wiping it off. This will prevent “ghosting” and make it easier to clean and rewrite in the future.
16. A Hanging Macramé Plant Holder
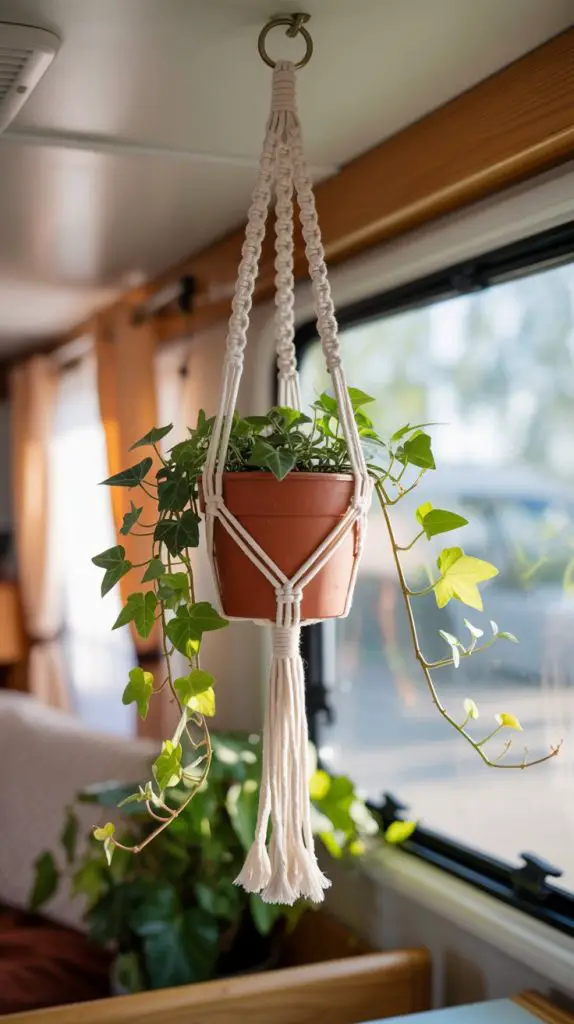
Bring a bohemian touch to your shabby chic decor with a delicate macramé plant hanger. The holder is made of soft, off-white cotton cord, featuring simple knots and tassels. It suspends a small, terracotta pot containing a trailing plant like ivy or a string of pearls, adding a vital pop of greenery and life to your space.
Hanging in a sunny spot near a window, it utilizes vertical space beautifully without taking up any precious counter or table space. The natural fiber of the macramé complements the textural, handmade feel of the shabby chic aesthetic.
PRO TIP: To prevent soil and water from spilling during travel, place a layer of small pebbles at the bottom of your plant pot for drainage, and consider using a lightweight plastic nursery pot inside a decorative cache pot. Water only when you’re settled at your campsite.
17. A Repurposed Shutter Headboard
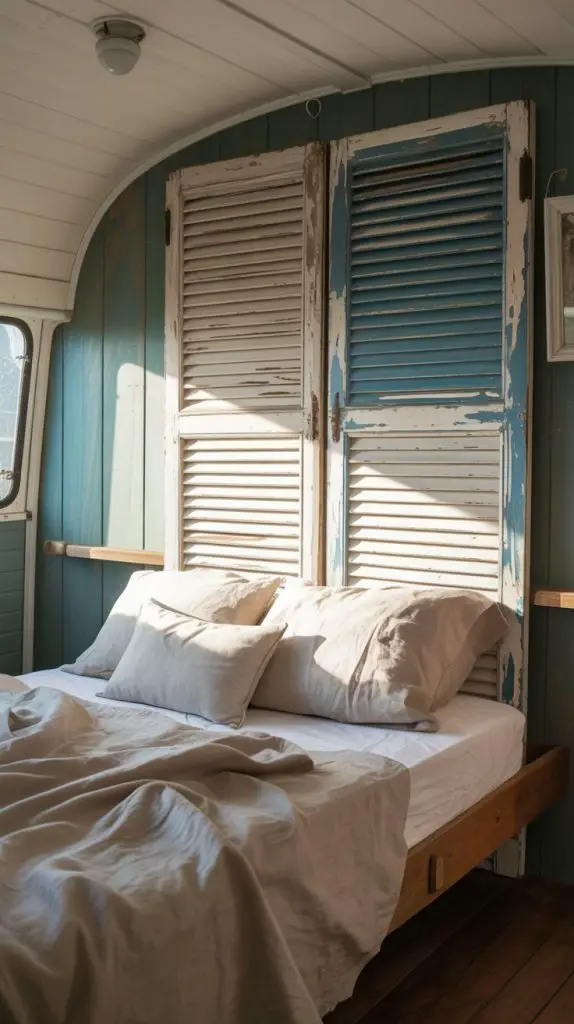
Create a stunning, custom headboard by repurposing an old wooden window shutter. The shutter is wide, with peeling paint in soft white and pale blue, leaning against the wall behind the bed. Its louvres or flat panel design adds significant architectural interest and height, making the sleeping area a defined and elegant focal point.
This headboard requires no permanent installation and is full of rustic character. It tells a story of salvage and reuse, perfectly capturing the shabby chic spirit. You can even weave fairy lights or drape a delicate garland through the slats for an extra touch of magic.
PRO TIP: Secure the shutter to the wall using heavy-duty command strips or a discrete bracket to ensure it doesn’t fall forward. If the shutter has sharp edges or rough wood, a light sanding will make it safe and smooth to the touch.
18. A Collection of Milk Glass Vases
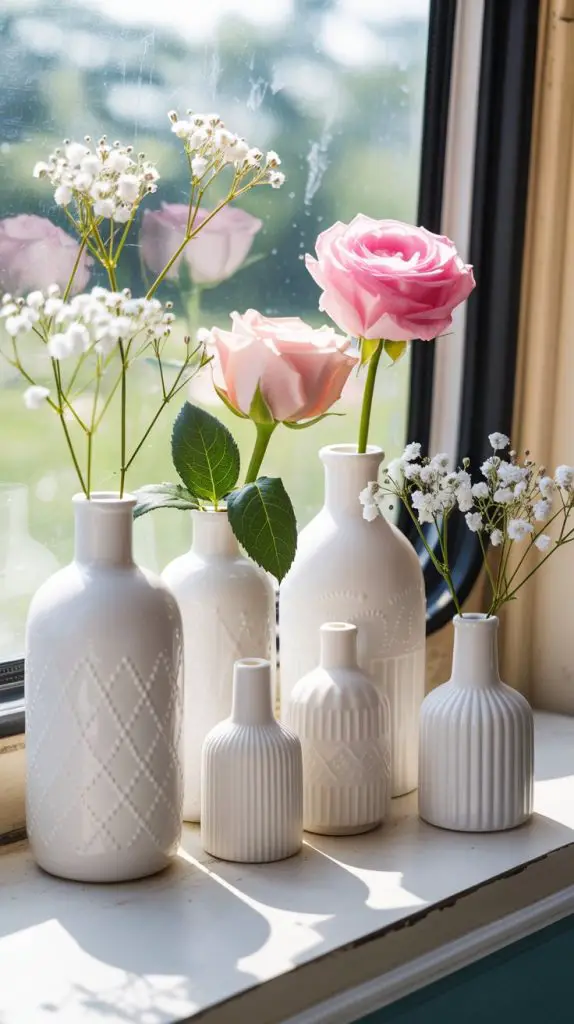
Display the timeless elegance of milk glass throughout your camper. Cluster a collection of these opaque white vases on a windowsill, shelf, or table. They come in various shapes—bud vases, compotes, and hobnail patterns—each holding a single, delicate bloom like a rose, a daisy, or a sprig of baby’s breath.
The uniformity of the white glass creates a cohesive and fresh look, while the varying shapes add visual interest. This collection is easy to curate from thrift stores and flea markets, and it brings a classic, clean, and romantic element to any surface.
PRO TIP: When camping, use faux florals or dried flowers (like lavender, pampas grass, or eucalyptus) in your milk glass vases. They will last the entire trip and beyond without wilting or spilling water, and they require no maintenance.
19. A Embroidered Linens Trunk
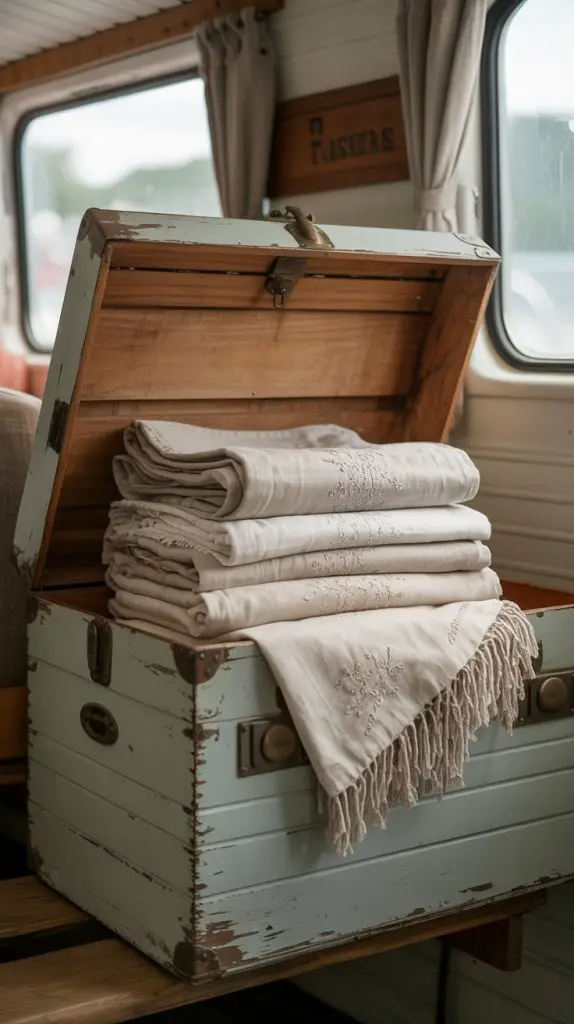
Store your beautiful textiles in a way that adds to the decor. A vintage, flat-top hope chest or trunk with a chipped paint finish sits at the foot of the bed or under a window. The trunk itself is a statement piece, but the real charm comes from leaving it slightly ajar to reveal a carefully folded stack of embroidered linens, lace-trimmed blankets, and crocheted afghans.
This not only provides easy access to your cozy supplies but also turns your storage into a display of beautiful textures and patterns. It suggests a treasure trove of comforts within, enhancing the layered, collected feel of the space.
PRO TIP: To keep your stored linens fresh and free from moisture, make simple sachets by filling small muslin bags with dried lavender or cedar chips. Tuck them in between the folds of your blankets and towels inside the trunk.
20. A Rustic Wooden Crate Shelf
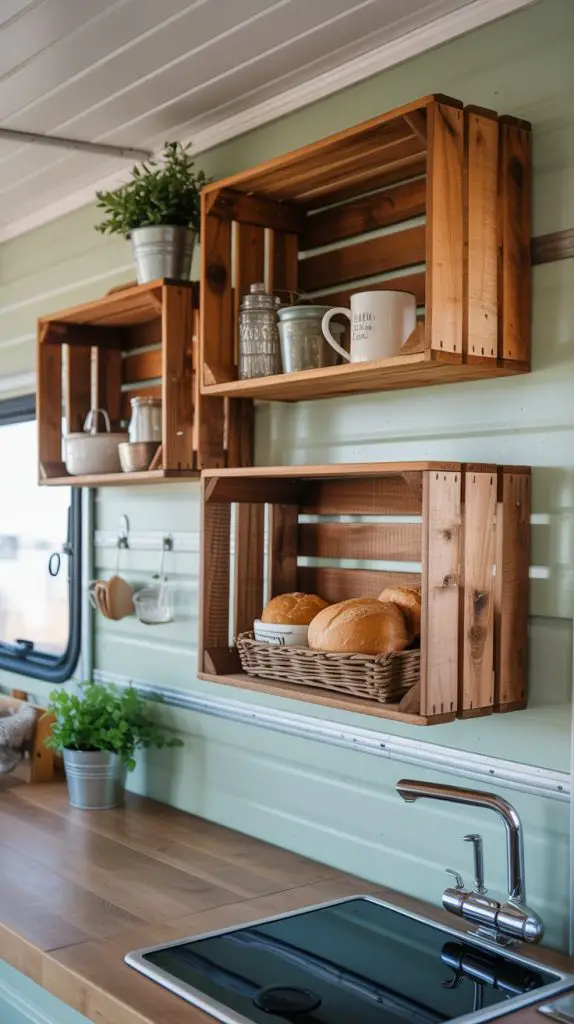
Add rustic, open shelving using reclaimed wooden crates. Two or three crates are fixed to the wall in an asymmetrical arrangement, their wood weathered and bearing faint, painted lettering from their past life. The shelves hold a curated mix of practical and decorative items: a stoneware mug, a rolling pin, a small bread loaf, and a tiny pot of herbs.
This idea brings an authentic, farmhouse feel to your camper. The open shelving makes small items easy to find and access, while the natural wood grain adds warmth and contrasts beautifully with the soft white and pastel colors typical of shabby chic.
PRO TIP: For a secure installation in a moving vehicle, use heavy-duty L-brackets to screw the crates directly into the wall studs. This will prevent them from pulling away from the wall during travel, keeping your displayed items safe.
21. A Delicate Teacup Candle Holder
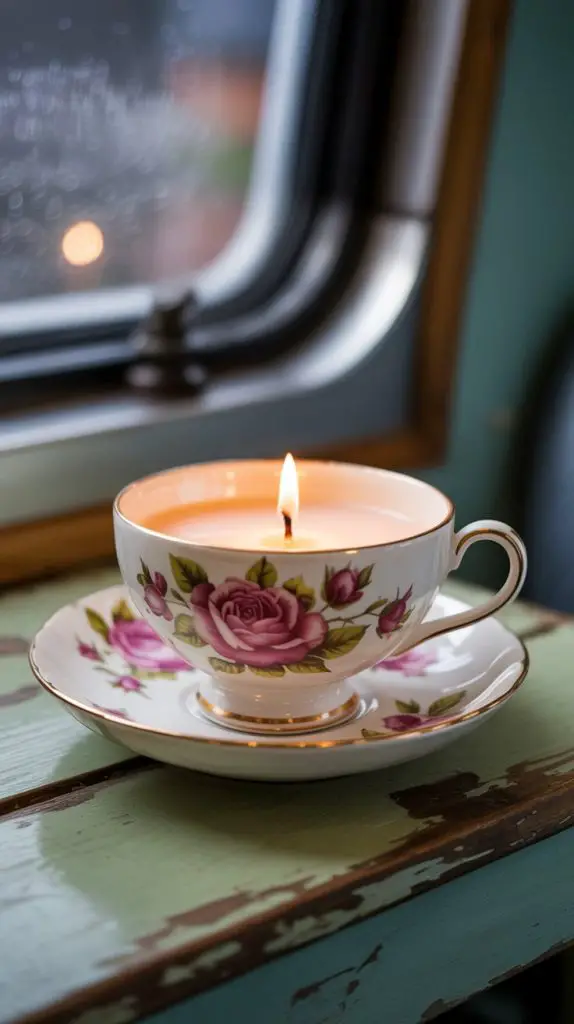
Repurpose a vintage floral teacup and saucer into an elegant candle holder. The china pattern is delicate, with faded pink roses and gold trim. A small, ivory pillar or votive candle is secured in the cup, ready to cast a soft, flickering glow. This creates a beautiful, sentimental accent for a bedside table, dinette, or vanity.
It’s a perfect project for a chipped or orphaned teacup found at a flea market, giving it new life and purpose. The gentle light it emits during the evening is perfect for creating a serene and romantic atmosphere.
PRO TIP: For safety, use a drip-less votive candle or a battery-operated LED tea light. This eliminates the risk of hot wax spills or an open flame tipping over while your camper is in motion or if it gets bumped.
22. A Woven Tapestry Wall Hanging
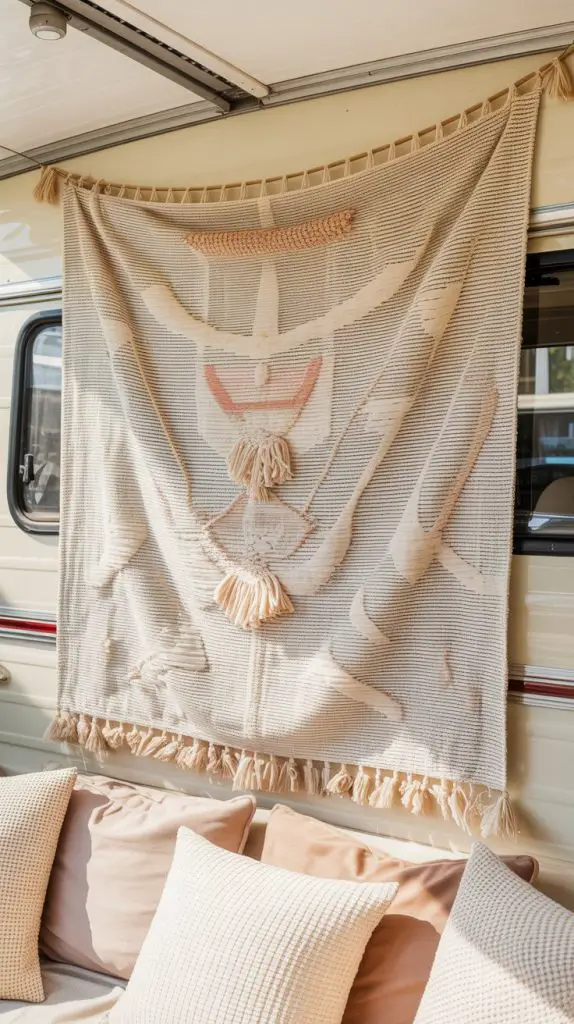
Add a soft, bohemian texture to a large, blank wall with a woven tapestry. The tapestry features a subtle, abstract pattern in a muted color palette of cream, gray, and pale pink. Made of wool or cotton, it adds a layer of softness that fabricates the space, absorbing sound and making the camper feel even cozier.
This is an excellent solution for covering a less-attractive wall or for adding a major artistic element without the weight of a large piece of furniture or framed art. It can be easily hung and taken down, making it a versatile decor piece.
PRO TIP: Use a thin, decorative drapery rod or a simple wooden dowel to hang your tapestry. Secure it with clip-on curtain rings, which are easy to adjust and won’t damage the fabric. This method also allows you to switch out tapestries for a different look.
23. A Painted & Stenciled Floor
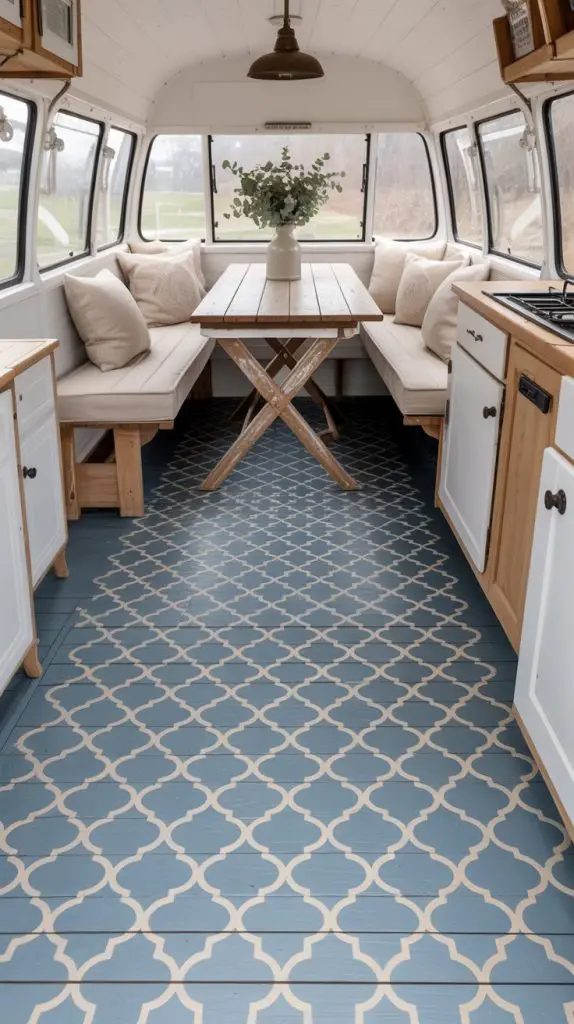
Elevate your camper’s foundation with a painted and stenciled floor. The base is a soft gray or beige paint, durable enough for high traffic. Over this, a delicate, all-over stencil pattern is applied in a slightly off-white color, mimicking the look of an expensive encaustic tile or a vintage rug with motifs like quatrefoils or small flowers.
This custom floor treatment ties the entire space together and adds a high-end, designer touch. It makes the floor itself a work of art, reinforcing the dreamy, detailed-oriented theme of your shabby chic escape.
PRO TIP: Use a high-quality, exterior-grade porch and floor paint for this project. Once the paint is fully cured, apply several thin coats of a water-based polyurethane to protect your beautiful stencil work from scratches and wear.
24. A Hanging Mason Jar Herb Garden
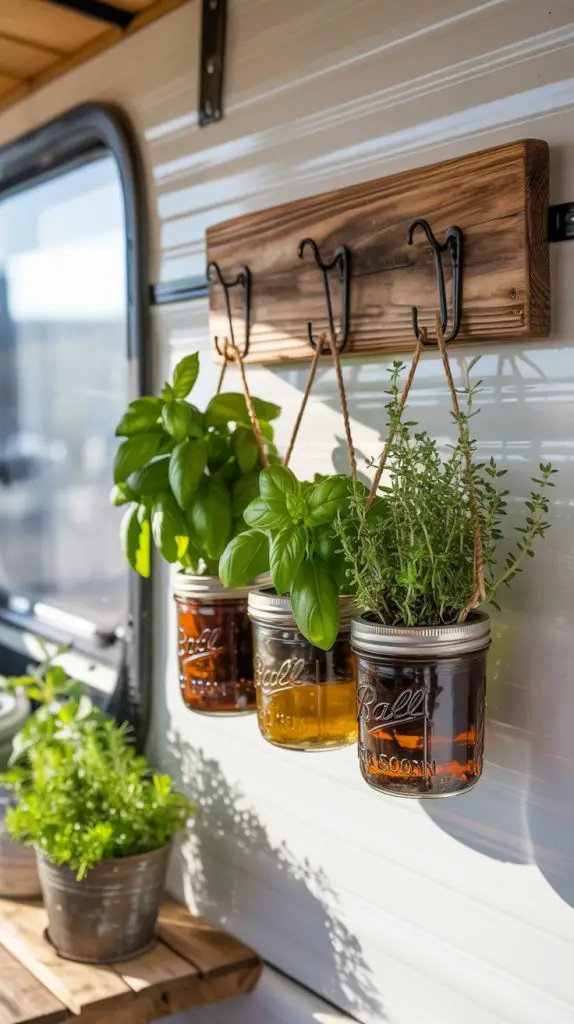
Create a functional and cute kitchen garden with hanging Mason jars. A reclaimed wooden board is mounted on the wall, from which simple metal holders suspend several glass Mason jars. Each jar is filled with soil and a small, growing herb like basil, mint, or thyme, with their fresh green leaves spilling over the top.
This brings life and a fresh scent right into your cooking space. The rustic wood and glass combination is perfectly shabby chic, and having fresh herbs within arm’s reach is a luxury that enhances your campfire meals.
PRO TIP: To prevent overwatering and root rot, add a layer of pebbles or gravel to the bottom of each Mason jar before adding the potting soil. This improves drainage and keeps your herbs healthy in their non-draining containers.
25. A Vintage Mirror with a Faded Frame
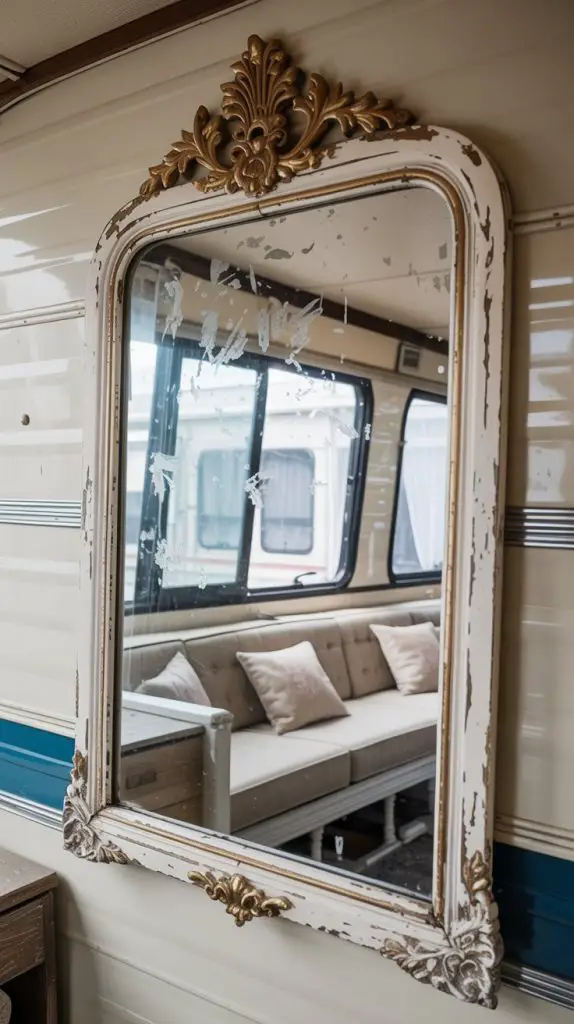
Make your small camper feel larger and brighter with a large, vintage mirror. The mirror’s frame is the star—wide and ornate, made of wood with a gilded or white finish that is heavily faded and chipped, revealing layers of paint and gesso underneath. The glass itself may have minor clouding or spots, which only adds to its authentic character.
Placed opposite a window, it will reflect natural light throughout the space, creating an airier and more open feeling. It serves as a stunning architectural element that feels like a cherished antique.
PRO TIP: When hanging a heavy mirror in an RV, always find a stud in the wall to secure it. Use a strong picture-hanging wire between two D-rings on the back of the frame, rather than a single sawtooth hanger, for a more secure and balanced hold.
26. A Crocheted Blanket Ladder
Lean a simple, wooden blanket ladder in a corner to stylishly store and display your favorite throws. The ladder is made of unfinished or lightly whitewashed pine, with three or four rungs. Draped over each rung is a different textural blanket: a chunky knit throw, a delicate crocheted afghan, a soft chenille blanket.
This is both a storage solution and a textural display. It keeps cozy blankets accessible for cool evenings and adds a strong vertical element filled with softness and color, reinforcing the comfortable, layered look of shabby chic.
PRO TIP: If you’re handy, build your own blanket ladder from pre-cut dowels and 1×2 lumber. You can customize the height and finish to perfectly match your camper’s decor. It’s an easy, inexpensive DIY project with a big payoff.
27. A Floral Fabric-Covered Switch Plate
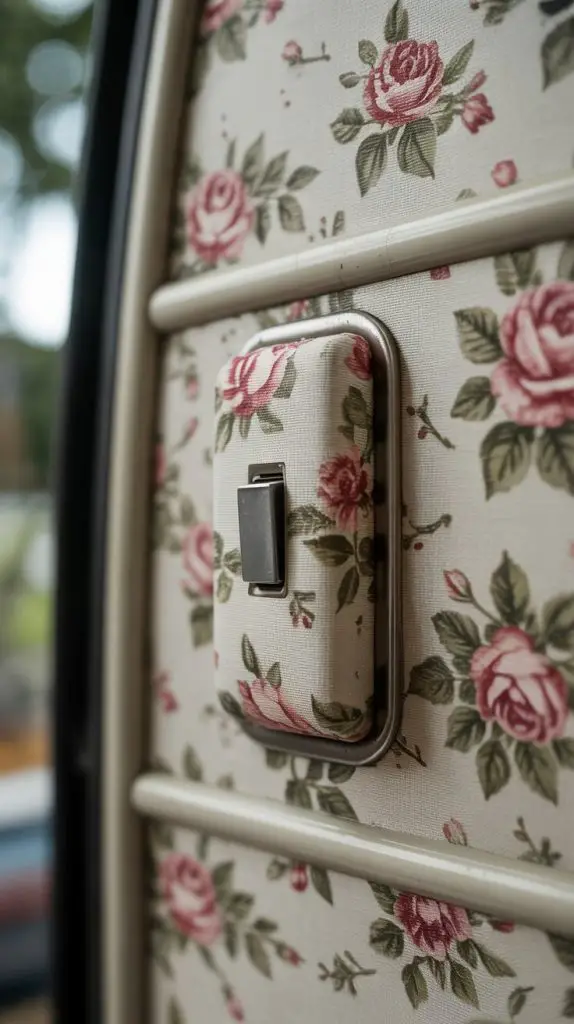
Camouflage a mundane, modern necessity by covering a light switch plate with fabric. A piece of delicate floral fabric, perhaps cut from a vintage scarf or napkin, is decoupaged onto a plain switch plate. The pattern is soft and romantic, turning a functional item into a tiny, almost hidden, piece of art.
This is a micro-detail that shows a high level of care and customization. It’s a surprising and delightful touch that guests will notice and admire, proving that no detail is too small in your shabby chic haven.
PRO TIP: Use Mod Podge or a dedicated decoupage glue to adhere the fabric. Carefully trim around the switch openings with a sharp craft knife. Finish with 2-3 thin coats of Mod Podge over the top to seal and protect the fabric from dirt and wear.
28. A “Floating” Rustic Mantel Shelf
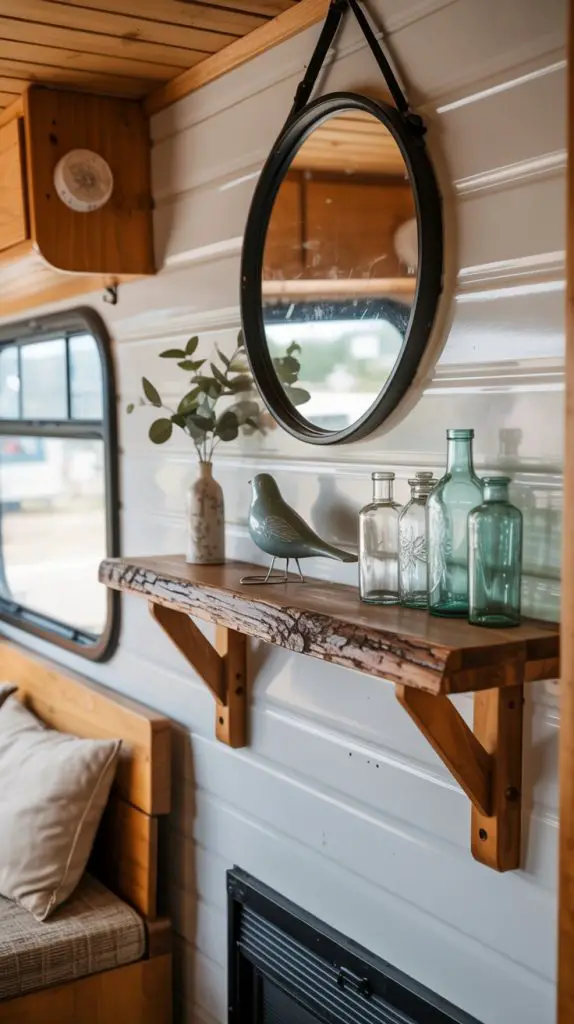
Install a single, floating wooden shelf to act as a faux mantel. The shelf is made from a thick, reclaimed wood plank with a live edge and a dark, weathered finish. It’s styled as a focal point with a small, round mirror hanging above it, and a collection of vintage bottles, a small clock, and a ceramic bird figurine arranged on top.
This creates a visual anchor for the room, providing a surface for rotating displays of your favorite treasures. It adds the cozy, heart-of-the-home feeling of a fireplace mantel, even in the most compact of spaces.
PRO TIP: For a truly secure floating shelf in a vehicle that moves, use heavy-duty shelf brackets that are screwed directly into the wall studs. The shelf can then be attached to the brackets from above, hiding the hardware for a clean, “floating” look.
29. A Basket Weave Headboard
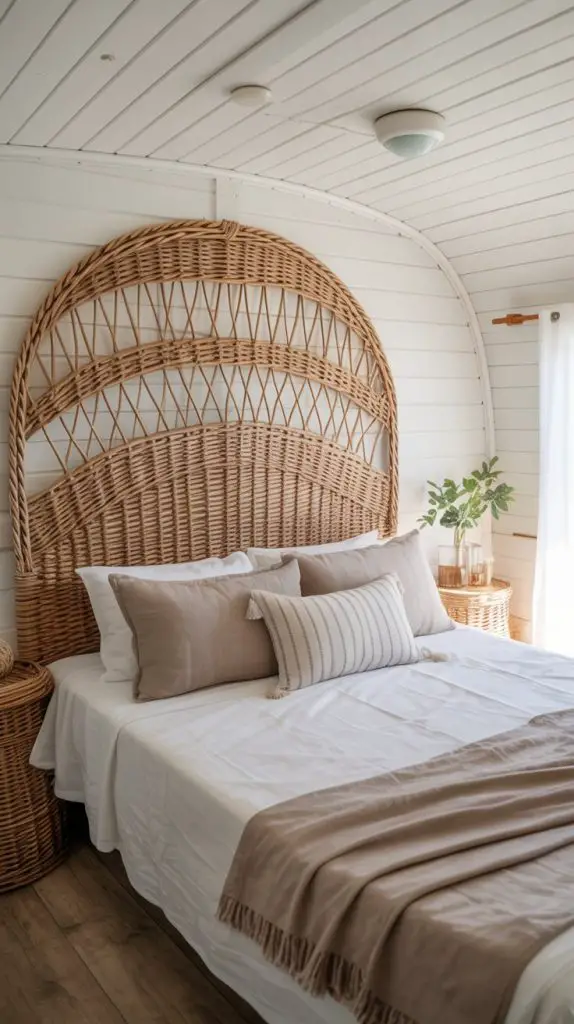
Add natural texture to your bed with a headboard made from woven wicker or rattan. The headboard is a large, rectangular panel with a classic basket weave pattern, its natural cane color adding warmth against a soft white wall. This material is lightweight and airy, preventing the bed from feeling too heavy or imposing in the small space.
It introduces a coastal or cottage feel, complementing the shabby chic style with its organic, handcrafted appearance. It’s a timeless piece that feels both relaxed and elegant.
PRO TIP: Lightly mist your wicker headboard with water and wipe it down with a soft cloth every few months to maintain its flexibility and prevent it from becoming brittle. Avoid placing it in direct, harsh sunlight for prolonged periods to prevent fading.
30. A Vintage Scale as a Fruit Bowl
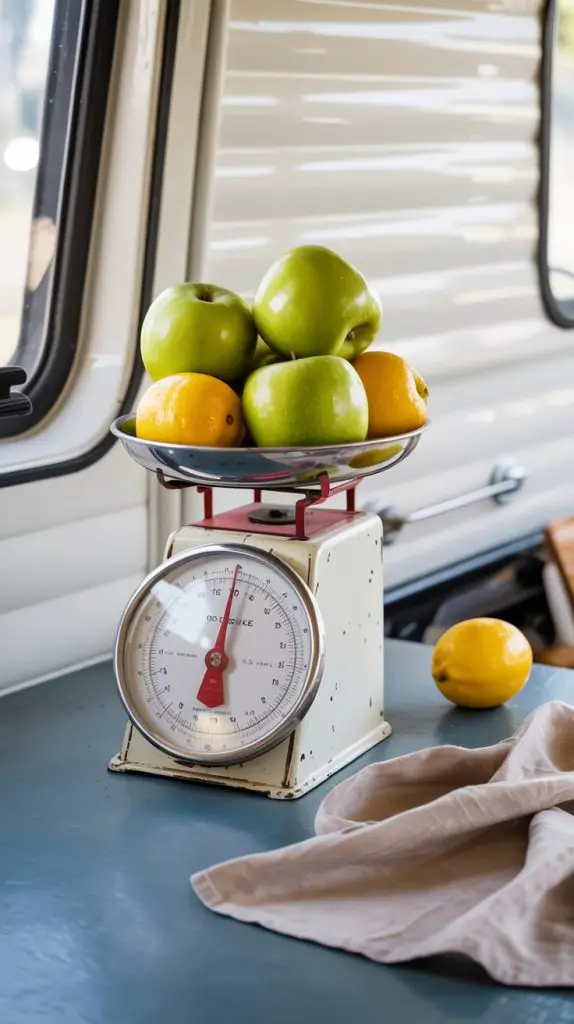
Use a vintage kitchen scale as a unique and charming fruit bowl. The scale is made of aged, painted metal with a glass dome (if available), though the base plate alone is used here. It holds a small, artful arrangement of green apples, a few lemons, or a bunch of fresh lavender, turning a simple kitchen staple into a decorative centerpiece.
This repurposed item adds a touch of nostalgia and industrial charm to your countertop. It’s a conversation piece that beautifully blends function and form in a way that feels collected and personal.
PRO TIP: To prevent bruising on your fruit, you can place a small, delicate linen napkin or a pretty paper doily in the bowl of the scale before adding your apples or lemons. This adds another layer of texture and protects your produce.
31. A Stenciled Welcome Mat
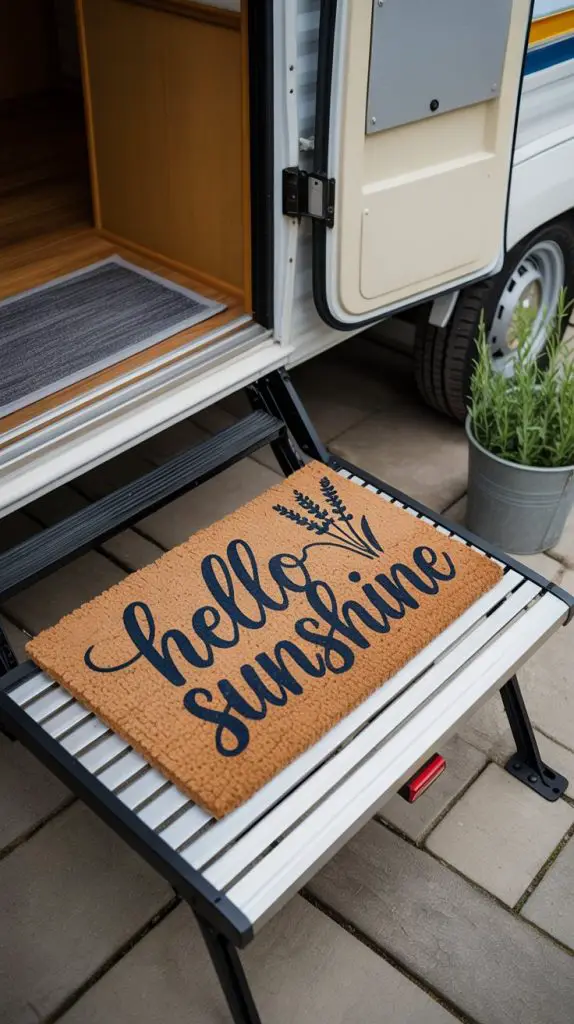
Set the tone right at your doorstep with a custom, stenciled welcome mat. The mat itself is a natural coir or a muted indoor-outdoor rug. Using outdoor paint, a welcoming phrase like “Hello Sunshine” or “Adventure Awaits” is stenciled in a elegant, cursive font, along with a simple floral motif like a wreath or a sprig of lavender.
This is the first touch of shabby chic charm for you and your guests, making your RV feel like a true home. It’s a personal and inexpensive way to make your campsite setup uniquely yours.
PRO TIP: Use a stencil brush and dab on outdoor-rated acrylic paint for the cleanest look. Seal the entire mat with a UV-protective clear coat spray designed for outdoor use to prevent the design from fading in the sun and wearing away from foot traffic.
32. A Peg Rail for Hanging Everything
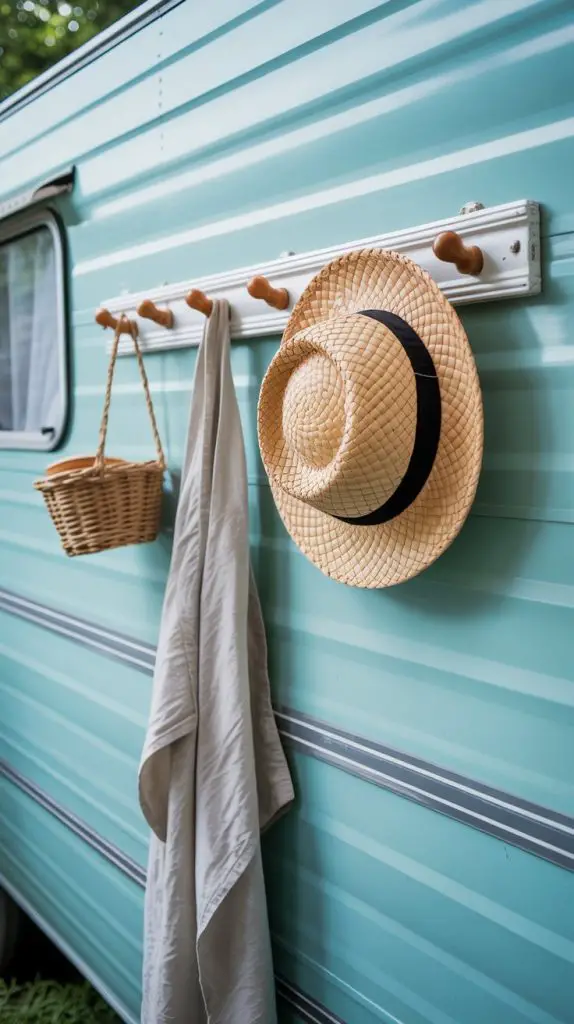
Install a simple wooden peg rail along a wall to create versatile hanging storage. The rail is a long, thin piece of wood with rounded, white-painted pegs spaced evenly along its length. From it, you can hang a variety of items: a straw sun hat, a linen apron, a small woven basket for keys, or a tiny mirror.
This traditional feature is incredibly practical for small-space living, keeping daily essentials organized and off countertops. It adds a clean, functional, and charming element to any wall.
PRO TIP: When installing the peg rail, make sure to screw it directly into the wall studs for maximum strength. This will ensure it can hold the weight of multiple items without pulling out of the wall, especially important in a moving vehicle.
33. A Paper Lantern Light Fixture
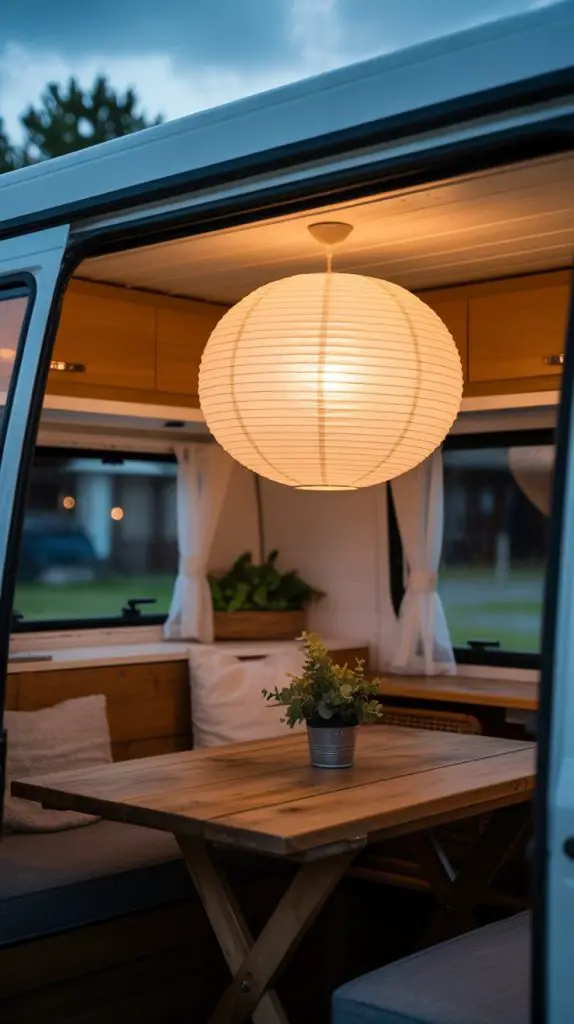
Replace a standard, harsh RV light fixture with a large, white paper lantern. The lantern is spherical and simple, diffusing the light from a bulb into a soft, warm, and gentle glow that fills the room. It hangs from the ceiling over the dinette or living area, immediately modernizing the space with a touch of minimalist, organic texture.
This is an inexpensive and lightweight update that makes a huge impact on the ambiance of your camper. It feels airy, modern, and perfectly in line with the soft, uncluttered feel of shabby chic.
PRO TIP: For the safest and most fire-resistant option, use an LED light bulb as they generate significantly less heat than incandescent bulbs. This is crucial when the bulb is enclosed in a paper shade.
34. A Window Box with Faux Flowers
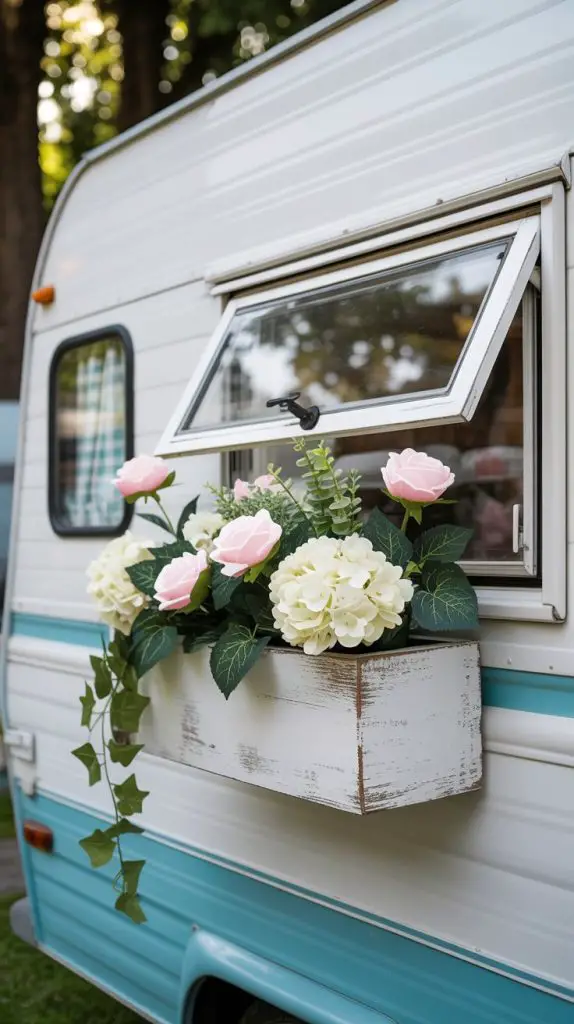
Add cottage curb appeal to your RV with an exterior window box. The box is made of wood and painted a distressed white, attached beneath a large window. It’s filled with an abundant, overflowing mix of faux flowers in a shabby chic palette: white hydrangeas, pale pink roses, and trailing green ivy.
This exterior touch makes your camper look charming and established at the campsite, blurring the line between a vehicle and a cozy cottage. It provides a beautiful view from both inside and outside.
PRO TIP: Use UV-resistant artificial flowers to prevent them from fading quickly in the sun. Secure the window box firmly to the camper’s exterior frame, and use floral foam inside the box to anchor the stems so they don’t blow away while driving.
35. A Final Touch: A Memory Jar
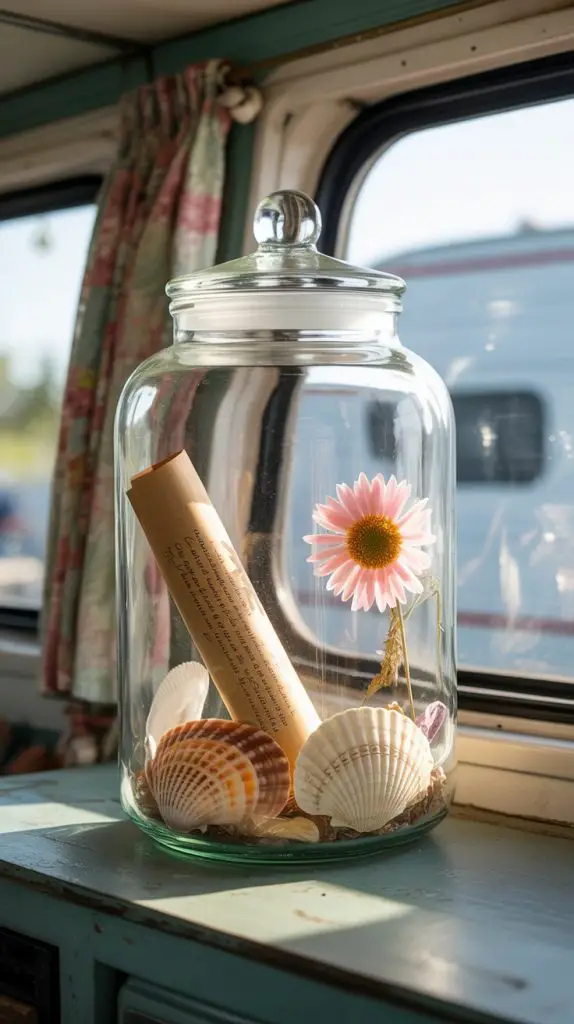
Capture the magic of your travels with a dedicated memory jar. The jar is a large, glass apothecary style with a delicate, zinc lid. Inside, you collect small mementos from each trip: a seashell, a ticket stub, a pressed flower, a handwritten note about a beautiful sunset. It sits on a shelf as a beautiful, evolving display of your dreamy escapes.
This is the perfect finishing touch, embodying the sentimental and personal heart of the shabby chic style. It’s not just about how the camper looks, but about the beautiful memories you create within it.
PRO TIP: Write your memories on small, uniformly cut pieces of vintage-looking paper or cardstock for a cohesive and elegant look inside the jar. This turns the collection into a curated and beautiful time capsule of your adventures.


