Full-time RV living sounds like the dream — no rent, no office cubicle, and waking up to a new view every day. But if you’ve ever wondered what it really looks like behind the Instagram-worthy sunsets and campfire photos, Joe and Kalyn from the YouTube channel Open Roading are pulling back the curtain.
In their latest video, this full-time couple is stuck in Phoenix, Arizona, waiting on RV parts that definitely did not arrive in three days like they were promised. On top of a busted front cap, a scuffed decal, and a sheared screw or two, they also did something completely unexpected — they adopted a tiny gray-and-white Holland lop rabbit named Ollie.
This video is a masterclass in the real cost of DIY RV repairs — from surprise shipping bills that will make your stomach drop, to decal replacements that require nerves of steel and a lot of painter’s tape. Whether you’re a full-timer, a weekend warrior, or someone dreaming of ditching their mortgage, this episode of Open Roading is your unofficial guide to life on wheels.
From the boondocking challenge math to Bunny Care 101, there’s something in here for everyone. So buckle up — this is the unfiltered side of RV life, and it’s equal parts hilarious, educational, and honestly, pretty heartwarming.
Would you like to save this article?
🔨 1. When Your RV Takes a Beating — The Damage Report
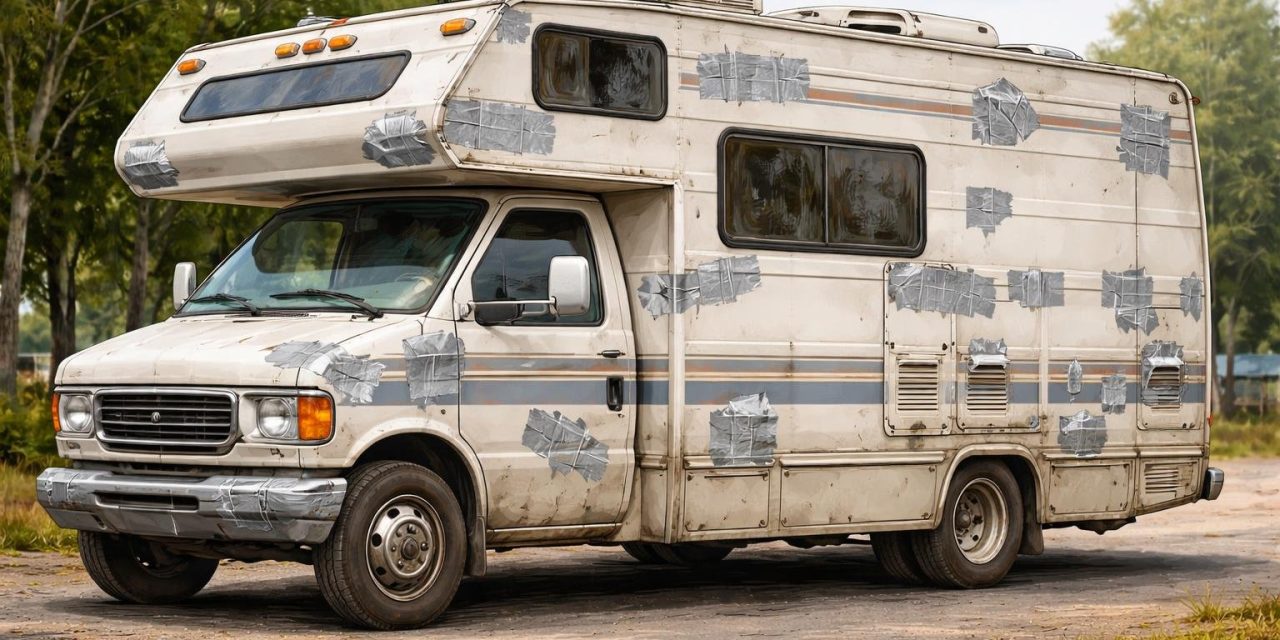
Even the most experienced RVers aren’t immune to the occasional oopsie. Joe and Kalyn’s Brinkley Z3515 took some serious hits on a recent travel day — and none of them were pretty.
Here’s exactly what happened:
| Incident | What Happened | Result |
|---|---|---|
| 🌲 Tree Branches | Scraped the front cap of the RV | Scratches on the cap |
| 🪞 Mirror Collision | Tail swing knocked a neighboring vehicle’s mirror | Damaged rear decal |
| 💥 Front Cap Hit | Busted the front cap entirely | Major trim damage |
Joe describes the sequence of events like a comedy of errors. Kalyn, to her credit, remained almost calm. Almost.
The scary truth? This kind of damage can happen to anyone — boondocking or at a campground. RV damage is not a matter of if, it’s a matter of when.
😂 Look, if your idea of a “bad day” is a dead phone battery, you clearly haven’t tried to navigate a 40-foot fifth wheel through a tree-lined campsite. One wrong inch and suddenly you’re starring in your own disaster documentary. Just know that tail swing is absolutely NOT your friend.
📦 2. The $600 Shipping Shock That Will Make You Cry
Here’s the plot twist nobody saw coming. The trim pieces to fix the front cap? Only $60 in parts. The shipping to deliver a 12-foot tube to Phoenix, Arizona? A jaw-dropping $600.
That’s right — Joe paid 10 times more in shipping than he did for the actual parts.
| Item | Cost |
|---|---|
| RV Trim Parts | ~$60 |
| Shipping (12-ft tube, “standard” rate) | $600 |
| Total Out of Pocket | ~$660 |
The order was supposed to arrive via 3-day express shipping. It was placed on December 23rd and didn’t land until January 5th — 13 days later. When Joe called the shipper, he found out no one had even scheduled a delivery.
According to the RV Repair Cost Index 2025, the average non-drivetrain RV repair runs between $450–$1,200 before parts. But oversized parts shipping? That’s a whole other monster that can blindside even the most budget-savvy RVer.
Reddit users on r/GoRVing have reported similar horror stories — small, lightweight RV parts costing $400+ just to ship due to dimensional weight pricing.
😂 You know that feeling when you order a $5 item online and the shipping is $47? Now imagine that, but with a 12-foot aluminum tube and a grown adult quietly crying in a Phoenix parking lot. Welcome to the RV life nobody puts on a bumper sticker.
☀️ 3. The Boondocking Math — How They’re Saving Thousands
One of the coolest parts of Open Roading’s content is their ongoing Boondocking Challenge. They invested in a full solar system to avoid paying for campsites — and they’re tracking every single penny of savings.
Here’s where the numbers stand after 72 straight days of boondocking:
| Boondocking Tracker | Amount |
|---|---|
| Solar System Total Investment | $14,486 |
| Average Campground Fee Saved Per Night | $55 |
| Total Days Boondocked So Far | 72 Days |
| Total Campground Fees Saved | $3,960 |
| Remaining Solar “Payoff” Balance | $10,526 |
That’s nearly $4,000 in campground fees avoided — just in the first 72 days!
According to iRV2 Forums, full-timers who boondock 85% of the time can save upwards of $10,800 per year in campground fees alone. The challenge started in Southern California and continued through Arizona — and the duo is still going strong.
Important note: The $600 shipping bill is absolutely, positively NOT being added to the boondocking cost tracker. Joe made that crystal clear. Twice.
😂 So let’s get this straight — you can avoid paying for campgrounds AND park your house in the desert surrounded by ATVs and dirt bikes all weekend long. That sounds less like a clever savings strategy and more like a very specific type of organized chaos. But hey, free is free.
🐰 4. Meet Ollie — The Tiny New Co-Pilot
In the middle of all the repair stress and parts drama, Joe and Kalyn did what any totally-reasonable full-time RV couple would do — they went to PetSmart and adopted a rabbit.
Ollie — formerly known as “Biscuit” at the rescue — is a gray-and-white Holland lop, approximately 3 years old, weighing around 5 lbs. He was adopted through the Central Arizona Animal Rescue and had been in the rescue for about 2.5 months before finding his forever home on wheels.
He was one of three finalists. His name was put to a vote among Open Roading’s channel members:
| Name | Result |
|---|---|
| 🏆 Ollie | 43% of votes — WINNER |
| Theo | Runner-up |
| Finn | Runner-up |
Ollie came from a bonded pair, but he and his brother were fighting constantly — so they were being adopted separately. This is actually Joe and Kalyn’s fourth rabbit, following beloved bunnies Twix, Cody, and Cinder — all of whom hold a very special place in their RV family story.
😂 Nothing says “we’re totally stressed out adults making responsible financial decisions” quite like pulling into a PetSmart parking lot at night and walking out with a Holland lop in your lap. But honestly? Ollie completely stole the show. Even the camera liked him more than the broken front cap trim.
🥬 5. Bunny Care 101 — Yes, You CAN Have a Rabbit in an RV
Kalyn — the resident rabbit expert of the duo — gave viewers a full and surprisingly detailed breakdown of what it takes to keep a bunny healthy and happy on the road. Spoiler: it’s more involved than you’d think.
Here’s the complete Ollie Daily Care Guide straight from the video:
| Care Category | Details |
|---|---|
| 🌾 Timothy Hay | Makes up the majority of diet — keeps teeth worn down and aids digestion |
| 🥙 Pellets | 1/4 cup per day of Oxbow brand (for a ~5 lb rabbit) |
| 🥗 Fresh Greens | Romaine lettuce or mixed greens — served at night |
| 💧 Water | Always available, always fresh and clean |
| 🚽 Litter Training | Neutered bunnies have excellent litter habits — Ollie is a pro |
| 🏠 Living Space | Exercise pen ($30 off Facebook Marketplace!) tucked under the office desk |
Holland lops can be prone to ear infections due to their floppy ears — but Kalyn reported Ollie’s ears looked great. His teeth also looked healthy, which is critical since rabbit teeth never stop growing.
According to PetMD’s Rabbit Care Sheet, rabbits require daily exercise, a spacious clean enclosure, a hay-heavy diet, and annual veterinary care. Kalyn is clearly doing everything right!
😂 You thought living in an RV was all about freedom and open roads? Wait until you’re carefully measuring out exactly 1/4 cup of pellets for a 5-pound animal who also has a better litter box record than most toddlers you know. Ollie has officially raised the standard of hygiene in this entire household.
🔧 6. DIY Trim Repair on a Brinkley Z3515 — The Struggle Is Very Real
This is where the video turns into a full-on DIY adventure — and by “adventure,” we mean sheared screws, misaligned holes, and some impressively creative problem-solving. Joe tackled the front cap trim repair on the Brinkley Z3515 with literally zero online tutorials available for this specific repair.
Here’s the complete step-by-step trim repair play-by-play:
| Step | What Happened |
|---|---|
| 1. Remove Old Trim | Bends surprisingly easily — both good and bad news |
| 2. Extract Sheared Screw | Required serious teamwork and maximum elbow grease |
| 3. Cut 12-ft Trim to 3 ft | Not exactly OSHA-approved, but it worked |
| 4. Discover Holes Don’t Line Up | A clear manufacturing quality control issue 😤 |
| 5. Drill All-New Holes | Because sometimes you just have to start completely over |
| 6. Shear Another Screw | Because of course. |
| 7. Apply Caulk | Joe’s single proudest moment of the entire day |
| 8. Admire the Results | Not factory-perfect, but seriously impressive for a DIY job! |
The Brinkley Z3515 is a luxury fifth wheel with an MSRP of $132,600, a total length of 39’11″, and a GVWR of 17,495 lbs. It features a one-of-a-kind flex-room office space — which is now also Ollie the rabbit’s official bedroom.
Pro tip straight from the video: Tear down the damaged area BEFORE ordering parts. If Joe had done this first, he might have discovered he could bend the original trim back into place and saved himself every single dollar of that $600 shipping bill.
😂 Imagine spending $132,600 on a luxury fifth wheel only to discover the pre-drilled holes don’t even line up with each other. You’d think at that price point, the holes would at least be on speaking terms. Apparently RV manufacturing has its own very unique definition of “precision.”
🎨 7. Replacing the Brinkley Decal — Painter’s Tape Is Your Secret Weapon
Replacing the damaged decal was the second major repair of the episode — and it was every bit as nerve-wracking as the trim work. Kalyn used a heat gun to carefully peel away the old decal while Joe hovered nearby trying his very best not to stress everyone out.
Here’s the DIY Decal Replacement Process they used, step by step:
- Assess the damage — identify exactly how much decal needs to be replaced
- Heat gun the old decal — apply gentle heat and peel back slowly and carefully
- Clean the surface — use Goo Gone to remove adhesive residue (NOT rubbing alcohol!)
- Apply painter’s tape down the center of the new decal — work one half at a time
- Peel the backing and press starting from the center and working outward to avoid bubbles
- Smooth out wrinkles — work carefully and take your time
- Remove the painter’s tape and reveal the finished result
- Step back and admire — the result was shiny, snazzy, and bubble-free (mostly!)
Professional RV decal replacement can cost anywhere from $1,000 to $3,600 depending on the size of your rig, according to Good Sam Community. Doing it yourself — the way Joe and Kalyn did — can save you thousands of dollars.
Fun fact: Brinkley’s own care documentation actually states: “If you need to replace decals, please go to a professional.” Joe and Kalyn are not professionals. They grabbed a heat gun and figured it out anyway.
😂 The manufacturer literally told them to hire a professional — and they responded by pulling out a heat gun, a bottle of Goo Gone, and sheer determination. This is the RV equivalent of your car manual saying “take to dealership immediately” while you’re already elbow-deep in the engine with a YouTube tutorial playing. Absolute respect.
🐕 8. Trinity Meets Ollie — The Most Stressful Introduction Since Middle School
Before Ollie could fully settle in and claim his spot under the desk, there was one very important hurdle to clear: Trinity, the dog. Trinity has lived peacefully with rabbits before — she was wonderful with Cody — but a Holland lop is roughly half the size of a dog’s entire head.
Here’s how the big introduction unfolded:
| Moment | What Happened |
|---|---|
| Trinity Enters the Room | Already hyper — clearly sensed something new was happening |
| First Sniff Through the Cage | Both animals approached with curiosity |
| Near Nose-to-Nose Contact | Almost happened — genuinely adorable moment |
| 🐰 Ollie’s Response | One firm, decisive THUMP — bun was not impressed |
| 🐕 Trinity’s Response | Tail wagging at genuinely dangerous speeds 🌀 |
| Final Verdict | Promising! Just needs time and patience |
Rabbits thump their back feet when they feel scared, threatened, or annoyed — it’s their way of communicating that things need to calm down immediately. Ollie thumped exactly once, which is honestly a very restrained and dignified response to having an excited dog’s nose shoved in your face.
Joe and Kalyn’s game plan going forward: keep the office door open while they’re home so Trinity gradually gets used to Ollie’s presence — but always separate them when leaving the RV, just to be completely safe.
😂 Your dog has been an only child for years and suddenly there’s a rabbit living under the desk. Trinity’s tail was wagging so hard it was essentially functioning as a helicopter rotor. Ollie did what any sensible, self-respecting creature does when confronted with that level of unhinged enthusiasm — he thumped once and went straight back to his hay pile. Honestly? Ollie has the right idea about life.
📊 Quick Stats Recap: Everything You Need to Know at a Glance
| Topic | Key Number |
|---|---|
| Parts Cost for Trim Repair | ~$60 |
| Shipping Cost | $600 😱 |
| Days Waiting on Parts | 13 days |
| Solar System Total Cost | $14,486 |
| Campground Fees Saved (72 nights @ $55/night) | $3,960 |
| Remaining Solar “Payoff” Balance | $10,526 |
| Ollie’s Age | ~3 years old |
| Ollie’s Weight | ~5 lbs |
| Facebook Marketplace Exercise Pen Score | $30 (originally $70!) |
| Brinkley Z3515 MSRP | $132,600 |
🔑 Key Takeaways for Every RV Owner
- Always price out shipping BEFORE ordering oversized parts — the freight cost may shock you more than the repair itself
- Boondocking with solar is a serious long-term investment — but at $55/night in savings, the math absolutely works out eventually
- DIY RV repairs are 100% possible — even on luxury fifth wheels with zero available online tutorials
- Rabbits CAN live happily in an RV — they just need the right space, the right diet, and a patient dog for a roommate
- Pre-drilled holes on RV trim may not line up — save yourself the frustration and just plan to drill new ones
- Painter’s tape down the center is the secret weapon for a smooth, professional-looking DIY decal replacement
SOURCES
- Open Roading YouTube — The TRUE COST of DIY RV Repairs (Original Video)
- Brinkley RV — Model Z 3515 Official Specs & Features
- Happy Campers — RV Repair Cost Index 2025
- Good Sam Community — Approximate Cost of Replacing RV Decals
- iRV2 Forums — Cost of Boondocking Full-Time
- PetMD — Complete Rabbit Bunnies Care Sheet
- RV Travel — DIY RV Decal Replacement Guide
- Cruise America — RV Ownership Costs: The Yearly Total
- Reddit r/GoRVing — Wild Shipping Costs for RV Parts
- Open Roading on Instagram


