
Picture this: You’re on a cross-country adventure in your beloved RV, enjoying the freedom of the open road, when nature calls. You head to the bathroom and immediately remember why you’ve been dreading this moment—that tiny, uncomfortable RV toilet that feels more like a toy than a real fixture. Sound familiar? Many RV enthusiasts wonder, can you install a regular toilet in an RV, and the answer might surprise you. While it’s technically possible, the reality involves more than just swapping out fixtures. Let’s dive deep into everything you need to know about upgrading your RV bathroom with a residential toilet.
Key Takeaways
- Yes, you can install a regular toilet in an RV, but it requires significant modifications to plumbing, flooring, and water systems
- Weight and water consumption are the two biggest challenges—residential toilets are heavier and use 3-4 times more water per flush
- Tank capacity modifications are essential since standard RV black tanks aren’t designed for the increased water volume from residential toilets
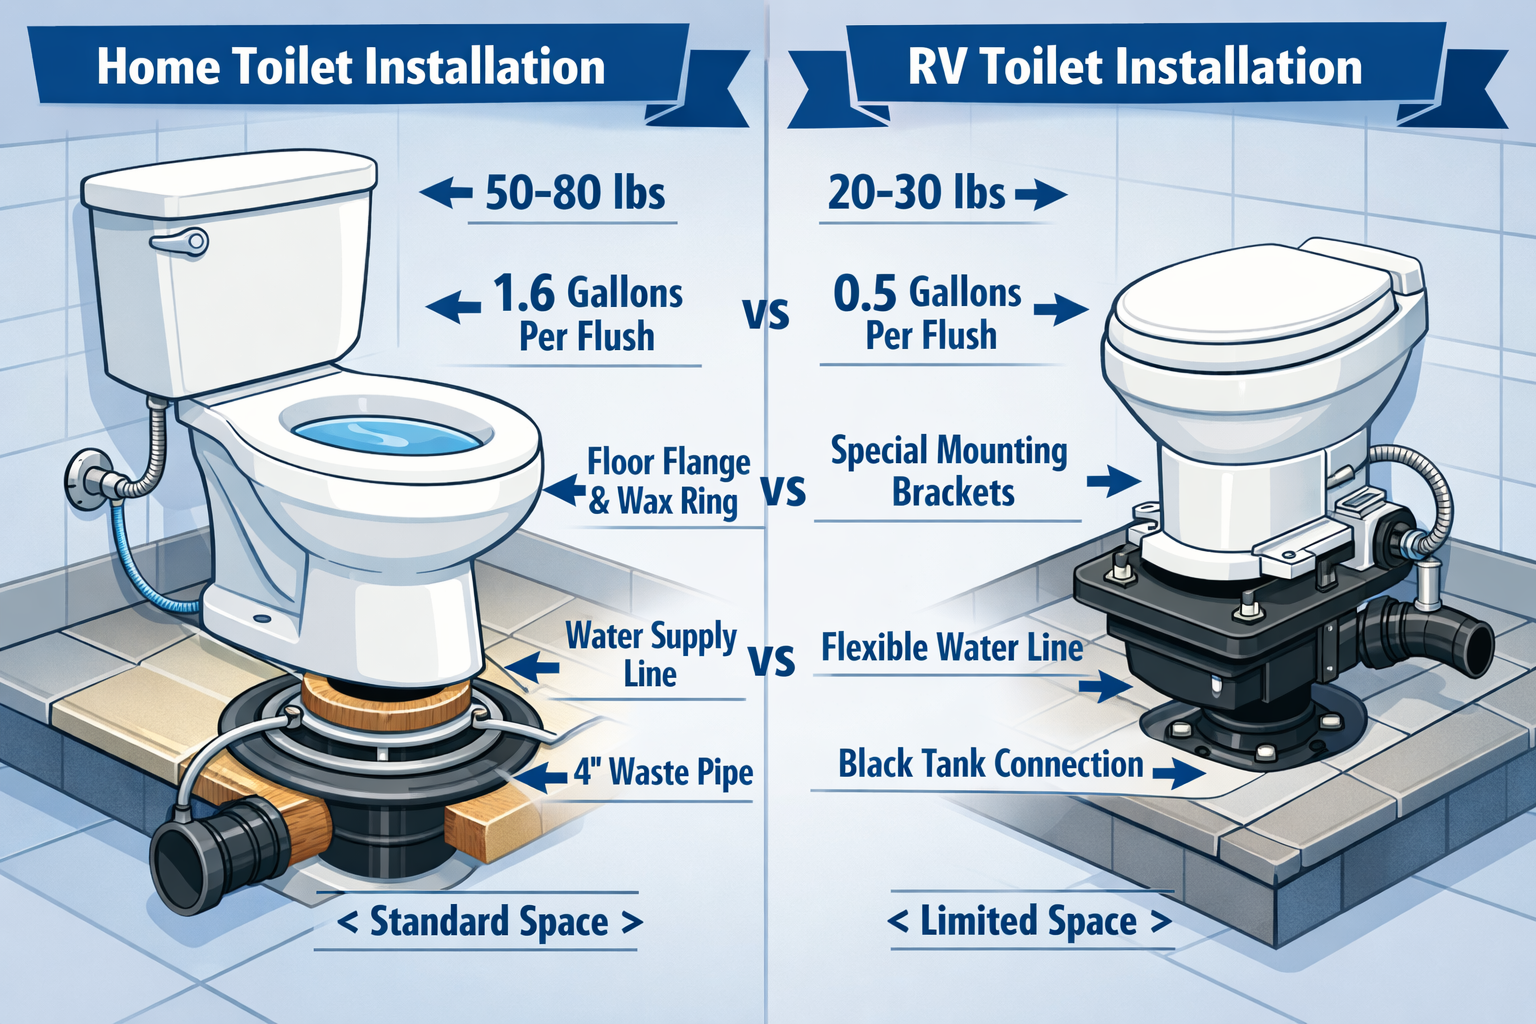
- Structural reinforcement of the bathroom floor may be necessary to support the additional weight (50-80 pounds vs. 20-30 pounds for RV toilets)
- Professional installation is recommended unless you have extensive plumbing and RV modification experience
Understanding the Differences Between RV and Residential Toilets
Would you like to save this article?
Before jumping into whether can you install a regular toilet in an RV, it’s crucial to understand what makes these fixtures fundamentally different.
RV Toilets: Built for the Road
RV toilets are specifically engineered for mobile living. They’re lightweight, typically weighing between 20-30 pounds, and designed to use minimal water—often just 0.5 gallons per flush or less[1]. The construction materials are usually plastic or lightweight composites, and they feature a direct-drop system where waste falls straight into the black tank below.
Key features of RV toilets:
- 🚽 Lightweight plastic construction
- 💧 Low water consumption (0.2-0.8 gallons per flush)
- 🔧 Simplified mounting system
- 📏 Compact footprint
- ⚡ Foot pedal or hand lever operation
Residential Toilets: Comfort First
Regular household toilets prioritize comfort and performance over portability. They’re constructed from heavy porcelain, weigh 50-80 pounds on average, and use significantly more water—typically 1.6 gallons per flush for modern low-flow models[2]. The flushing mechanism relies on a gravity-fed or pressure-assisted system that requires a full water trap.
Key features of residential toilets:
- 🏺 Heavy porcelain construction
- 💦 Higher water usage (1.28-1.6 gallons per flush)
- 🔩 Standard floor flange mounting
- 📐 Larger physical dimensions
- 🚿 Traditional lever or button operation
Can You Install a Regular Toilet in an RV? The Technical Reality
The short answer is yes, you can install a regular toilet in an RV—but it’s not a simple swap. This modification requires careful planning and several critical considerations.
Weight Distribution Concerns
One of the primary challenges involves weight. Adding an extra 30-60 pounds to your RV’s bathroom floor might not seem like much, but it matters significantly when you’re traveling. The floor structure in most RVs isn’t designed to support the concentrated weight of a porcelain toilet, especially during travel when the vehicle experiences vibrations, bumps, and lateral forces.
Weight comparison table:
| Toilet Type | Average Weight | Floor Stress | Travel Safety |
|---|---|---|---|
| Standard RV Toilet | 20-30 lbs | Low | Excellent |
| Residential Low-Profile | 50-60 lbs | Moderate | Good with reinforcement |
| Standard Residential | 70-90 lbs | High | Requires significant reinforcement |
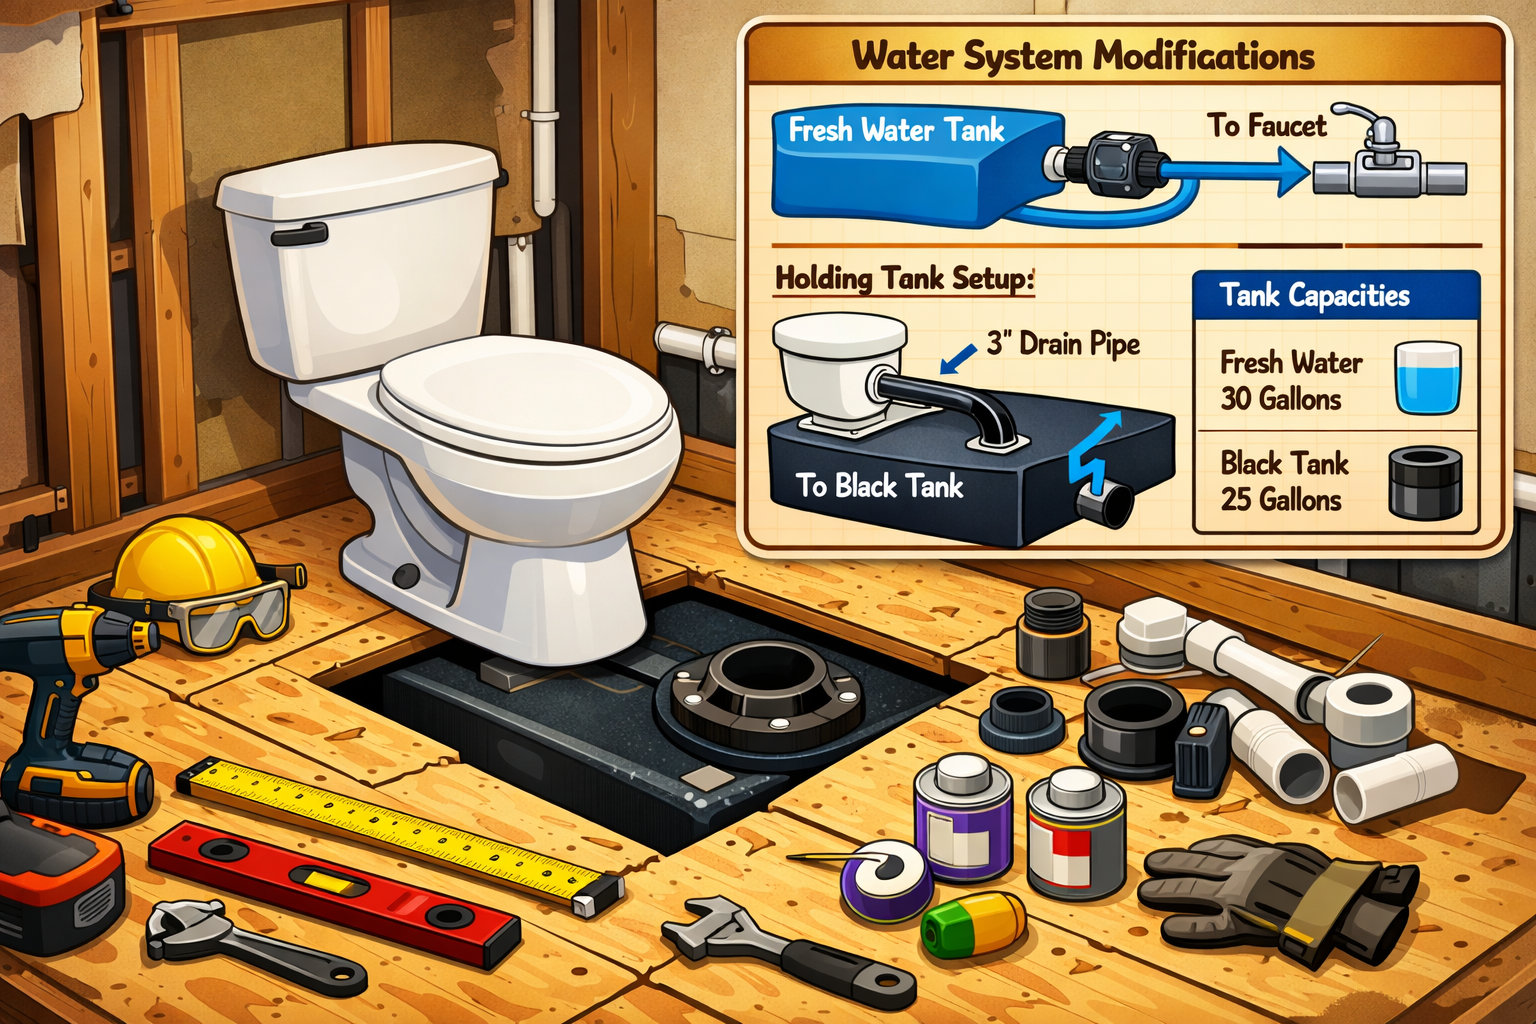
Water System Modifications
The water consumption difference creates a domino effect throughout your RV’s systems. A residential toilet using 1.6 gallons per flush means your freshwater tank depletes much faster, and more importantly, your black tank fills up significantly quicker.
Consider this calculation: If you’re a family of four, each person using the toilet five times per day:
- RV toilet: 4 people × 5 uses × 0.5 gallons = 10 gallons per day
- Residential toilet: 4 people × 5 uses × 1.6 gallons = 32 gallons per day
That’s a 220% increase in water usage! 💧
The Installation Process: What’s Actually Involved
Installing a regular toilet in your RV isn’t a weekend DIY project for most people. Here’s what the process typically entails:
Step 1: Structural Assessment and Reinforcement
First, evaluate your RV’s bathroom floor structure. Most RV floors consist of thin plywood over foam insulation and metal framing. You’ll likely need to:
- Remove existing flooring material
- Add reinforced plywood (minimum 3/4-inch thickness)
- Install additional support beams or brackets
- Ensure proper weight distribution across floor joists
- Consider the impact on the RV’s overall weight capacity
Step 2: Plumbing Modifications
The plumbing changes are where things get complicated. RV toilets use a simple direct-drop system, while residential toilets require a proper waste trap and different mounting flange.
Required plumbing modifications:
- Install a standard toilet flange (typically 3-inch or 4-inch)
- Create a proper seal between the toilet and black tank
- Modify water supply lines to accommodate residential toilet connections
- Install shut-off valve for easier maintenance
- Ensure proper venting to prevent vacuum issues in the black tank
Step 3: Black Tank Considerations
Your existing black tank might not handle the increased water volume effectively. Many RVers who make this switch also upgrade to a larger black tank or add a second tank to accommodate the additional wastewater.
Step 4: Actual Toilet Installation
Once the prep work is complete, installing the toilet follows standard residential plumbing procedures:
- Position the toilet over the flange
- Install new wax ring or rubber gasket
- Secure with closet bolts
- Connect water supply line
- Test for leaks
- Seal base with caulk
Pros and Cons: Is It Worth the Effort?
Advantages ✅
Comfort: Let’s be honest—residential toilets are simply more comfortable. The larger bowl, higher seat, and familiar feel make bathroom breaks much more pleasant.
Better flushing power: Residential toilets typically flush more effectively, reducing odors and keeping the bowl cleaner.
Durability: Porcelain toilets are incredibly durable and can last decades with minimal maintenance.
Home-like feel: For full-time RVers, this modification brings a significant quality-of-life improvement.
Resale value: Some buyers specifically seek RVs with residential toilet upgrades, particularly in the luxury market.
Disadvantages ❌
Water consumption: The dramatically increased water usage means more frequent tank dumps and freshwater refills.
Weight: Additional weight affects fuel economy, handling, and may push you closer to your RV’s weight limits.
Installation complexity: This isn’t a simple DIY project—expect to invest significant time or money for professional installation.
Floor damage risk: Improper installation or inadequate reinforcement can lead to floor damage, especially during travel.
Winterization challenges: Residential toilets are more difficult to winterize and more susceptible to freeze damage.
Cost: Between the toilet itself ($150-$500), installation materials ($200-$400), and potential professional labor ($500-$1,500), this upgrade isn’t cheap.
Alternative Solutions Worth Considering
Before committing to a full residential toilet installation, consider these alternatives that might provide similar benefits with fewer drawbacks:
High-Profile RV Toilets
Modern RV toilet manufacturers have developed high-profile models that closely mimic residential toilets while maintaining the lightweight, low-water-usage benefits. Brands like Dometic and Thetford offer porcelain RV toilets that provide a more comfortable experience without the installation headaches[3].
Composting Toilets
Composting toilets have gained popularity in the RV community, especially among boondockers. These systems use no water, eliminate black tank concerns entirely, and are surprisingly comfortable. Models from Nature’s Head and Air Head are particularly well-regarded.
Macerating Toilets
Macerating RV toilets offer powerful flushing action similar to residential toilets while using less water. They grind waste before sending it to the black tank, improving tank efficiency and reducing odors.
Real-World Experiences from the RV Community
The RV community is divided on this modification. Many full-time RVers who’ve made the switch report high satisfaction, particularly those who:
- Stay primarily at campgrounds with full hookups
- Have larger RVs (Class A motorhomes or fifth wheels)
- Rarely boondock or dry camp
- Have upgraded to larger holding tanks
However, weekend warriors and boondocking enthusiasts often regret the modification due to:
- Rapid tank filling during off-grid camping
- Increased weight affecting towing and fuel economy
- Complexity of winterization in cold climates
“We installed a residential toilet in our Class A three years ago, and it’s been one of our best upgrades. Yes, we dump more frequently, but the comfort is absolutely worth it for us as full-timers.” – RV Forum User, 2025
“I switched back to an RV toilet after one season. The water usage was killing our boondocking ability, and we had to dump every other day instead of weekly.” – RV Forum User, 2024
Cost Breakdown: What to Expect
Let’s talk numbers. Here’s a realistic cost breakdown for installing a regular toilet in your RV:
DIY Installation:
- Residential toilet: $150-$500
- Floor reinforcement materials: $100-$200
- Plumbing supplies (flange, wax ring, connectors): $50-$100
- Tools (if needed): $50-$150
- Total DIY cost: $350-$950
Professional Installation:
- All materials (above): $350-$950
- Labor (8-16 hours): $500-$1,500
- Potential floor repairs: $200-$800
- Total professional cost: $1,050-$3,250
Keep in mind these figures don’t include potential black tank upgrades or water system modifications that might be necessary.
Maintenance and Long-Term Considerations
Once you’ve installed a residential toilet in your RV, ongoing maintenance requires attention:
Regular Maintenance Tasks
- Check floor integrity around the toilet base every few months
- Inspect for leaks at connections and base seal
- Monitor black tank sensors more frequently due to increased water volume
- Use RV-safe toilet chemicals to manage odors and break down waste
- Deep clean the porcelain bowl regularly to prevent staining
Winterization Challenges
Winterizing a residential toilet in an RV requires extra steps:
- Completely drain the bowl and tank
- Add RV antifreeze to the bowl and trap
- Consider removing the toilet entirely in extreme cold climates
- Use a space heater in the bathroom area if temperatures drop below freezing
Potential Problems and Solutions
Problem: Floor damage or soft spots developing around toilet base
Solution: Immediately address any leaks; may require floor reinforcement repair
Problem: Black tank filling too quickly
Solution: Consider adding a second black tank or upgrading to larger capacity
Problem: Toilet shifting during travel
Solution: Ensure proper mounting with high-quality closet bolts; check tightness regularly
Making the Decision: Is It Right for Your RV Lifestyle?
Whether you can install a regular toilet in an RV successfully depends heavily on your specific situation. Ask yourself these questions:
✅ You’re a Good Candidate If:
- You primarily stay at campgrounds with full hookups
- You own a larger RV (Class A, large fifth wheel)
- You’re a full-time RVer prioritizing comfort
- You have the budget for proper installation
- You rarely boondock or dry camp
- Your RV’s weight capacity allows for the addition
❌ Reconsider If:
- You frequently boondock or dry camp
- You own a smaller RV or travel trailer
- You’re near your RV’s weight limits
- You travel in freezing climates regularly
- You’re on a tight budget
- You prefer simple, low-maintenance systems
Conclusion: The Verdict on Installing Regular Toilets in RVs
So, can you install a regular toilet in an RV? Absolutely—but whether you should depends entirely on your RVing style, budget, and priorities. This modification offers genuine comfort improvements that many full-time RVers find invaluable, but it comes with real trade-offs in water consumption, weight, and complexity.
For those who spend most of their time at full-hookup campgrounds and prioritize home-like amenities, a residential toilet installation can be a game-changing upgrade. However, weekend warriors, boondockers, and those with smaller RVs might find the disadvantages outweigh the benefits.
Your Next Steps:
- Assess your RV’s structural capacity and floor condition
- Calculate your typical water usage and determine if increased consumption is manageable
- Research high-end RV toilet alternatives before committing to a full residential installation
- Consult with an RV modification specialist to get a professional assessment
- Join RV forums and connect with others who’ve made this modification to learn from their experiences
- Create a realistic budget including all materials, labor, and potential system upgrades
Remember, there’s no one-size-fits-all answer in the RV world. The best setup is the one that matches your lifestyle, travel habits, and comfort priorities. Whether you stick with an RV toilet, upgrade to a high-end RV model, or take the plunge with a residential installation, make sure your decision aligns with how you actually use your RV. 🚐
Happy camping, and may all your bathroom experiences be comfortable ones!
References
[1] Recreational Vehicle Industry Association (RVIA). “RV Water System Standards and Best Practices.” 2025.
[2] Environmental Protection Agency (EPA). “WaterSense Specification for Tank-Type Toilets.” 2024.
[3] Dometic Corporation. “RV Sanitation Systems Technical Guide.” 2026.


