Nearly 90% of RV water damage traces back to a single point of failure — a compromised roof seal. Yet many RV owners reach for whatever sealant is handy, not realizing that the wrong product can cause more damage than the leak itself. So, can you use silicone on RV roof surfaces? The answer is nuanced, and getting it right could save thousands of dollars in repairs.
Would you like to save this article?
Key Takeaways 📌
- Silicone CAN be used on some RV roofs, but compatibility with the roof material is critical before application.
- Silicone is not recommended for EPDM rubber roofs — it bonds poorly and can cause long-term damage.
- For fiberglass and metal roofs, silicone sealant is often an excellent, durable choice.
- Always clean and prime the surface before applying any silicone product.
- Self-leveling silicone is ideal for flat or low-slope RV roof areas; non-sag formulas work best on vertical seams.
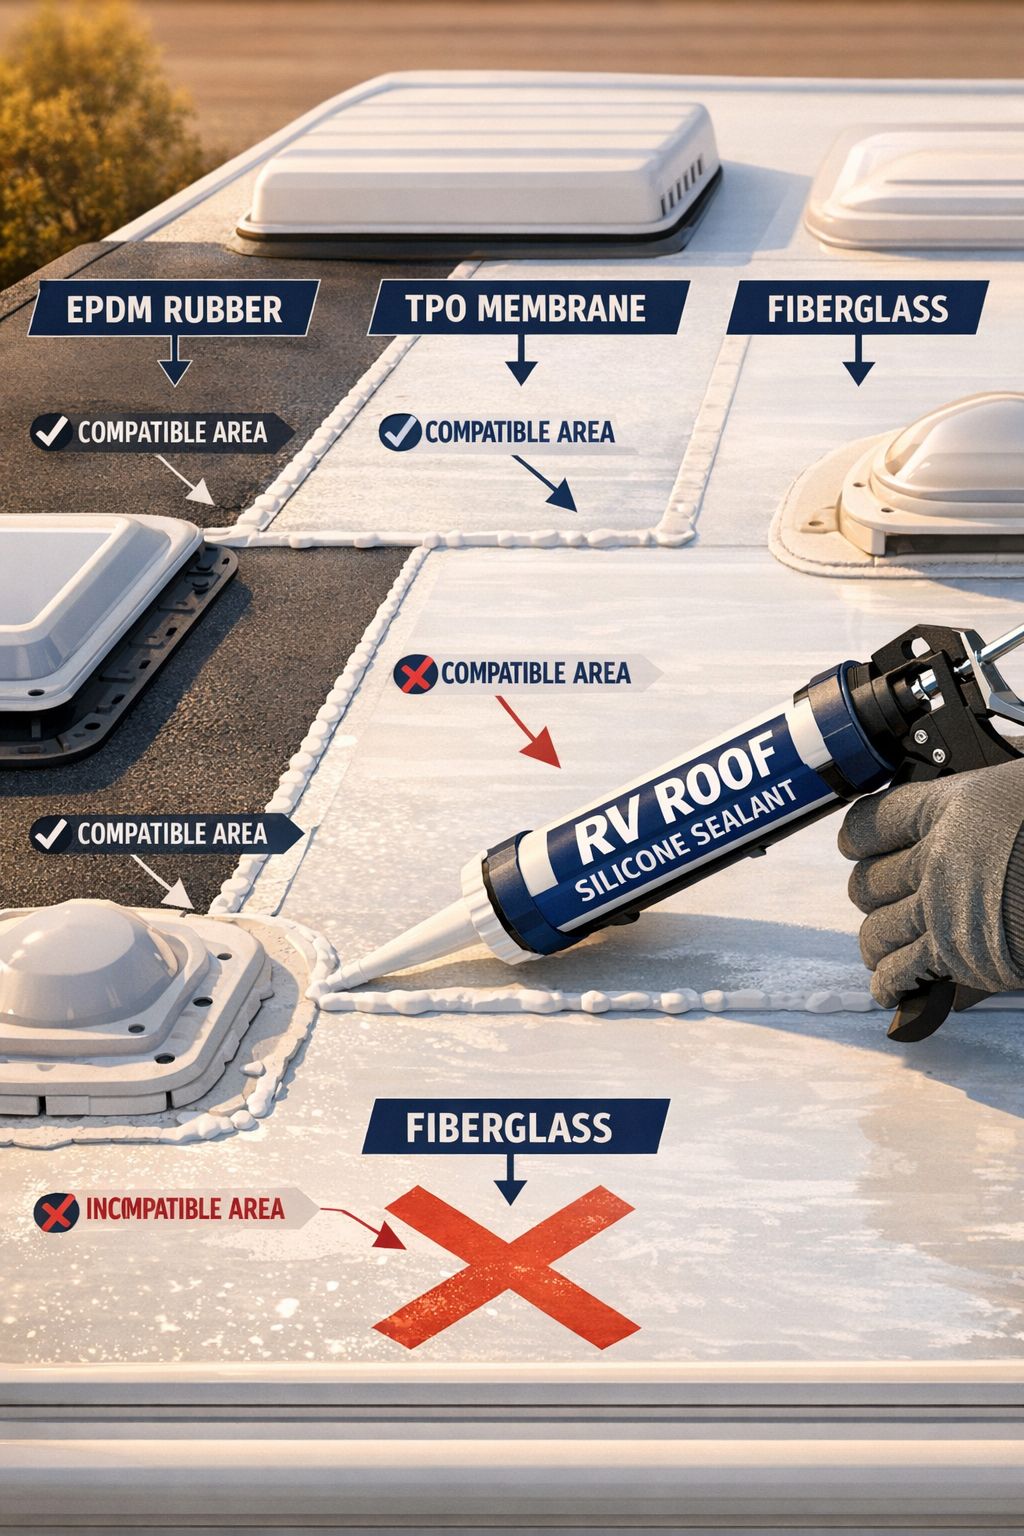
Understanding RV Roof Types and Why It Matters
Before answering “can you use silicone on RV roof?” definitively, it’s essential to understand what the roof is actually made of. RV roofs are not one-size-fits-all, and the material dictates which sealants are safe and effective.
The Four Most Common RV Roof Materials
| Roof Type | Common Brands | Silicone Compatible? |
|---|---|---|
| EPDM Rubber | Dicor, Heng’s | ⚠️ Generally No |
| TPO (Thermoplastic Polyolefin) | Dicor TPO | ⚠️ Use with caution |
| Fiberglass | Various OEMs | ✅ Yes |
| Aluminum/Metal | Airstream, others | ✅ Yes |
EPDM rubber is the most common RV roof material, found on a large percentage of Class A, Class C, and travel trailers. The problem? Silicone does not bond reliably to EPDM. It sits on the surface rather than penetrating it, which means it can peel, lift, and allow water intrusion over time.
💬 “Using the wrong sealant on an RV roof is like putting a bandage on a wound without cleaning it first — it looks fixed, but the damage continues underneath.”
TPO roofs are increasingly common on newer RVs. Silicone adhesion to TPO is better than on EPDM, but it still requires a compatible primer for a lasting bond.
Fiberglass and metal roofs are the most silicone-friendly surfaces. Silicone adheres well to these materials, provides excellent UV resistance, and remains flexible through temperature extremes — a must for RV roofs that face brutal sun, rain, and freezing conditions.
Can You Use Silicone on RV Roof? Breaking Down the Pros and Cons
Understanding the advantages and limitations of silicone sealant helps RV owners make smarter maintenance decisions.
✅ Advantages of Silicone on RV Roofs
- Superior UV resistance — Silicone holds up exceptionally well under prolonged sun exposure, resisting cracking and degradation.
- Wide temperature range — Remains flexible from -65°F to 400°F, ideal for RVs that travel across climates.
- Excellent waterproofing — Once cured, silicone creates a watertight seal that repels moisture effectively.
- Long service life — Quality silicone sealants can last 20+ years on compatible surfaces.
- Mold and mildew resistant — Silicone’s non-porous surface discourages biological growth.
❌ Disadvantages of Silicone on RV Roofs
- Poor adhesion to EPDM rubber — This is the single biggest limitation for RV applications.
- Difficult to paint over — Silicone repels most paints, limiting future touch-up options.
- Hard to remove — Once cured, silicone is notoriously difficult to strip cleanly.
- Slippery when wet — A safety concern if roof access is needed for maintenance.
- Not compatible with all primers — Requires specific primers for certain substrates.
The EPDM Problem Explained 🔍
EPDM rubber has a naturally low surface energy. Adhesives and sealants need a surface with high energy to bond properly. Silicone, while flexible and waterproof, cannot chemically grip EPDM the way purpose-built rubber roof sealants can. Products like Dicor lap sealant (a self-leveling butyl-based product) are specifically engineered for EPDM roofs and should be the first choice for that material.
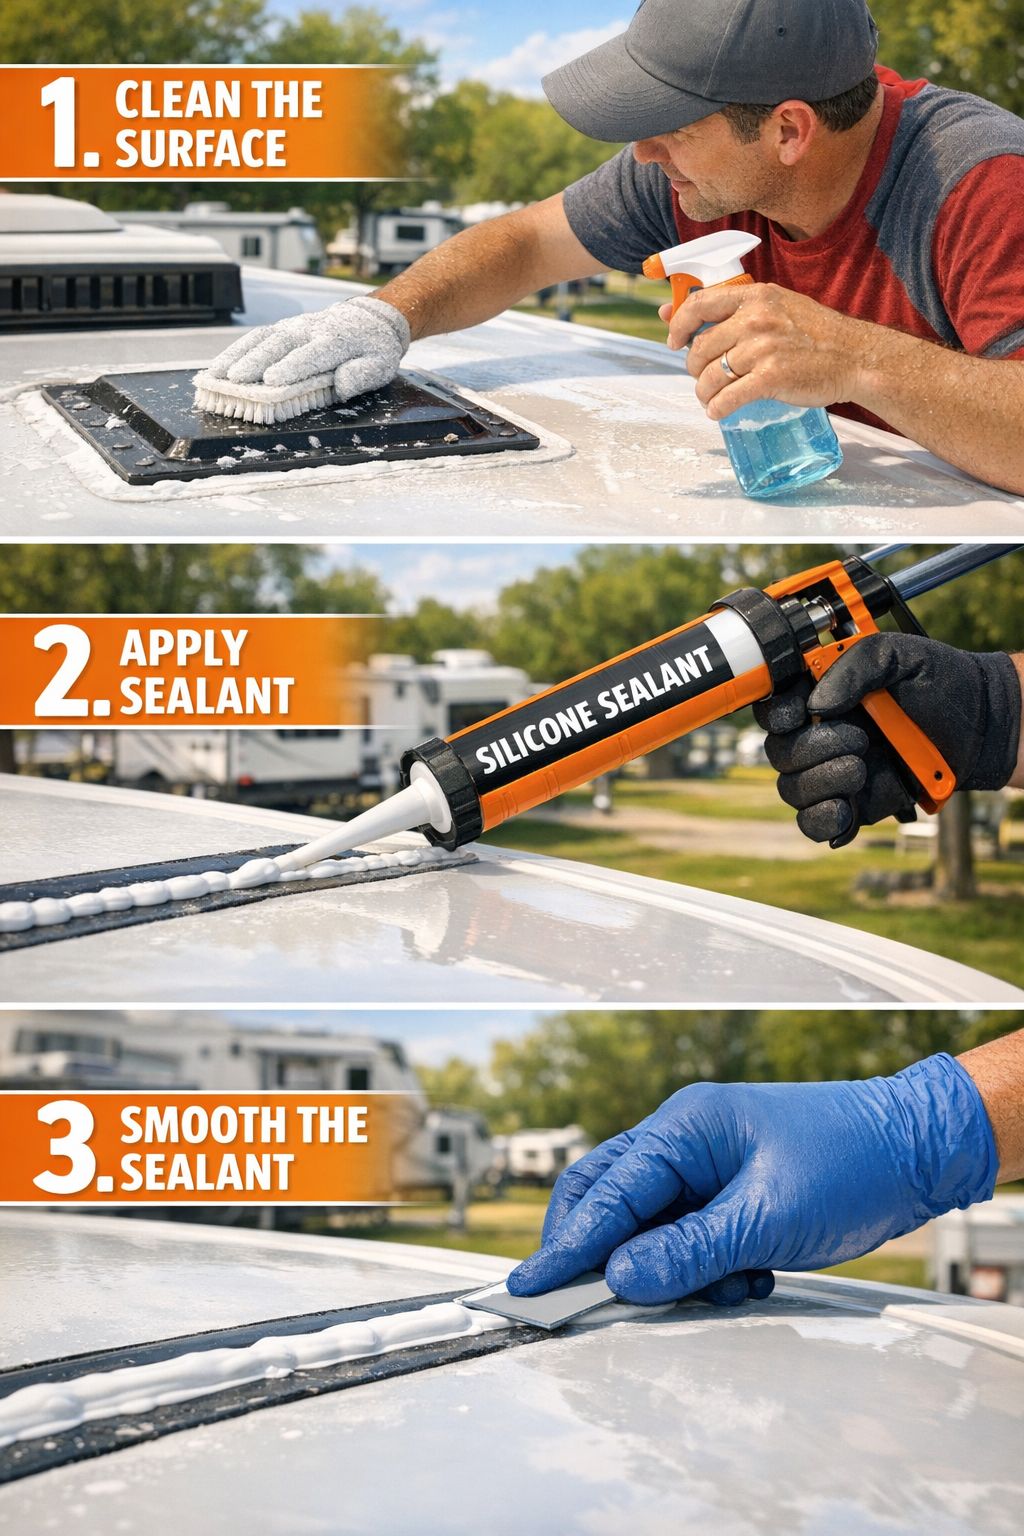
How to Properly Apply Silicone on a Compatible RV Roof
For RV owners with fiberglass or metal roofs, silicone is a top-tier sealant option. However, proper application is everything. A poorly applied bead of silicone is almost as bad as no sealant at all.
Step-by-Step Application Guide
Step 1: Inspect the Roof Thoroughly
Walk the entire roof carefully. Look for cracks, bubbles, lifted seams, and areas where old sealant is peeling. Document problem areas before starting.
Step 2: Remove Old Sealant
Use a plastic scraper or silicone remover product to strip away any existing sealant. Leaving old product under new silicone is a common mistake that leads to early failure.
Step 3: Clean the Surface
Wipe down all areas to be sealed with isopropyl alcohol or a dedicated roof cleaner. Remove all dirt, grease, oxidation, and debris. Allow to dry completely.
Step 4: Apply Primer (If Required)
For TPO roofs or any surface where adhesion may be questionable, apply a silicone-compatible primer. Allow it to tack up per the manufacturer’s instructions — typically 15–30 minutes.
Step 5: Apply the Silicone
- Use a caulk gun for controlled application.
- Apply a smooth, continuous bead along seams, around vents, skylights, and any roof penetrations.
- For flat roof areas, consider a self-leveling silicone that flows into low spots for complete coverage.
- For vertical seams or edges, use a non-sag silicone that holds its shape.
Step 6: Tool the Bead
Use a wet gloved finger or a caulk smoothing tool to press the silicone firmly into the joint and create a smooth, professional finish. This improves both adhesion and aesthetics.
Step 7: Allow Full Cure Time
Most silicone sealants skin over in 30–60 minutes but require 24–72 hours for full cure. Avoid rain exposure during this window.
Recommended Silicone Products for RV Roofs 🛒
- Geocel 2300 Crystal Clear — Popular for RV use, excellent adhesion to fiberglass and metal.
- Sika Sikaflex 715 — Professional-grade, highly flexible, UV stable.
- GE Silicone II — Widely available, reliable for fiberglass applications.
- Permatex Clear RTV Silicone — Budget-friendly option for minor repairs.
When to Choose an Alternative to Silicone
Silicone is not always the right answer, even on compatible surfaces. Here are situations where alternative sealants may perform better:
- EPDM roofs → Use Dicor lap sealant or a butyl-based product specifically designed for rubber roofs.
- Areas that need to be painted → Use a polyurethane sealant instead, which accepts paint after curing.
- High-traffic roof areas → Consider a liquid roof coating for broader coverage rather than spot sealing.
- Budget repairs on aging roofs → A full roof reseal with an EPDM-compatible product may be more cost-effective than silicone spot repairs.
💡 Pro Tip: Always check the RV manufacturer’s documentation or contact them directly to confirm which sealant types are approved for the specific roof material on the rig.
Maintenance Schedule for RV Roof Seals
Regardless of sealant type, regular inspection is non-negotiable for RV owners who want to avoid costly water damage.
| Frequency | Task |
|---|---|
| Every 3 months | Visual inspection of all seams and sealant |
| Every 6 months | Clean roof and check for cracks or lifting |
| Annually | Full resealing of any compromised areas |
| After severe weather | Immediate inspection for impact damage |
Conclusion: Making the Right Call for Your RV Roof
So, can you use silicone on RV roof surfaces? Yes — but only on the right materials. Silicone is an outstanding sealant for fiberglass and metal RV roofs, offering superior UV resistance, flexibility, and longevity. However, it is the wrong choice for EPDM rubber roofs, which require purpose-built rubber roof sealants.
Actionable Next Steps ✅
- Identify the roof material on the RV before purchasing any sealant.
- Inspect the roof every 90 days — catch small issues before they become expensive repairs.
- Use self-leveling silicone for flat areas and non-sag formulas for vertical seams on compatible roofs.
- Never apply silicone over EPDM — use a butyl or lap sealant instead.
- Invest in a quality caulk gun — a smooth, controlled application makes all the difference.
Protecting an RV roof is one of the highest-return maintenance investments an owner can make. The right sealant, applied correctly, keeps the adventure going and the water out. 🚐
References
- RV Industry Association. (2022). RV roof maintenance best practices and material standards. RVIA Technical Publications.
- Dicor Products. (2021). Application guide for EPDM lap sealant and rubber roof care. Dicor Corporation.
- Sika Corporation. (2020). Sikaflex 715 product data sheet and application guidelines. Sika Technical Documentation.
- National RV Dealers Association. (2023). Common causes of RV water damage and prevention strategies. NRVDA Industry Reports.
- Geocel. (2022). Geocel 2300 series sealant technical specifications for recreational vehicle applications. ITW Performance Polymers.


