
Ninety-nine cents. That’s about what a handful of binder clips costs at any office store. And yet that tiny office supply is quietly becoming one of the most talked-about awning fixes in RV forums, camping groups, and outdoor lighting guides right now. No tools. No drilling. No new hardware. Just a clip you probably already have in a junk drawer.
If you’ve ever watched your string lights slide across your awning arm at 2 a.m. while wind rattles your camper, you already know the panic. This article explains exactly how a simple binder clip solved an awning nightmare for campers everywhere, and how you can copy the fix in under five minutes.
Key Takeaways
- Binder clips wedge into the awning channel next to hooks to stop them from sliding side to side or bouncing in wind. 📎
- They work on lights, fabric, and rope, from string lights to keder rails to canopy tarps.
- The fix costs almost nothing, uses items most people already own, and needs zero tools or drilling.
- It’s fully reversible, so renters, RV owners, and campers can remove it before retracting the awning.
- Bigger clips grip better, but even binder clips can slip in extreme gusts, so pairing them with zip ties adds extra security.
The Awning Nightmare Every Camper Knows
Awnings look simple. Roll it out, hang some lights, enjoy the shade. But anyone who has spent a few nights at a campsite knows the truth: awnings and wind do not get along.
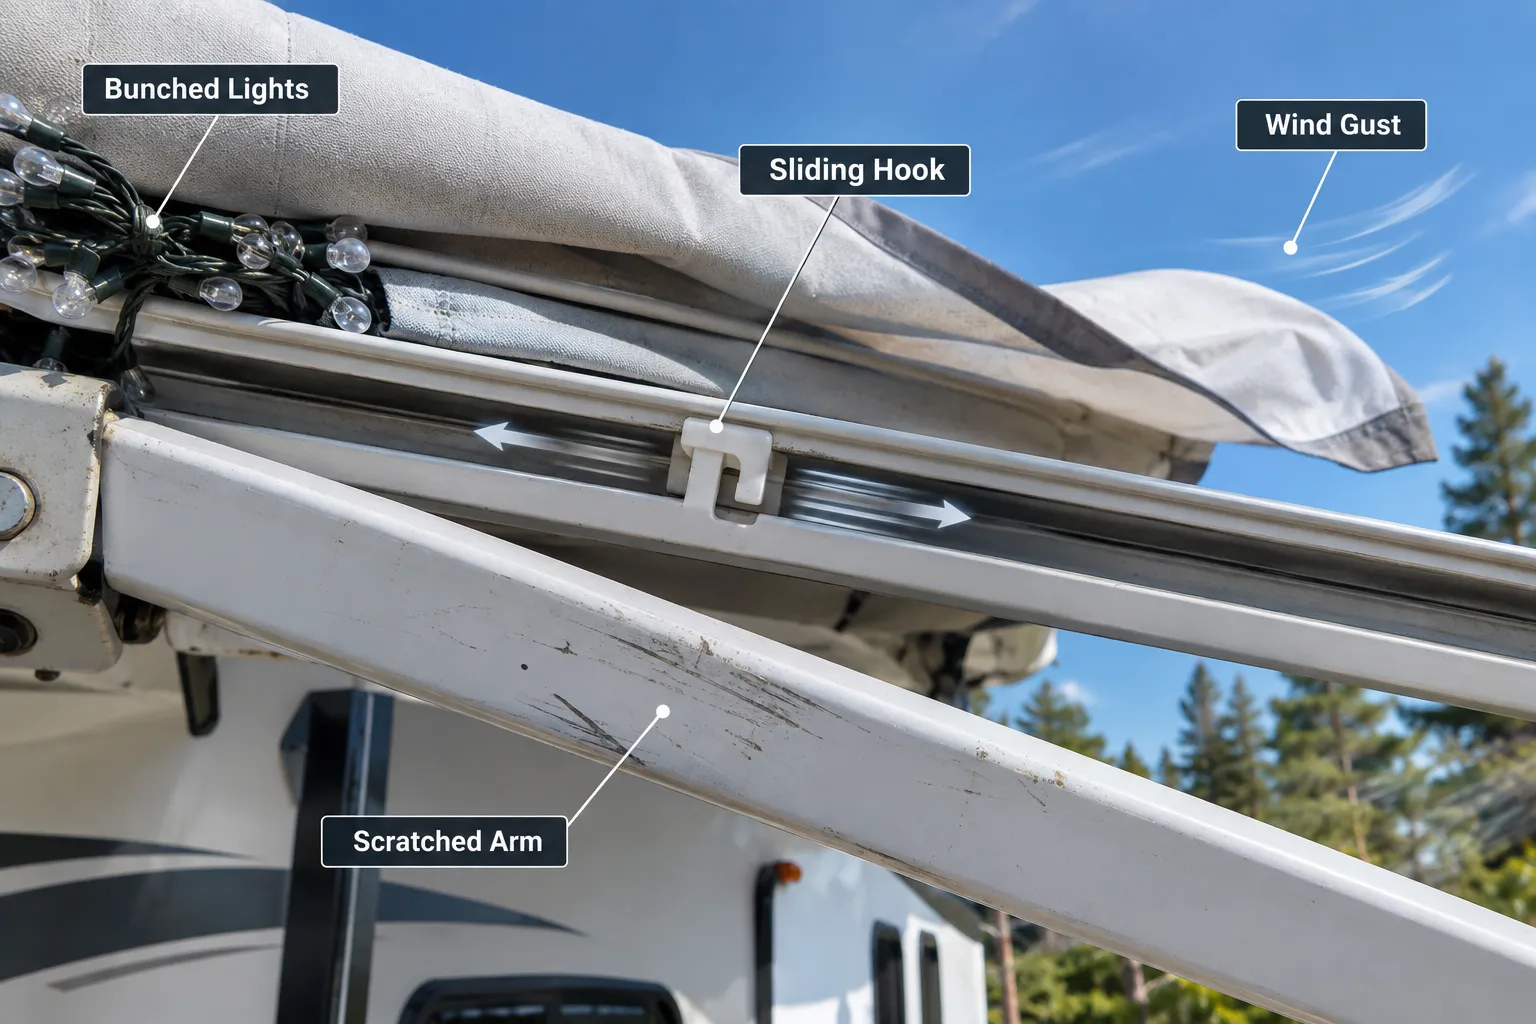
The most common complaint sounds something like this: string lights get hung neatly across the awning using little plastic hooks. Everything looks perfect. Then the evening breeze picks up. Within minutes, those hooks start sliding down the channel, bunching all the lights into one corner. Worse, the hooks bounce up and down, scratching the awning arm’s paint or finish with every gust.
This isn’t a rare problem. It shows up again and again in RV guides, camping forums, and product reviews. The awning channel, that thin metal groove running along the awning arm, was built to hold the fabric roller, not decorations. So when people clip lights, tarps, or fabric to it, there’s nothing stopping those items from traveling wherever the wind pushes them.
For folks who love outdoor RV decorating ideas to transform your campsite, this sliding problem can ruin an otherwise beautiful setup in one windy night.
Why Hooks Slide and Lights Bunch Up
Here’s the simple science behind it. The awning channel is smooth and slightly angled. Plastic clothespin-style hooks have almost no grip once wind pushes against the light strand attached to them. Every gust nudges the hook a little further, and because there’s nothing physically blocking its path, it keeps sliding until it hits another hook or the end of the channel.
The result:
- Lights pile up in one messy clump 🌀
- The awning arm gets scratched from repeated hook movement
- Decorations look uneven and sloppy by morning
- Some hooks pop off entirely, leaving lights dangling or falling
This is the exact nightmare that sent campers searching for a fix, and the binder clip trick is what many of them landed on.
How a Simple Binder Clip Solved An Awning Nightmare
So how does a plain office binder clip fix a problem that plastic-designed-for-awnings hooks couldn’t handle? The answer is mechanical, not magical.
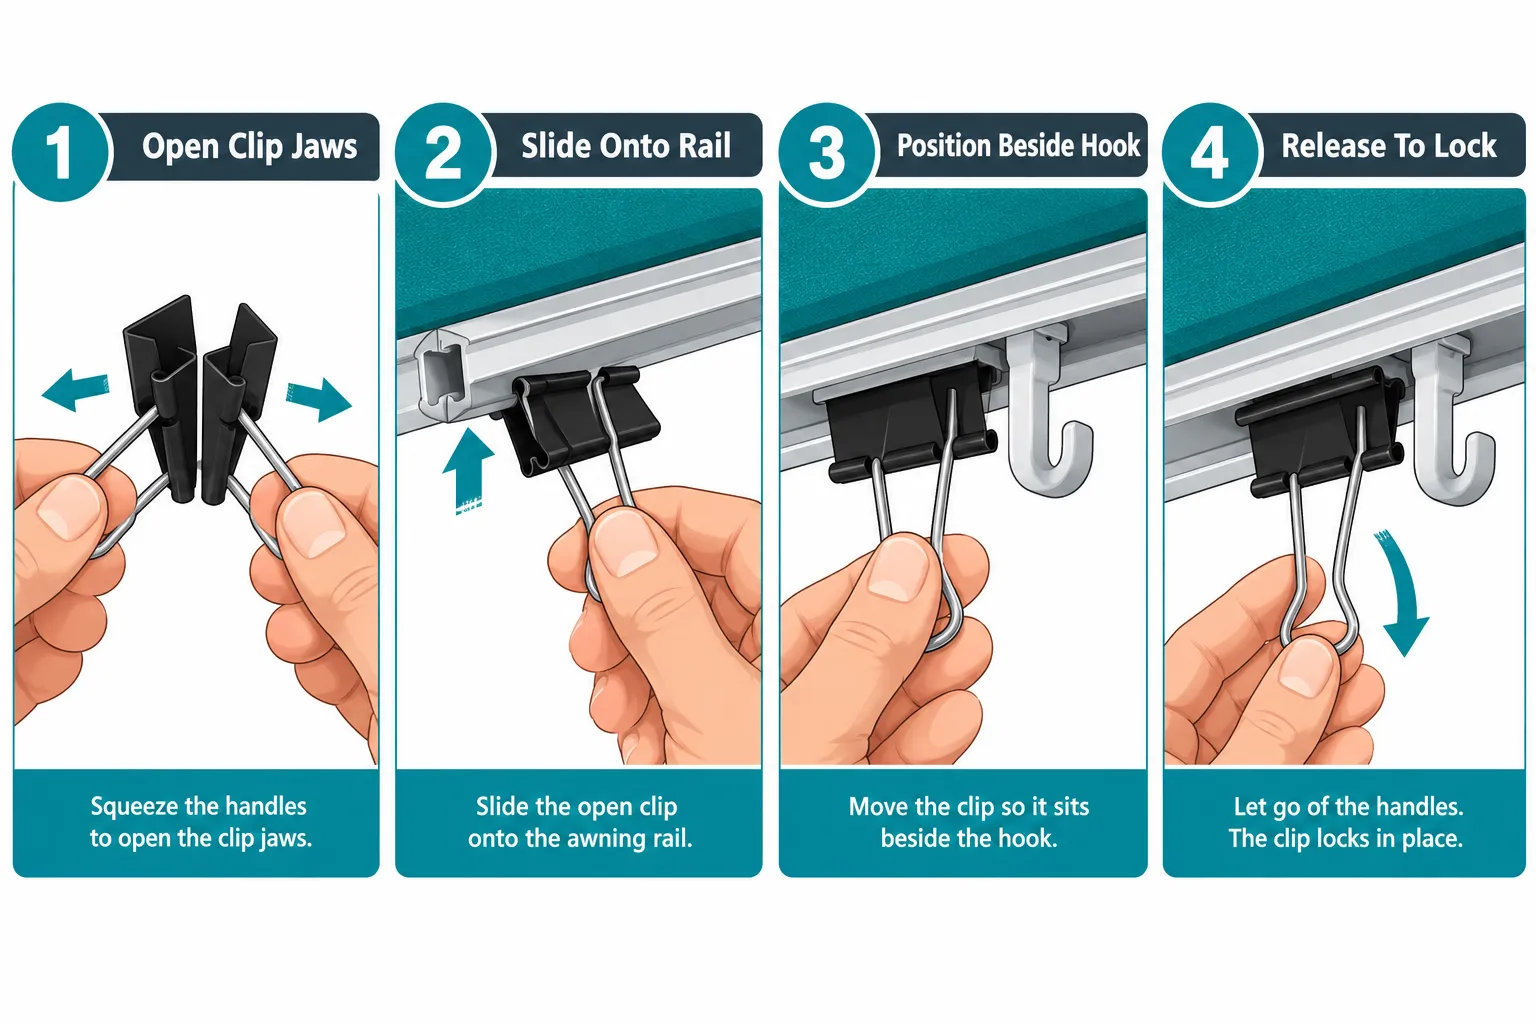
A March 2026 guide on RV awning hooks laid out the method clearly: wedge a small binder clip into the awning channel on both sides of each hook. The clip’s metal jaws grip the channel tightly, creating a solid stop point. Once the hook is boxed in by two clips, it physically cannot slide left, right, up, or down, no matter how hard the wind blows.
Think of it like bookends on a shelf. The hook is the book. The binder clips are the bookends. Wind can push all it wants, but the hook has nowhere to go.
This is why the binder clip trick spread so fast among RVers dealing with string lights, and it’s also why it works for so many other awning-related annoyances.
Step-by-Step: The Binder Clip Fix
Here’s exactly how campers are doing it:
- Open the binder clip’s silver handles all the way.
- Slide the clip onto the awning channel right next to where the hook or item needs to stay.
- Release the handles so the clip’s metal jaws squeeze the channel edges tight.
- Repeat on the other side of the hook if you want it locked from both directions.
- Fold the metal handles flat against the clip so they don’t flap or make noise in the wind.
That’s it. No screws, no adhesive, no permanent marks on the awning hardware.
“A binder clip gives you a predictable stop point. It’s not fancy, but it works exactly where sliding hooks fail.”, common sentiment echoed across RV forums and lighting guides
Why This Beats Other Quick Fixes
People have tried plenty of workarounds before landing on binder clips:
| Fix Attempted | What Happens |
|---|---|
| Zip ties alone | Hard to remove quickly, can leave marks |
| Duct tape | Leaves sticky residue, weakens in heat |
| Extra clothespins | Still slide, just slower |
| Knots in rope/cord | Loosen over time, hard to undo |
| Binder clips | Locks in place instantly, removes in seconds |
Binder clips win because they combine strong clamping force with zero permanent damage. That balance is rare, and it’s exactly why so many camping and RV guides now recommend them.
Beyond Lights: Other Ways Binder Clips Fix Awning Problems
The string-light fix is just the beginning. Once people realized how well binder clips solved that one issue, they started finding more uses around the campsite.
Stopping the Keder Rail From Creeping
Owners of certain travel trailers, including popular teardrop-style campers, deal with a specific annoyance: the awning’s keder rope, the reinforced edge that slides into the awning’s keder rail, creeps sideways in gusty wind. Over time, this can pull the whole awning fabric out of alignment.
Experienced owners on RV forums recommend placing a binder clip directly on the keder rail. The clip acts as a physical stop, preventing the rope from traveling any further along the rail. It’s the same bookend logic as the light-hook fix, just applied to a different part of the awning system.
Holding Fabric and Tarps in Windy Weather
Canopy users and festival campers face a similar battle with tapestries, sheets, and lightweight tarps that constantly threaten to blow away. A popular trick: fold the fabric over the support bar, then clip it to itself using a binder clip. This creates a secure fold without punching holes in the material or using permanent hardware.
Community discussions note that larger binder clips hold fabric more reliably than smaller ones, though even big clips can occasionally fail during very strong gusts. That’s why some campers pair clips with zip ties for extra holding power during storms, a small upgrade for a lot of peace of mind.
Attaching Lights With Zip Ties for Fast Removal
One creative approach involves attaching binder clips to the awning frame using zip ties. This setup lets campers snap LED lights on and off in seconds. When wind picks up unexpectedly, lights can be pulled down fast to protect them, then reattached once things calm down. It’s a flexible system that adds durability without permanent mounting.
This kind of quick-attach, quick-remove flexibility matters a lot for anyone who spends first night in RV setups still learning what their awning can and can’t handle in local weather.
Why Professionals Already Trust Binder Clips
It turns out binder clips aren’t just a camper hack, they have a track record in professional settings too.
Sewing and fabric professionals who work with heavy-duty outdoor materials, including awning fabric, commonly use binder clips to hold multiple layers together before stitching. The reason is simple: binder clips grip tightly without punching holes in the fabric, unlike pins or staples. That matters a lot for awning repair and construction, where every hole is a potential weak point for water or tearing.
This professional trust adds real credibility to the camper-discovered fix. If sewers trust binder clips to hold expensive fabric steady during precision work, it makes sense that campers can trust them to hold a string of lights steady during a windy weekend.
A Growing “Best Practice” Hack
There’s no official manufacturer standard that lists binder clips as approved awning hardware. No awning company ships a bag of binder clips with their product. But the idea keeps showing up again and again, in RV guides, lighting tutorials, sewing articles, and camper forums, across nearly two years of separate, unrelated sources.
That pattern matters. When totally different communities, RV owners, festival campers, professional sewers, independently land on the same low-cost fix, it usually means the fix actually works. It’s becoming what many call an emerging best-practice hack: not officially endorsed, but proven through repeated real-world use.
Choosing the Right Binder Clip Size
Not all binder clips are equal, and picking the right size matters for how well the fix holds up.
Small clips (about 3/4 inch):
- Best for lightweight string lights
- Less visible, blends in nicely
- Good for gentle to moderate wind
Medium clips (about 1 1/4 inch):
- Good all-around choice for most awning fixes
- Strong enough for keder rail stops
- Works well as an alternative to clothespins, which often slip or look unsightly compared to a clean metal clip
Large clips (2 inch or bigger):
- Best for heavier fabric, tarps, or tapestries
- Provides the strongest grip in gusty conditions
- More visible, but worth it for holding power
A simple rule: match the clip size to the weight of what you’re securing. Lights need small clips. Fabric needs bigger ones.
Setting Up Your Awning the Smart Way
Before adding any binder clip fix, it helps to think about your overall awning setup. If you’re still deciding on a style, this guide on what type of RV awning do you prefer breaks down the pros and cons of different options, which affects how well binder clip fixes will work with your specific channel or rail design.
A few extra tips for a stronger setup:
- Test the wind resistance by giving the clipped item a gentle shake before leaving it overnight.
- Remove clips before retracting the awning, since most channels need to stay clear for the fabric roller to move smoothly.
- Store clips in a labeled bag in your RV storage so you always have a few on hand at the next campsite.
- Check clips each morning after a windy night, just to make sure nothing loosened.
This kind of small daily check fits naturally into general RV camping routines, alongside things like tire checks and hookup inspections.
When Binder Clips Aren’t Enough
Binder clips are strong for their size, but they aren’t invincible. In true storm-force winds, even large clips can pop loose from fabric or rails. That’s not a flaw unique to binder clips, it’s just physics. No small clamp can outmuscle extreme wind forever.
For serious storms, most experienced campers recommend:
- Fully retracting the awning rather than relying on any clip
- Removing all lights and decorations ahead of time
- Using specialized tarp clips or ratchet straps for anything that must stay attached in dangerous weather
Binder clips shine in everyday breezy conditions, the kind that ruin a light display or shift a keder rope, not in named storms. Knowing that difference helps set realistic expectations and avoid disappointment.
A Quick Comparison: Binder Clip vs. Other Awning Accessories
| Accessory | Cost Feel | Reusable? | Damage Risk |
|---|---|---|---|
| Binder Clip | Very low | Yes, many times | None |
| Specialty Tarp Clip | Moderate | Yes | Low |
| Zip Ties | Low | No, cut off | Low |
| Adhesive Hooks | Moderate | Limited | Medium (residue) |
This side-by-side shows why the binder clip fix keeps winning over other options: it’s cheap, reusable, and leaves nothing behind.
Fitting the Fix Into Your Camping Lifestyle
Small hacks like this one matter more than they seem. Anyone building out their setup, whether decorating with a boho chic RV decorating ideas for a free spirited vibe theme or just trying to keep a simple string of lights looking neat, benefits from knowing these low-cost, no-tool tricks.
It’s also a good reminder for newer RVers. Families still figuring out RV family tips often assume every problem needs a store-bought solution. But sometimes the best fix is already sitting in a desk drawer.
Conclusion: Try It Before Your Next Trip
The story of how a simple binder clip solved an awning nightmare isn’t really about office supplies. It’s about noticing that a small, well-placed clamp can solve a problem that fancier gear couldn’t. Sliding hooks, bouncing lights, creeping keder ropes, and flapping tarps all share the same root cause: nothing was stopping the movement. Binder clips simply give that movement somewhere to stop.
Before your next camping trip, grab a handful of binder clips in a few sizes. Toss them in your RV storage bin next to your string lights. The next time wind threatens to turn your peaceful evening into a scratched-arm, bunched-light mess, you’ll have a fix ready in under a minute, no tools, no drilling, and no cost worth worrying about.
rv awning hack, binder clip fix, RV string lights, awning hooks, camping tips, RV maintenance, awning wind protection, keder rail fix, DIY camping fixes, RV lighting ideas, outdoor decorating hacks, camper accessories