A rusty pivot bolt on a 12-year-old travel trailer can cost you almost nothing to fix, sometimes less than the price of a tank of gas. That’s the real secret hiding behind big suspension ads and flashy air-ride kits. While full suspension systems can run $700 or more, learning how to upgrade your RV suspension for less than $100 is absolutely possible if you know exactly where to spend your money.
This guide skips the hype. It shows you real parts, real prices, and real steps so your rig rides smoother without draining your wallet. No fluff. No $3,000 “miracle kits.” Just smart, targeted fixes that actually work.
Key Takeaways
- 🔧 Wet bolts are the single best budget upgrade, often costing just $18,$20 each.
- 🛠️ Full bushing/wet-bolt kits run $80,$200 in parts alone, buy a partial kit to stay under $100.
- 🪛 Leaf springs for smaller trailers cost $48,$79 per spring, making single-spring swaps budget-friendly.
- 💰 Labor is what breaks the budget, most professional installs add $250,$600, so DIY is key.
- ⚠️ Cheap upgrades improve ride comfort but do not raise your RV’s tow rating or payload capacity.
What “Upgrade” Really Means on a Tight Budget
Before grabbing a wrench, it helps to understand what a $100 budget can and cannot buy. Suspension “upgrades” usually fall into two very different categories:
- Component-level fixes, replacing a single worn part like a bushing, wet bolt, or one leaf spring.
- System-level upgrades, full kits like SumoSprings, Timbren SES, or air-ride systems.
The second category is where most RV suspension marketing lives, and it’s also where prices explode. SumoSprings often start around $400 for a pair. Air-spring kits run $700 to $1,500. Timbren SES systems start near $300. These are excellent products, but they are simply not $100 upgrades.
The good news? Component-level fixes are where real budget wins happen. Worn pivot points, dry bushings, and tired leaf springs are often the actual cause of a bouncy, noisy ride, not a lack of a fancy air system.
“Most RVs don’t need a whole new suspension. They need someone to finally replace the $18 part that’s been squeaking for three years.”
If you’re curious about other budget-friendly upgrades beyond suspension, check out these easy RV upgrades that make a huge difference for more low-cost wins around your rig.
How to Upgrade Your RV Suspension for Less Than $100: The Wet Bolt Fix
If there’s one upgrade that deserves the crown for “best bang for your buck,” it’s the wet bolt swap. This is the most realistic way to actually pull off how to upgrade your RV suspension for less than $100 without cutting corners.
What Is a Wet Bolt?
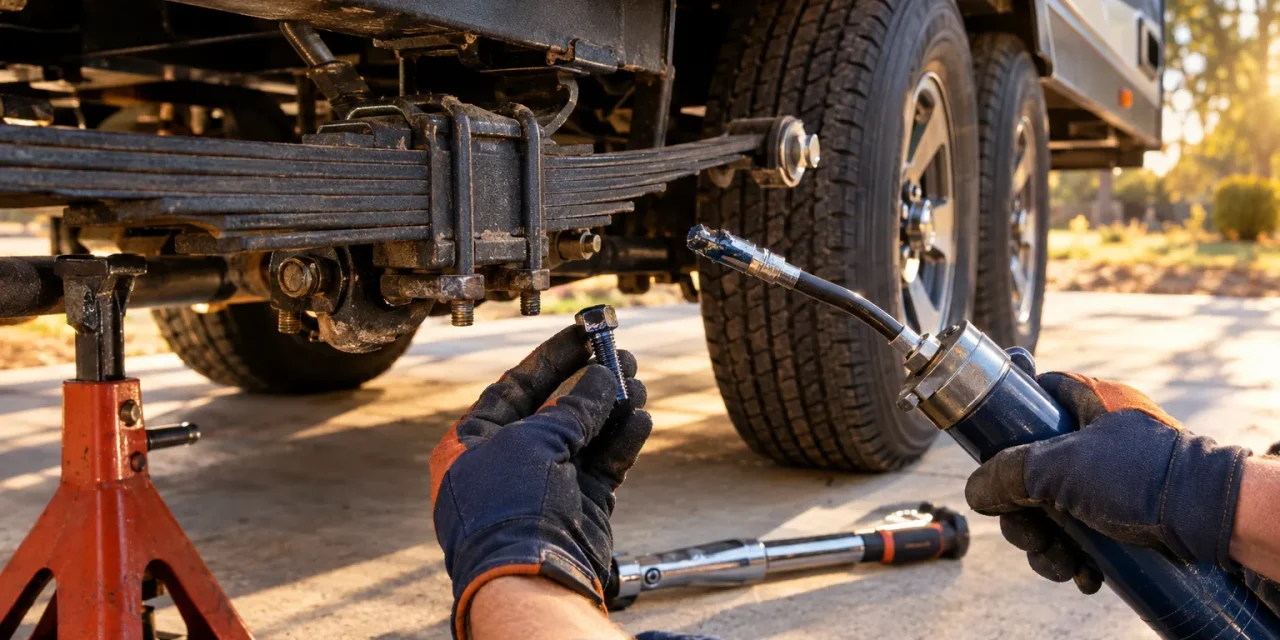
A wet bolt is the metal pin that connects your leaf spring to the equalizer or hanger. Over time, road grit and rust destroy the smooth surface, causing that dreaded squeak and a rougher ride. A popular option, the Redline 1/2-inch wet bolt, is marketed specifically as an affordable, single-component fix instead of buying an entire heavy-duty kit.
Why It Works So Well
- Cheap: A single Lippert-style wet bolt costs around $18,$20.
- Targeted: You’re replacing exactly the part causing the problem, not paying for parts you don’t need.
- Fast: Most single-axle trailers only need 2-4 wet bolts replaced to feel dramatically smoother.
Step-by-Step: Replacing a Wet Bolt
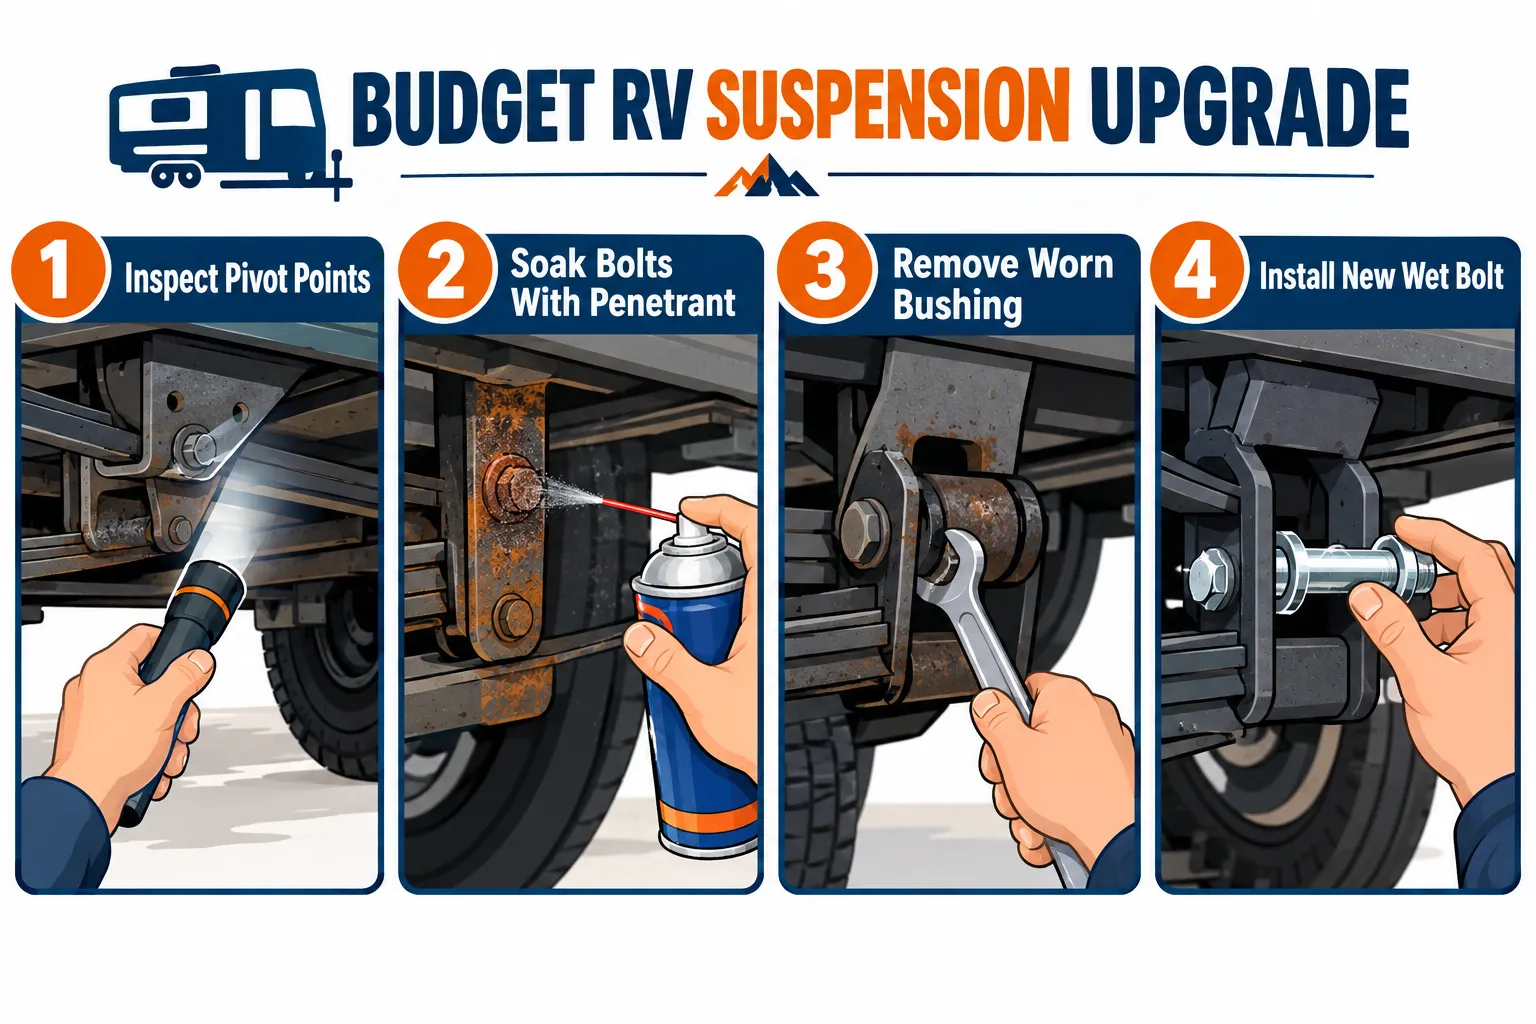
- Inspect first. Jack up the trailer safely and check each pivot point for rust, wobble, or grinding noise.
- Soak the old bolt. Spray penetrating oil (like WD-40) on the bolt threads a full week before removal if it’s rusted in place. This single tip saves hours of frustration.
- Mark everything. Take a photo or mark orientation before removing anything, especially near steering or axle components.
- Remove the old bolt. Use a breaker bar, impact driver, or ratchet with the correct socket size.
- Install the new wet bolt. Grease it before inserting so it moves smoothly for years.
- Torque to spec. Always tighten to the manufacturer’s torque value, not just “as tight as it’ll go.”
- Repeat on each worn pivot point until the trailer feels solid.
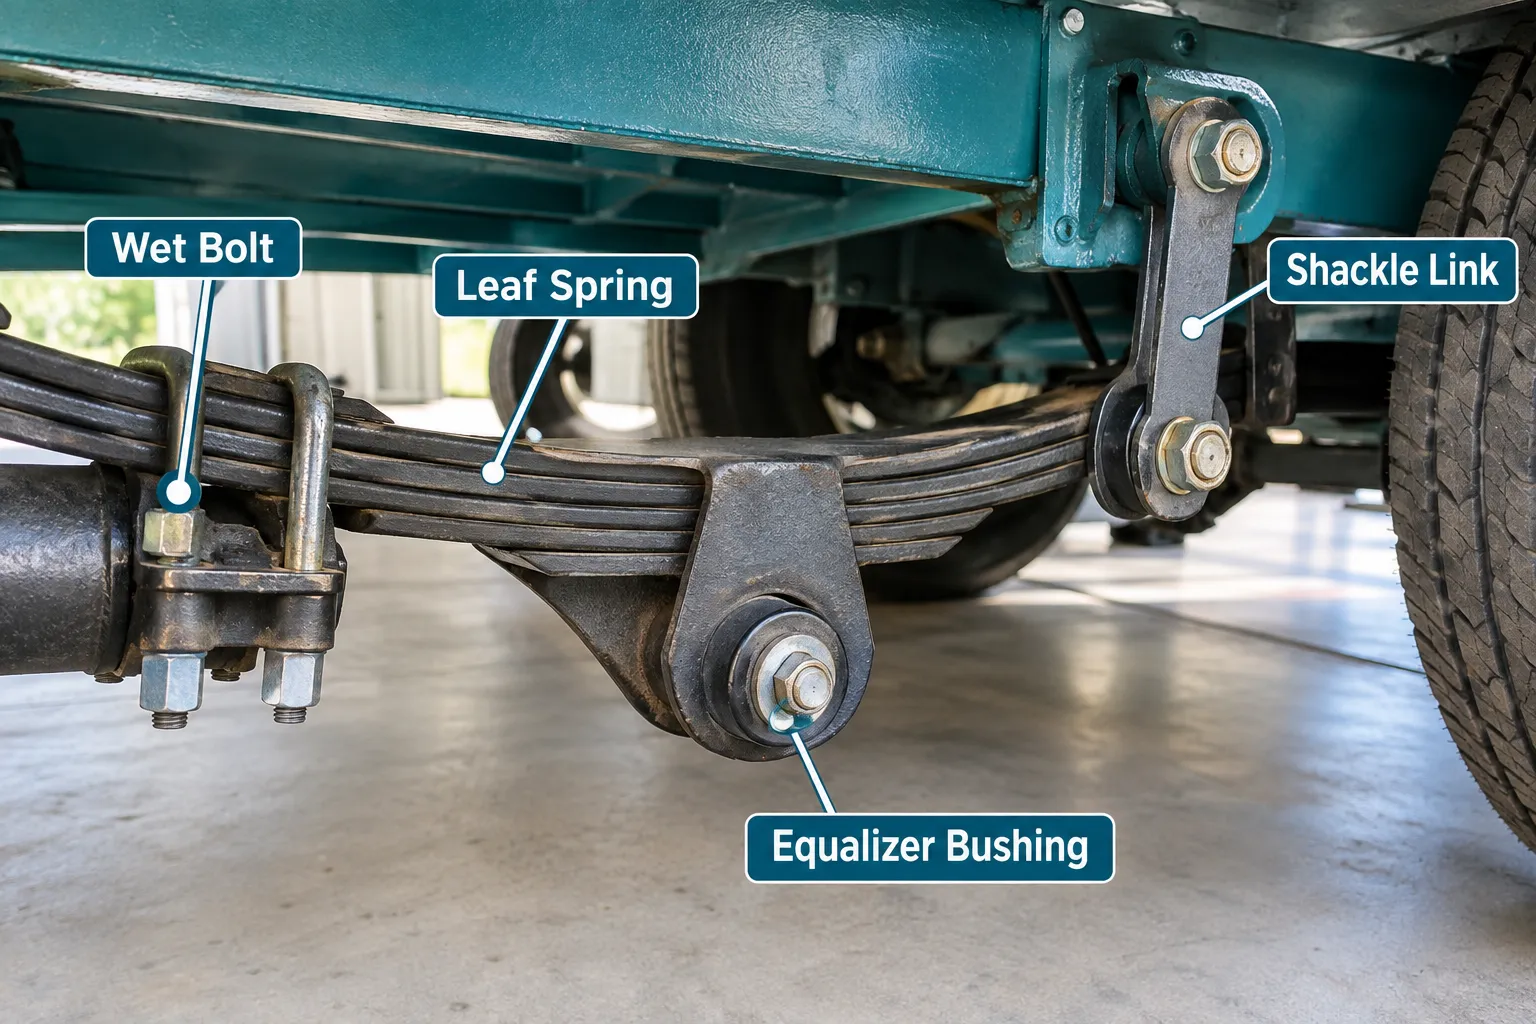
This single swap can eliminate creaking, reduce play in the axle, and make towing feel noticeably tighter, all for less than a fast-food dinner for four.
If you’ve been putting off maintenance chores like this, you’re not alone. Many RVers admit they skip regular upkeep, see how common that is in this poll on whether RVers perform their own RV maintenance.
Bushing Kits: Getting Close to the $100 Line
Wet bolts fix pivot points, but bushings are the rubber or polyurethane sleeves that cushion the metal-to-metal connection. When these dry out or crack, your RV starts feeling every pebble on the road.
The Real Cost Breakdown
Heavy-duty bushing and wet-bolt kits for tandem-axle trailers typically cost $80,$200 for parts alone. That means:
- A partial kit (just the front or rear axle set) can often land under $100.
- A full tandem-axle kit usually creeps above $100, especially with shipping.
- DIY labor is what keeps you under budget, professional installation alone can add $250,$600 depending on your region and how rusted the hardware is.
Smart Shopping Tips
| Strategy | Why It Helps |
|---|---|
| Buy bushings for one axle at a time | Cuts cost roughly in half |
| Choose polyurethane over rubber | Lasts longer, similar price |
| Skip “kit bundles” with tools you already own | Avoids paying for duplicate wrenches |
| Buy directly from RV parts suppliers | Often cheaper than big-box markups |
Bushing replacement takes more patience than a wet bolt swap, but it’s still a manageable weekend project for most RV owners, especially with basic tools and a little elbow grease.
Leaf Spring Swaps: The Overlooked Budget Hero
Here’s a fact most RVers don’t know: replacing a single leaf spring is one of the few meaningful ride-quality upgrades that can realistically stay under $100.
Why Leaf Springs Matter
Leaf springs absorb the bounce from bumps and potholes. When one spring sags or cracks, your trailer leans, sways more, and feels rougher, even if everything else is fine.
The Price Sweet Spot
A common double-eye leaf spring for RV trailers typically costs $48.76,$79.38 per spring. This pricing has remained fairly stable and is still used as a benchmark in current suspension-parts catalogs. That means:
- Single-axle trailers: You can often replace one worn spring and stay comfortably under $100.
- Tandem-axle trailers: Selectively replacing just the most stressed spring (usually the one with the most sag) is a smart, budget-friendly move instead of replacing all four at once.
How to Tell If You Need One
Look for these warning signs:
- 🚩 Trailer sits noticeably lower on one side
- 🚩 Uneven tire wear
- 🚩 Visible cracks or flattened spring leaves
- 🚩 A “clunk” sound over bumps that wasn’t there before
Replacing just the worst spring is a perfectly valid strategy. You don’t need to fix everything at once to feel a real improvement.
What You Cannot Fix for $100 (And Why That’s Okay)
It’s important to set honest expectations. Full suspension upgrades, the kind that dramatically transform ride quality, simply aren’t $100 projects. Here’s what typically costs more:
| Upgrade | Typical Starting Price |
|---|---|
| SumoSprings (pair) | Around $400 |
| Timbren SES system | From about $300 |
| Air-spring kits | $700,$1,500 |
| Automatic leveling systems | Around $500 |
| Basic shocks or sway bars (parts + labor) | $500,$3,000 |
Industry experts, including a Roadmaster representative quoted in recent RV suspension coverage, point to rear anti-sway bars and upgraded equalizers as the single biggest stability improvements for motorhomes. But these are still multi-component systems priced well above simple hardware swaps.
The takeaway? Don’t feel like you’re missing out by skipping these. A $100 budget focused on wet bolts, bushings, and a single leaf spring can noticeably reduce noise, sway, and harshness, even if it’s not a full transformation.
Important Reminder About Tow Ratings
No matter how many parts you replace, cheap suspension upgrades do not increase your RV’s manufacturer-rated towing or payload capacity. This applies whether you install add-a-leaf springs, SumoSprings, or full air-spring kits. Always follow your manufacturer’s weight ratings regardless of what hardware you add.
A Simple Budget Plan: How to Upgrade Your RV Suspension for Less Than $100
Here’s a practical way to spend your $100 based on real-world pricing:
Option A, The Squeak Fixer ($60,$80)
- 3-4 wet bolts ($18,$20 each)
- Grease and penetrating oil
Option B, The Sag Fixer ($50,$79)
- 1 double-eye leaf spring
- Basic hand tools you likely already own
Option C, The Partial Overhaul ($90,$100)
- 2 wet bolts
- 2 matching bushings
- Grease
Pick the option that matches your RV’s actual problem. There’s no point buying leaf springs if your real issue is a squeaky pivot point, and vice versa.
Tools You’ll Likely Already Have
- Jack and jack stands
- Socket set and breaker bar
- Torque wrench
- Penetrating oil
- Grease gun
If you don’t own a torque wrench, it’s worth borrowing one, improperly torqued suspension bolts can undo all your hard work and create a safety issue down the road.
Safety Tips Before You Start
- Always use jack stands, never rely on a jack alone.
- Soak rusted bolts for at least a week before attempting removal.
- Mark bolt orientation and steering components before disassembly.
- Follow torque specs exactly, too loose or too tight both cause problems.
- Work on a flat, stable surface, never gravel or a slope.
Suspension work is beginner-friendly, but it’s not zero-risk. Take your time and don’t rush a job just to save an afternoon.
When to Call a Professional Instead
Even the most budget-savvy RVer should know when DIY isn’t the right call. Consider a professional if:
- Rust has fused bolts so badly that penetrating oil isn’t helping after multiple soaks.
- You notice frame damage, not just worn hardware.
- Your RV has had a significant mechanical issue before, if so, it’s worth reviewing lessons from other owners in this poll on significant RV issues.
- You’re not confident using a torque wrench correctly.
Remember, professional labor is exactly what pushes most suspension jobs from “under $100” to “several hundred dollars.” If your project needs a shop, budget accordingly rather than trying to force it under $100.
Maintaining Your Upgrade So It Lasts
A $20 wet bolt won’t help much if you never maintain it. After your upgrade:
- Grease pivot points every 6-12 months.
- Check torque on all suspension bolts once a season.
- Inspect for rust before long trips.
- Listen for new noises, they’re early warning signs.
Pairing these cheap upgrades with consistent maintenance is genuinely one of the smartest money moves an RV owner can make. It’s a similar philosophy to other budget-conscious RV strategies, like the ones covered in ways to save your RV budget without sacrificing fun.
Final Comparison: Is It Worth It?
| Upgrade | Effort Level | Ride Improvement |
|---|---|---|
| Wet Bolts | Low | Noticeable noise & tightness improvement |
| Single Leaf Spring | Medium | Fixes sag, improves leveling |
| Partial Bushing Kit | Medium | Reduces harshness and rattling |
Each of these fixes tackles a real, specific problem. None of them turn your rig into a luxury coach, but they solve the annoying issues that actually bother most RV owners day to day.
Conclusion: Your Next Steps
Learning how to upgrade your RV suspension for less than $100 isn’t about finding a magic kit, it’s about being smart with where your money goes. Skip the flashy $700 air-ride ads for now and start with the basics:
- Inspect your pivot points, bushings, and leaf springs this weekend.
- Identify your biggest problem, noise, sag, or harsh bumps.
- Buy the specific part that fixes that exact issue.
- Install it yourself using penetrating oil, proper torque specs, and patience.
- Maintain it with regular grease and torque checks.
A smoother ride doesn’t have to cost hundreds of dollars. Sometimes it just takes one $18 bolt and a Saturday afternoon. Start small, stay safe, and enjoy the difference a properly maintained suspension makes on your next trip.