When your RV air conditioner stops blowing cold air on a hot summer day, you might wonder if adding Freon could fix the problem.
Yes, Freon can be added to RV air conditioners, but it depends on your unit’s age and design, and it requires professional expertise to do safely.
Most RV air conditioners built before 2010 use R-22 refrigerant (commonly called Freon).
Newer units typically use R-410A or other modern refrigerants.
The process involves more than just adding refrigerant.
You need to identify the correct type, locate service ports, and follow specific safety procedures to avoid damaging your system or creating health hazards.
Adding refrigerant to your RV air conditioner is not a simple DIY task.
It requires specialized tools, proper training, and certification to handle refrigerants safely.
Key Takeaways
- RV air conditioners can have Freon added, but older units use R-22 while newer models use different refrigerants
- The process requires professional expertise, special tools, and proper safety precautions to avoid system damage
- Identifying the correct refrigerant type and following legal requirements is essential for safe and effective service
Can Freon Be Added to RV Air Conditioners?
Most RV air conditioners use sealed refrigerant systems that don’t require adding freon.
Whether you can add freon depends on your unit’s age and design.
Understanding Closed Refrigerant Systems
RV air conditioners typically use closed refrigerant systems that are sealed at the factory.
These systems don’t need freon top-ups during normal operation.
The refrigerant circulates continuously through the system.
It moves from the compressor to the condenser, then to the evaporator, and back again.
When your RV air conditioner stops cooling properly, the problem is usually not low freon.
Common causes include:
- Dirty air filters blocking airflow
- Clogged condenser coils reducing heat transfer
- Electrical issues with the compressor or fan motors
- Thermostat problems preventing proper operation
Some RV air conditioner units have sealed charges that cannot be recharged.
If the refrigerant leaks out, you need to replace the entire unit.
When Adding Freon Is Possible
You can add freon to RV air conditioners made before 2010 that use R-22 refrigerant.
These older units may have service ports for recharging.
Units made after 2010 typically use R-410A refrigerant instead of traditional freon.
These systems are more environmentally friendly but still sealed.
Adding freon requires welding a charging port into the system if none exists.
This modification is expensive and requires special skills.
Signs your RV air conditioner might need freon:
- Warm air from vents
- Reduced cooling power
- Ice forming on coils
- Strange noises from the unit
Most RV air conditioners need 1 to 2 pounds of refrigerant when recharged.
Check your unit’s specifications for exact amounts.
Professional Versus DIY Recharging
Never attempt to add freon yourself.
This job requires specialized training, tools, and certifications that only HVAC technicians have.
Improper handling of refrigerants creates serious health and environmental risks.
Refrigerants can cause frostbite, breathing problems, and environmental damage.
A certified technician will:
- Test the system for leaks
- Remove old refrigerant safely
- Repair any damaged components
- Add the correct amount of new refrigerant
RV air conditioner recharge kits are available for purchase.
However, these kits still require professional installation to ensure safety and proper operation.
The cost of professional recharging often exceeds buying a new RV air conditioner unit.
Consider replacement if your unit needs frequent freon additions.
Determining the Right Refrigerant and Identifying Service Ports
RV air conditioners use specific refrigerants like R-410A or R-22.
Finding the correct service port is essential for safe refrigerant addition.
Each system requires the right type of refrigerant and proper port identification to avoid damage.
Identifying R-410A and R-22 in RV Air Conditioners
Most modern RV air conditioners use R-410A refrigerant.
This type replaced the older R-22 in newer systems.
R-410A operates at higher pressures than R-22.
Older RV units may still use R-22 refrigerant.
You cannot mix these two types.
Using the wrong refrigerant will damage your system.
Check the nameplate on your RV air conditioner.
The refrigerant type is printed there.
Look for “R-410A” or “R-22” clearly marked.
Never guess which refrigerant your system uses.
The wrong type can cause expensive damage.
Some RV air conditioners also use R-134a, especially in Dometic units.
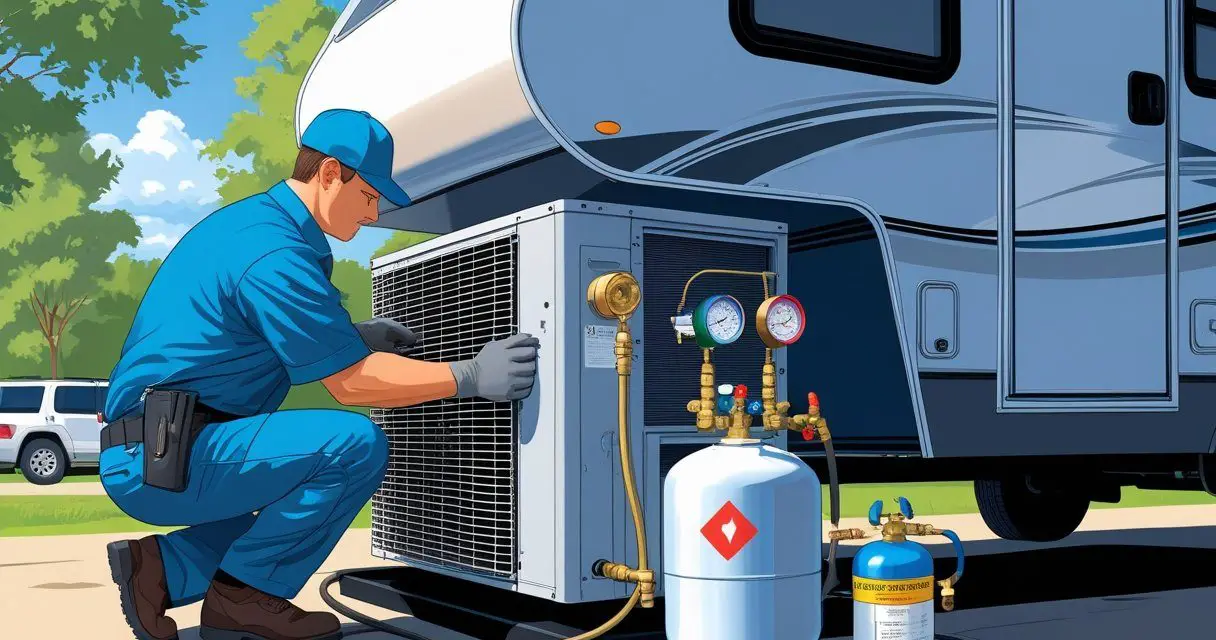
Locating and Accessing the Service Port
Your RV air conditioner has two service ports.
The low-pressure port is where you add refrigerant.
This port usually has a blue or black cap.
The high-pressure port typically has a red cap.
Never add refrigerant to this port.
It can cause serious injury or system damage.
Most RV rooftop units don’t come with easy-to-reach service ports.
You may need to remove panels to access them.
Some units require welding a charging port into the system.
The service port is usually located near the compressor.
You might need to climb on your RV roof to reach it safely.
Checking Manufacturer Specifications
Always check your owner’s manual first.
It lists the exact refrigerant type and capacity for your unit.
Different models use different amounts.
Contact the manufacturer if you cannot find this information.
They can tell you the correct refrigerant type and system capacity.
Keep your model number ready when you call.
Dometic units commonly use R-134a refrigerant.
Coleman and Carrier units often use R-410A.
Older units from any brand may use R-22.
Your system capacity is measured in pounds or ounces.
Adding too much refrigerant causes poor cooling and potential damage.
Step-by-Step Process for Adding Freon
Adding Freon to your RV air conditioner requires the right tools, safety equipment, and a systematic approach.
Start by gathering essential equipment and checking for leaks before connecting the refrigerant canister to recharge the system.
Gathering Tools and Safety Equipment
You need specific tools to safely add Freon to your RV air conditioner.
Get a manifold gauge set to measure system pressure accurately.
This tool shows you the current refrigerant levels.
Purchase a leak detector to find any refrigerant leaks.
Electronic leak detectors work best for spotting small leaks that cause Freon loss.
Buy the correct Freon canister for your RV air conditioner.
Check your owner’s manual for the right refrigerant type.
Most RV units use R-410A or R-22 refrigerant.
Essential safety gear includes:
- Safety goggles to protect your eyes
- Insulated gloves to prevent frostbite
- Long-sleeve shirt and pants
- Work in a well-ventilated area
Keep a fire extinguisher nearby.
Refrigerant can be dangerous if handled incorrectly.
Checking for Leaks and Pressure Levels
Turn off your RV air conditioner before starting.
Let the system sit for 15 minutes to equalize pressure.
Use your leak detector around all connections, fittings, and coils.
Check the evaporator and condenser coils carefully.
Look for oily spots that show refrigerant leaks.
Connect your manifold gauge set to the service ports.
The low-pressure port connects to the larger copper line.
The high-pressure port connects to the smaller line.
Normal pressure readings:
- Low side: 40-70 psi
- High side: 150-250 psi
Record the current pressure readings.
Low readings mean your system needs more refrigerant.
Fix any leaks before adding Freon.
Connecting the Freon Canister and Recharging
Locate the low-pressure service port on your RV air conditioner.
Remove the protective cap and keep it safe.
Connect the hose from your Freon canister to the low-pressure port.
Tighten the connection by hand, then use a wrench for a snug fit.
Don’t over-tighten.
Turn on your RV air conditioner to maximum cooling.
This helps the refrigerant flow into the system properly.
Open the valve on your Freon canister slowly.
Add Freon gradually while watching the pressure gauge.
The system should reach the correct pressure range.
Stop adding refrigerant when you reach proper levels.
Close the canister valve first, then disconnect the hose.
Replace the service port cap immediately.
Run the air conditioner for 15 minutes to test cooling performance.
The air should be 15-20 degrees cooler than room temperature.
Safety, Legal, and Maintenance Considerations
Would you like to save this article?
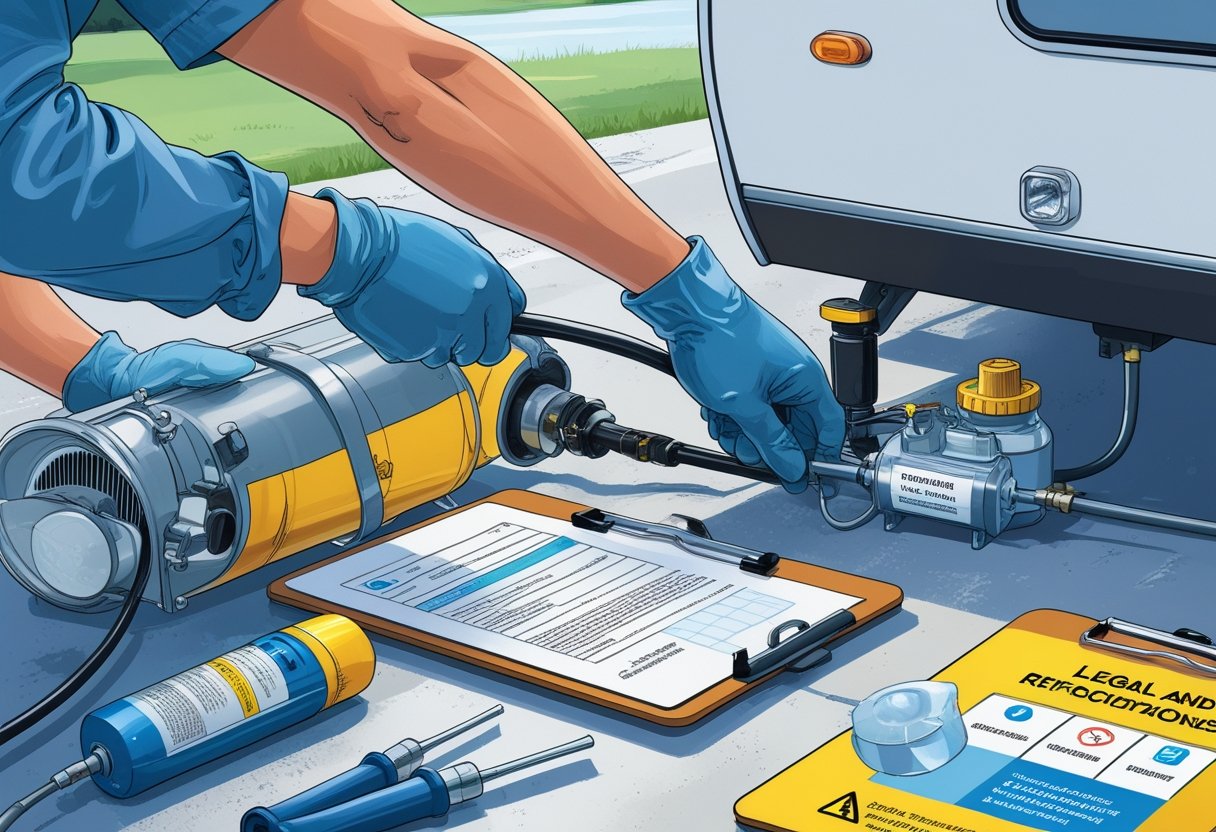
Working with refrigerant in RV air conditioners involves strict EPA regulations that require certification.
Proper safety gear is needed to prevent injury.
Regular maintenance helps avoid costly repairs and environmental damage.
Handling Freon Safely
Freon can cause serious injuries if handled wrong.
The refrigerant can cause frostbite on contact with skin and breathing problems if inhaled.
Always wear protective gear when working near RV air conditioners.
You need safety glasses, insulated gloves, and long sleeves.
Work in areas with good airflow to avoid breathing refrigerant vapors.
Never let liquid refrigerant touch your skin.
If it happens, flush the area with warm water right away.
Get medical help if you feel dizzy or have trouble breathing.
Store refrigerant containers upright and away from heat sources.
Keep them in cool, dry places.
Never use damaged containers or mix different types of refrigerant.
If you smell refrigerant leaking from your RV air conditioner, turn off the unit and leave the area.
Call a certified technician to fix the leak before using the system again.
EPA and Certification Requirements
The EPA requires certification to handle refrigerant in RV air conditioners.
Only technicians with Section 608 certification can legally buy, handle, and add refrigerant to AC systems.
Attempting to add freon without certification is illegal and can result in fines up to $37,500 per violation.
The law applies to all refrigerant types used in RV air conditioners.
You cannot buy refrigerant without showing proof of certification.
Online retailers and supply stores must verify credentials before selling refrigerant to customers.
DIY refrigerant kits sold online often violate EPA rules.
These products may not contain real refrigerant or could damage your RV air conditioner.
Stick to certified professionals for refrigerant work.
Professional service typically costs $100 to $300.
This investment protects you from legal issues and prevents expensive damage to your RV air conditioner.
Long-Term Maintenance and When to Replace
Regular maintenance prevents refrigerant leaks and extends your RV air conditioner’s life. Clean or replace filters monthly during use.
Dirty filters make the system work harder and can cause refrigerant lines to freeze. Check for ice buildup on coils monthly.
Ice often signals low refrigerant levels or blocked airflow. Turn off the unit and let ice melt completely before running it again.
Schedule annual inspections with certified technicians. They can spot small leaks before they become major problems.
Replace your RV air conditioner if it needs frequent refrigerant additions. Constant leaks mean the system has failed.
Units over 10 years old often cost more to repair than replace. Consider upgrading to newer refrigerants like R-410a.
Older R-22 systems are being phased out and will become more expensive to service.


